How was your Thanksgiving? My family spent ours at my godparents’ ranch. The food and company were great and there were five dogs, so it was basically the best day ever.
Before I start with the Christmas cookies, let’s talk about breakfast. It may be the most important meal of the day, but that doesn’t mean it has to be boring.
Today, I’m bringing you seven show-stopping recipes guaranteed to make your family and friends feel at home for the holidays.
Monkey Bread is basically cinnamon rolls, deconstructed. The sweet dough is cut into small pieces, dipped in butter, rolled in cinnamon-sugar, and baked in a tube pan. I like to finish it off with warm homemade caramel sauce.
Canned biscuits are a popular alternative to making Monkey Bread from scratch. If you’d like to cut down on time and skip the yeast without sacrificing flavor, this is the recipe for you. It’s made with a simple cream biscuit dough and can be ready in 90 minutes or less.
Cinnamon rolls are a popular Christmas morning breakfast for a reason. Swirls of buttery cinnamon-sugar goodness, fluffy rolls, and sweet glaze are hard to beat! But if you add in a can of marzipan, some almond extract, and some toasted slivered almonds, you might come close.
Puff Pancakes were a common weekend breakfast in my house and remain a favorite to this day. The batter comes together in the food processor and is super easy to scale up and down to feed any number of guests! Everyone will love seeing you pull a big, puffy pancake out of the oven, and the crispy edges and custard-like center will have them coming back for seconds.
Puff Pancakes are a classic for a reason, but this time of year, I go for this Caramel Apple version. Sliced apples and pie spices are tossed together and baked into the pancake batter. When it comes out of the oven, it gets a drizzle of homemade caramel sauce–totally impossible to resist.
Speaking of apples, I cannot say enough good things about this Apple Cider Coffee Cake. It’s super moist from an apple cider reduction, sour cream and tart apples, and it has two layers of that crunchy coffee cake crumb we all love!
If there were ever a time to pull out all the stops and make homemade doughnuts, the holidays are it. This recipe is formulated so that you can make the dough one day and cut and fry doughnuts the next. Give them a dip in a simple chocolate glaze and shower them with sprinkles (or crushed candy canes!) before serving. These are the best doughnuts I have ever had, and I know you’ll love them too.
Did you make any of my recipes for Thanksgiving? Let me know in the comments or on social media using #e2bakes 💗
It’s no secret that I don’t like Halloween. I’m ambivalent about wearing costumes and if I’m going to eat candy, I’d like for it to be full-sized.
That’s not to say I haven’t participated in the festivities as an adult. Just last year, my friend, VJ, showed up at my apartment with a panda costume. She was dressed as a unicorn. On our way to a party, we somehow got on the one car of the R train where literally nobody else was in costume. “So a panda and a unicorn get on the subway…”
We went outside like this.
Long story short, I’m skipping the Halloween treats this year. If you aren’t, I recommend these, these, and these (please forgive the terrible photos on that last link).
Instead, I’m putting my energy toward dreaming up and making excellent “company” breakfasts, i.e. the sort of dessert-masquerading-as-breakfast that is socially accepted when you have a house full of guests in November and December. Cinnamon rolls are a common choice for such occasions, but I recommend you save those for another day and make this Apple Cider Coffee Cake instead. It’s faster, doesn’t involve fiddling with yeast, and has two layers of that crunchy crumb that everyone loves.
The base of this coffee cake is basically a souped up muffin batter. I started with my Orange Pecan Muffin recipe and then made a few changes. I swapped the oil for butter, the yogurt for sour cream, and the milk for an apple cider reduction. Oh, and I threw in some pie spices and chunks of tart apple. Flavor all over the place, y’all.
Let’s talk about that apple cider reduction. It’s an easy way to get big flavor! This is the base of flavor in this recipe, so make sure to use quality apple cider–the refrigerated stuff, not the shelf-stable variety. Pour two cups of it into a saucepan, bring it to a simmer over medium-high heat, and let it go. This will take 20-30 minutes; I recommend checking the amount every ten minutes. Once it’s at 2/3 cup, let it cool to room temperature so it doesn’t melt your butter or scramble the egg. This is a very hands-off task, but if it seems like a little too much, you can do this step a day in advance and then refrigerate the reduction until you’re ready to use it.
Enough about batter though. Coffee cake crumb topping is where it’s at! It’s crispy, crunchy cinnamon-brown sugar magic–the perfect foil for that rich, appley cake. The crumb recipe I use here is the same one from my Cranberry Crumb Pie. It comes together super quickly and easily and…well, I’m totally crazy about it.
To assemble the cake, butter a springform pan and line it with parchment. If you don’t have a springform, you may bake this cake in a deep (!) 9-inch cake pan. Dividing it into two loaf pans may work too, but I haven’t tried it. Let me know if you do!
Layer the ingredients into the pan, starting with half the batter. Top it with half of the crumb. Then more batter, then more crumb. Bake it for nearly an hour, until the top is nice and golden.
Let the cake cool completely in the pan before releasing the springform and dusting it with confectioner’s sugar.
Invite a friend or two over, put on a pot of coffee, and slice up the cake!
You are going to love the combination of rich, buttery apple cider cake and the almost meltingly-soft chunks of apple, not to mention the craggy crumb 😍 I’ve made two of these this week and I know there will be many more before 2017 is over.
Can’t. Get. Enough.
Apple Cider Coffee Cake
makes one 9-inch round cake
Batter:
2 cups apple cider
2 cups all-purpose flour
1/2 cup granulated sugar
1/4 cup light brown sugar, packed
1 1/2 teaspoons ground cinnamon
1/4 teaspoon ground allspice
1/4 teaspoon ground nutmeg
1 1/2 teaspoons baking powder
1/4 teaspoon baking soda
1/2 teaspoon Kosher or sea salt
1/2 cup (1 stick) unsalted butter, softened to room temperature
1 large egg, room temperature
3/4 cup full-fat sour cream
1 teaspoon pure vanilla extract
1 large tart baking apple, peeled &1/2-inch diced (I used Granny Smith)
Crumb:
1 cup + 2 tablespoons all-purpose flour
3/4 cup + 2 tablespoons light brown sugar, packed
1 teaspoon ground cinnamon
pinch of Kosher or sea salt
1 teaspoon pure vanilla extract
1/2 cup (1 stick) unsalted butter, cold, cut into cubes
Garnish:
1-2 tablespoons confectioner’s sugar
Pour apple cider into a small saucepan. Heat over medium-high heat for 20-30 minutes, until reduced to 2/3 cup. Set aside to cool to room temperature.
Make the crumb. In a large mixing bowl, whisk together flour, light brown sugar, cinnamon, and salt. Pour in vanilla. Add butter. Use your hands (or a pastry blender) to work butter into dry ingredients until a clumpy but homogenous mixture forms. Set aside.
Preheat oven to 350F. Grease a 9-inch springform pan with butter. Line with parchment. Grease parchment with butter. Set aside.
In a medium mixing bowl, whisk together flour, granulated sugar, light brown sugar, cinnamon, allspice, nutmeg, baking powder, baking soda, and salt. Set aside.
In a large mixing bowl, use an electric mixer to beat butter until fluffy. Mix in egg, apple cider reduction and sour cream; mixture may be a bit lumpy. Add dry ingredients in two installments, mixing just until combined. Use a silicone spatula or wooden spoon to fold in apple pieces.
Pour half the batter into the prepared pan and spread it evenly. Top with half the crumb. Pour in the remaining batter and sprinkle with the last of the crumb. Place full pan on a baking sheet and bake 50-60 minutes, until a toothpick inserted in the center comes out clean.
Let cool completely in the pan on a rack. Run a thin, flexible knife around the edge of the pan before releasing the springform. If you’d like, invert the cake and remove the parchment before placing on a serving platter. Sift confectioner’s sugar over the top. Serve.
Leftover cake will keep well at room temperature for up to two days, or in the refrigerator for up to five.
I planned to post this recipe a year ago. I can’t tell you why it didn’t happen–I had written the recipe and a whole post. All I had to do was take some photos and hit “publish,” but instead I just let the file get buried in the digital depths of my iPad, never to be seen again…
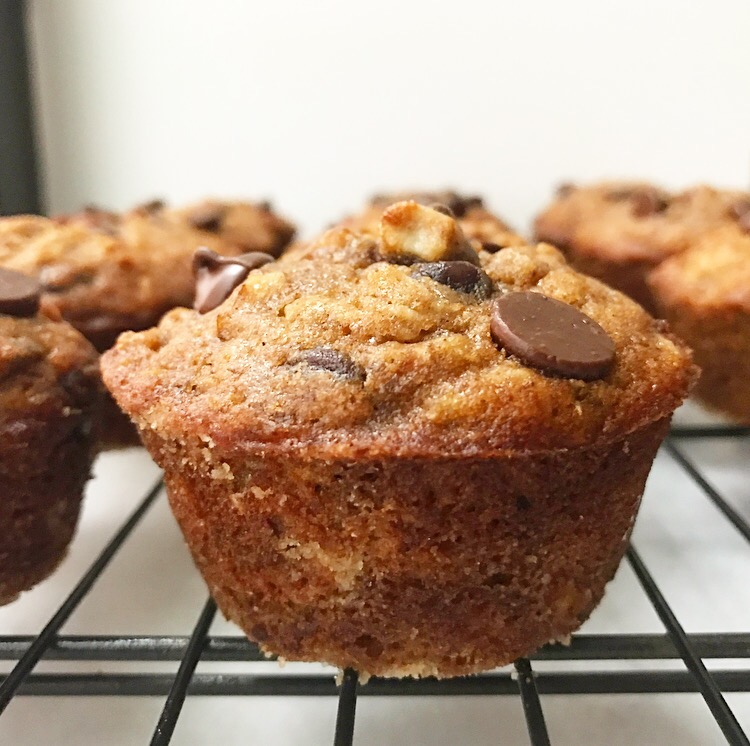
…until two weeks ago. I was searching for these Whole Grain Banana-Chocolate Chip Bars, but this recipe caught my eye instead. Long story short, I’ve made these Whole Grain Banana Muffins twice since rediscovering them, and let me tell you: they are freaking delicious. I mean, most banana baked goods are–mashed banana just has a way of making things wonderful–but these muffins have a little something extra.
It’s not some new product or anything. No, that’s not my style. There are no unusual ingredients in this recipe. Instead, its one little almost-no-effort step that makes these muffins truly spectacular:
Before you do anything else, spread the oats and walnuts out on a rimmed baking sheet and toast them in a 350F oven for 5-7 minutes.
Yep, that’s it. That one little step is the difference between good muffins and great ones.
Other than that, this recipe is exactly what you’d expect. Mix together some dry ingredients (whole wheat flour, cinnamon, nutmeg, and leaveners) and some wet ingredients (oil, eggs, mashed bananas, buttermilk, and just 2/3 cup light brown sugar). Whisk it all together with exactly ten strokes of the bowl. Add the toasty oats and walnuts and use a silicone spatula (or wooden spoon) to fold everything together for another 10 strokes. Throw in some chocolate chips if you like, and fold for another five strokes.
Why do we need to count strokes of the batter? This keeps the gluten from over-developing and making the muffins tough. When the gluten in the flour meets the liquid ingredients, it’s activated, meaning it starts forming the bonds that give baked goods structure and texture. If we stir/fold too much, we’ll end up with tough, chewy muffins, and nobody wants that. For tender muffins, keep your mixing to a maximum of 25 strokes.
Divide the batter amongst about 16 prepared muffin cups and bake for 16-18 minutes. Then let them cool in the pans for about ten minutes before turning them out and digging in.
These Whole Grain Banana Muffins are much more than the sum of their parts, y’all. They’re soft, tender, not too sweet, and full of nutty whole grain goodness from the whole wheat flour and toasted oats. Oh, and of course there’s all sorts of good flavor from the mashed ripe bananas, toasted walnuts, and chocolate chips! That’s my kind of breakfast treat 💗
Whole Grain Banana Muffins
makes about 16 standard muffins
1 1/2 cup old-fashioned rolled oats
1 cup walnuts, chopped (optional)
1 1/4 cup whole wheat flour (or white whole wheat flour)
1 1/4 teaspoons ground cinnamon
1/4 teaspoon ground nutmeg
1 teaspoon baking powder
1 teaspoon baking soda
1/2 teaspoon Kosher or sea salt
2 large eggs, room temperature
2/3 cup light brown sugar, packed
1/2 cup neutral-flavored oil (I like canola)
3 large very ripe bananas, mashed
1/2 cup buttermilk*
1 cup semisweet chocolate chips (optional)
Preheat oven to 350F. Grease a standard muffin tin or line with cupcake liners. Set aside.
Toast the oats and walnuts. Place oats and walnuts (if using) on a rimmed baking sheet and spread to cover the surface. Toast in the oven for 5-7 minutes, or until fragrant. Do not burn. Place pan on a rack to cool a bit.
Make the muffin batter. In a small mixing bowl, whisk together whole wheat flour, cinnamon, nutmeg, baking powder, baking soda, and salt. Set aside.
In a large mixing bowl, whisk eggs until frothy (about 30-60 seconds). Whisk in light brown sugar, followed by oil, mashed bananas, and buttermilk. Add flour mixture and whisk 10 strokes. Add oats and nuts (which may still be warm) and use a silicone spatula or wooden spoon to stir an additional 10 strokes. Add optional chocolate chips and fold an additional 5 strokes. Batter may have a few small lumps.
Place about 1/4 cup of batter in each muffin cup; they should be about 2/3 full. Place full pan in the oven and bake 16-18 minutes, until a toothpick inserted in the center comes out clean. Let muffins cool in the pan for ten minutes until removing to a rack to cool completely.
Bake any remaining batter, filling any unused muffin cups halfway with water to keep the pan from warping.
Muffins will keep in an airtight container at room temperature for up to five days.
Note:
If you do not have buttermilk, you may make your own. Place 1 teaspoon white or apple cider vinegar (or fresh lemon juice) in a liquid measuring cup. Pour milk up to the 1/2 cup mark. Let mixture sit for five minutes, until curdled. Proceed with recipe as written.
The great thing about classic dishes is that there are a million ways to make them. Take Chocolate Chip Cookies for instance: whether you like them soft and chewy, thin and crispy, with chocolate chips, with chocolate chunks, more brown sugar, more granulated sugar, etc., there’s a recipe out there to suit your preferences. The same rings true for just about any dish you can think of, really–no matter what you like, I guarantee there is someone else out there who feels the same way. While I like to think this blog is full of the “best” ways to make 200+ recipes, it’s really just a bunch of things made exactly the way I like them.
Today, let’s talk about French Toast, that classic dish made by dipping day-old bread in custard, frying it up, and serving it with maple syrup. The concept is simple, but there are endless ways to make it. Whether you like your French toast thin, thick, with just a whisper of custard, soaked with custard, fried, baked, stuffed, baked and stuffed, on the sweet side, with more of a savory note, or any other way, know that a recipe exists that suits your needs.
While I don’t think I’ve ever turned up my nose at any variety of French Toast, right now I’m into Baguette French Toast. My particular recipe was born of necessity on the last morning of my trip to Maine–we had two kinds of bread leftover, and I’ll be damned if I’m going to make this custard-dipped syrup-smothered dish with whole wheat sandwich bread. Thick-cut white bread or bust, am I right?!
My Baguette French Toast (or Pain Perdu, if you’re feeling kicky) is made with thick slices of day-old baguette. You want each piece to be somewhere between 1- and 1 1/2-inches thick; I can get about 20 slices out of a baguette. The advantage to using thick slices of slightly-stale crusty bread is that they can soak up a lot of custard without getting mushy and weird. This French toast has all the fluffy texture your (or uh, my) little heart desires, but also stays fully intact.
Let’s talk about the custard. While the (very good) French toast of my childhood was soaked in just eggs and milk, as an adult, I like mine to have a little more panache. I add cinnamon, a bit of sugar, salt, and vanilla to my custard, and while none of the flavors are particularly strong, they all work to make this breakfast treat taste balanced and delicious.
A word on mixing. There is nothing I dislike more than finding unadulterated bits of egg yolk or white on my French toast. To keep this from happening, I like to mix the cinnamon, sugar, salt, and vanilla into the eggs before adding the milk. This ensures a smooth, homogeneous custard.
I soak the baguette slices in the custard for about two minutes per side before frying them in a combination of butter and oil. Yes, butter and oil. Why? Because I want the flavor of butter and the smoke point of canola oil. If I used only butter, I’d run the very real risk that it would burn, and if I used only oil, I’d miss out on flavor. By using a combination, I get plenty of flavor and crispy edges.
As far as service goes, it’s up to you. I like the usual maple syrup, but I also heartily endorse sifting confectioners sugar over the top. Dot it all with fresh fruit, if you feel so inclined. However you choose to serve Baguette French Toast, know that you and your guests are in for a treat.
Baguette French Toast
makes 4-5 servings
1 day-old baguette* (about 11-13 ounces)
3 large eggs
1 teaspoon ground cinnamon
3 tablespoons granulated sugar
1/4 teaspoon Kosher or sea salt
2 teaspoons pure vanilla extract
2/3 cup whole milk
1-2 tablespoons butter, for cooking
1-2 tablespoons neutral-flavored oil, for cooking (I like canola)
For Serving:
seasonal fruit
pure maple syrup
confectioner’s sugar
Use a serrated knife to remove the very ends of the baguette. Slice into 1-1.5 inch slices (about 20 slices). Set aside.
Make the custard. In a small-medium mixing bowl, whisk together eggs and cinnamon until smooth. Whisk in sugar, salt, and vanilla, followed by whole milk. Pour mixture into a shallow dish.
Soak about 8-10 baguette slices in the custard for 2 minutes per side.
Heat 1 tablespoon each of butter and oil in a heavy-bottomed skillet over medium-high heat. Place baguette slices in the skillet. Let cook until a golden brown crust forms, about 2-3 minutes. Flip baguette slices and cook an additional 2-3 minutes. Remove French toast to a plate.
Repeat soaking and cooking processes until all slices of baguette have been used. Add more butter and oil to the pan, as necessary.
Divide French toast over 4-5 plates. Top with seasonal fruit, maple syrup, and confectioner’s sugar, as desired. Serve immediately.
Note:
Don’t have a baguette? Use 8 slices of thick-cut challah, brioche, or soft Italian bread instead.
It took me seven tries to get these pancakes right.
About a month before we left for Maine, I declared to my travel buddies, VJ and Adam, that I was going to make a a pancake recipe that we could all enjoy. They sort of smiled and nodded because I had clearly lost my mind–VJ is a gluten-free vegan and Adam is a bit of a picky eater, so this basically seemed impossible.
Never one to let logic stop me, I set to work. I looked at my pancake recipes and a couple more from around the internet, and then I had six consecutive fails. Every problem pancakes could have, these had: too dry, too bland, too thin, too many ingredients, too stuck to the pan–you name it. I had one batch that was somewhere in the realm of “okay” and as vacation drew near I figured it could work in a pinch, but I was less than enthused about it. I’d crack the code one day, but it wasn’t going to be in time for this trip.
But then, there was cornbread. On the second night of vacation, we decided to grill out. Grilling is not my forte, so Adam took the lead there and I worked on side dishes. I threw out a few ideas to VJ; sautéed spinach was a definite winner, but she sort of lost her mind when I mentioned veganizing my already-gluten-free Southern-Style Cornbread. I had never attempted a vegan version of that recipe, but I figured it would be easy enough. I could swap almond milk soured with vinegar for buttermilk, use a few tablespoons of vegan margarine in place of butter, and I could crack open a can of chickpeas and use the aquafaba in place of the egg. It’s that last change that made that cornbread so good, and when VJ asked for my overhyped Cornmeal Pancakes last Wednesday morning, it’s that change that made a solidly “okay” recipe into one I’ll make again and again.
Have you heard of aquafaba? It’s having a bit of a moment right now–it made The New York Times. If you’re in the dark about this miracle of modern baking, I’m sure you’re not alone. Literally translated, aquafaba means “bean water.” And that’s exactly what it is–the liquid from cooking (and canning) chickpeas. If you have a can of chickpeas (or any bean, actually) in your pantry, you have aquafaba in your house right now. Who knew?!
Before you go clicking away from this blog forever, hear me out. I know using the cooking liquid from chickpeas in baking sounds absolutely bizarre, but it actually makes a lot of sense, scientifically speaking. Like eggs, aquafaba is super high in protein and very viscous; when whipped, it can even hold stiff peaks! You don’t need to break out your mixer for this recipe though–just three tablespoons of liquid aquafaba help these Cornmeal Pancakes to stay fluffy and keep them from being too crumbly. And since aquafaba doesn’t have a distinctive flavor like other vegan egg replacers (I’m looking at you, flaxseed), it doesn’t distract from the slightly sweet corn flavor 🙌🏻🙌🏻🙌🏻
These Cornmeal Pancakes, y’all. They’re light and fluffy with crispy edges and a rich corn flavor. Oh, and they’re beautiful too.
You could certainly serve them with butter (or vegan margarine) and maple syrup…
…but I am all about this Blackberry Compote. It only has four ingredients and takes less than ten minutes to prepare, and it’s basically like topping your pancakes with pie filling (but with much less sugar).
However you choose to serve these Cornmeal Pancakes, I hope they make your friends and family as happy as they made mine.
Photo courtesy of Valancy Jane.
Cornmeal Pancakes {Vegan & Gluten-Free}
makes about 12 pancakes
1 1/2 cups unsweetened almond milk
1 tablespoon apple cider vinegar
2 3/4 cups yellow cornmeal
1/4 cup cornstarch
1/4 cup granulated sugar
1 tablespoon baking powder
1/2 teaspoon Kosher or sea salt
3 tablespoons aquafaba (chickpea canning liquid)
1/3 cup neutral-flavored oil (I like canola), plus more for cooking
2 teaspoons pure vanilla extract
For Serving:
butter (vegan or regular)
pure maple syrup
Blackberry Compote (recipe below)
In a liquid measuring cup, combine unsweetened almond milk and apple cider vinegar. Let sit 5 minutes or until curdled.
In a large mixing bowl, whisk together cornmeal, cornstarch, sugar, baking powder, and salt. Add almond milk mixture, aquafaba, oil, and vanilla, and whisk until combined.
Heat about 1 tablespoon of oil in a non-stick skillet over medium heat. Add batter to the pan in 1/4 cup increments, leaving space between pancakes. Let cook until the edges no longer look raw, about 2-3 minutes. Flip pancakes and cook an additional 1-2 minutes. Remove to a plate. Repeat process with all remaining batter, adding oil to the pan as necessary.
Divide pancakes among serving plates. Top with butter, maple syrup, and/or Blackberry Compote. Serve immediately.
Blackberry Compote
makes about 2 cups
12 ounces fresh blackberries
3 tablespoons granulated sugar
1/8 teaspoon ground cinnamon
juice of 1/2 lime
In a small saucepan, combine blackberries, sugar, and cinnamon. Heat over medium-low heat, stirring frequently, until a sauce forms (about 5 minutes). Use a potato masher to mash blackberries until the desired texture is reached. Bring to a boil for 1 minute before removing from heat. Stir in lime juice. Let cool completely.
Compote will keep in an airtight container in the refrigerator for up to a week.
 Before I start with the Christmas cookies, let’s talk about breakfast. It may be the most important meal of the day, but that doesn’t mean it has to be boring.


 Caramel Apple Puff Pancake {Dutch Baby}
 Overnight Yeast-Raised Doughnuts