I have been thinking a lot lately about what it means to celebrate this year. Does it feel like the world is crashing down around us and everything is at least vaguely scary? Sure. Is there still stuff to celebrate? You know it.
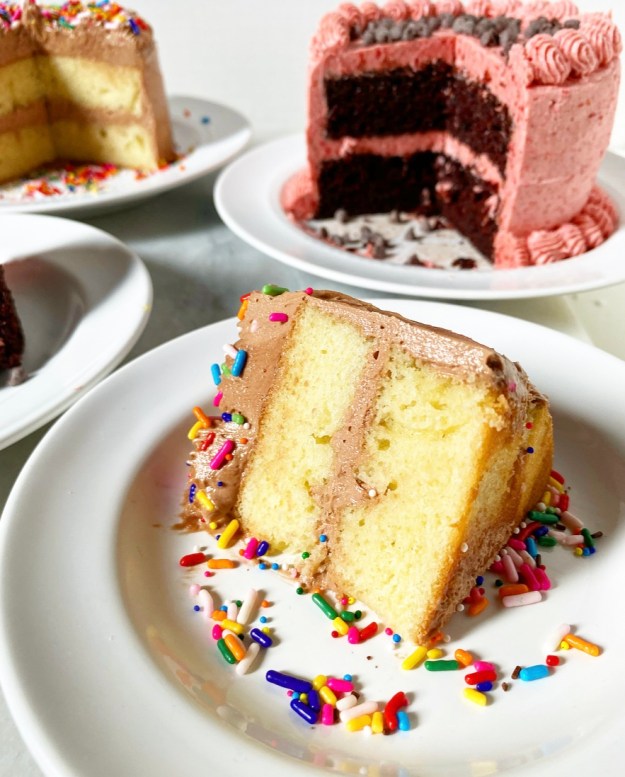
I mean, all of us are going to have pandemic birthdays this year. Every last dang one. Birthday parties are inadvisable, but cake? That’s non-negotiable. If we can’t have cake in times of both joy and crisis, then what on earth are we even doing here?! In that spirit, today’s post is not actually a recipe, but instead is all about how to make a layer cake fit for a pandemic…er, small group. Sure, you could make a single layer of cake for any occasion you have coming up, but some things require a cake that’s stacked up tall, even if it’s on the miniature side. I’ve been making Mini Layer Cakes for years, for everything from birthdays to baby showers to wedding cake practice. It’s super fun and a great way to brighten someone’s day (or your own!) in these rough times.

How Big are Mini Layer Cakes?
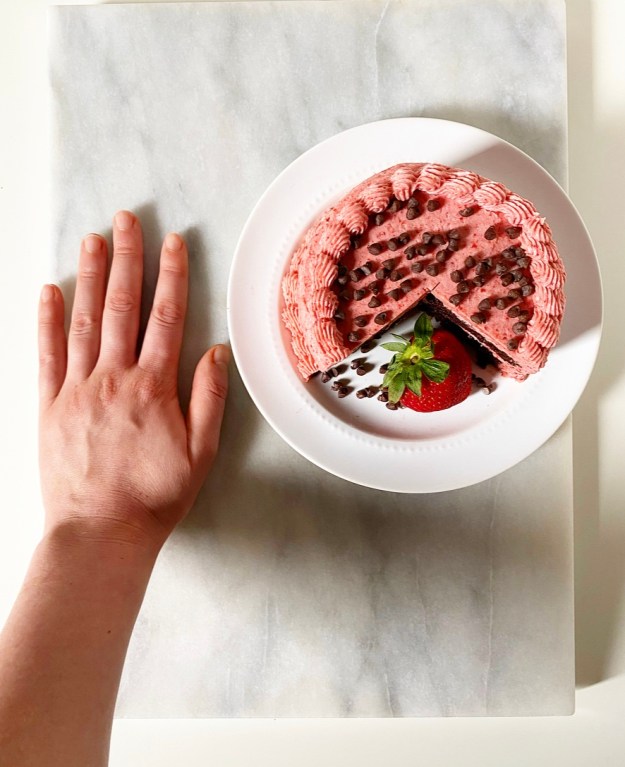
The cakes pictured are 4 inches in diameter and 2.5 and 2.75 inches tall, respectively.
How Many People Can Mini Layer Cakes Feed?
Well, it depends. I think of these as being 4-6 servings, but could go up to eight in a pinch. I’m sure some of you are looking at these and thinking they’d only feed two–I suppose it all depends on exactly how much cake you want to eat in one go. Use your judgment.
What Flavors are Best for Mini Layer Cakes?
The answer here is pretty much anything your heart desires. The cakes pictured are Vanilla Cake + Nutella Buttercream and Chocolate Cake + Strawberry Buttercream; I chose these flavors based solely on what I had on hand.
The general rule for my Mini Layer Cakes is to make roughly half the recipe of any normal 9-inch layer cake. If you need some inspiration, here are some ideas off the top of my head:
–Funfetti cake + vanilla buttercream
–red velvet cake + cream cheese frosting
–carrot cake (without nuts/fruit) + cream cheese frosting
–white cake + seasonal fruit or jam + whipped cream frosting
–vanilla cake with a little almond extract + mocha buttercream
-vanilla cake + key lime curd + whipped cream frosting
-vanilla cake + lemon syrup + lazy lemon curd + vanilla buttercream with lemon zest
–chocolate cake + Oreo Buttercream
–peanut butter cake + chocolate frosting
–Black Forest Cake {Schwarzvaldtårta}! <—Yes, it works!
Things You Need to Make a Mini Layer Cake
-a single 9-inch layer of cake
-a half-batch of buttercream
-filling of choice, if not using buttercream
-a serving plate or cardboard round
-a ruler
–a 4-inch ring cutter
-a serrated knife for trimming
-an offset icing knife
First things first, you’ve got to have the supplies. This list is pretty similar to what I use for regular layer cakes with a few exceptions. To start, you’ll need one 9-inch layer of cake and a small batch of buttercream…or roughly a half the quantity of most layer cake recipes. I understand that not all cake recipes halve easily (splitting eggs!), so I’ve included halved versions of my vanilla and chocolate cakes at the end of the post. The major specialty item here is a 4-inch ring for cutting small layers. Can you just bake your cake in 4-inch pans? Sure, and I have on many occasions, but they tend to produce dramatically domed cakes, and frankly, you’re never going to get as much use out of those pans as you think you will. As a person who has nearly every piece of kitchen equipment anyone could ever need, please trust me on this. It is much easier to bake a single larger layer of cake and then cut it into smaller ones.
With a 4-inch cutter, you’ll be able to get two small layers out of a single 9-inch round layer. If you measure/have a keener eye than I do, you can bake a 9-inch square layer and get four small layers out of it. That way, you can make two mini cakes at once or freeze two of the layers for another occasion. Either way, you’ll have leftover cake scraps, but I don’t see that as a problem.
Don’t have or want a 4-inch ring? Find a 4-inch circular object, trace it onto parchment, then cut out the circle and use it as a stencil.
How to Assemble a Mini Layer Cake
Mini Layer Cake assembly isn’t rocket science, but has its challenges. There is a lot of measuring and evening out of things, but rest assured that you’ll get the hang of it quickly. Start by using your cutter to cut two small layers out of your larger layer. Make sure that the cutter is as close to the edge of the larger layer as possible, so as to make room for a complete second layer. <—This is important.
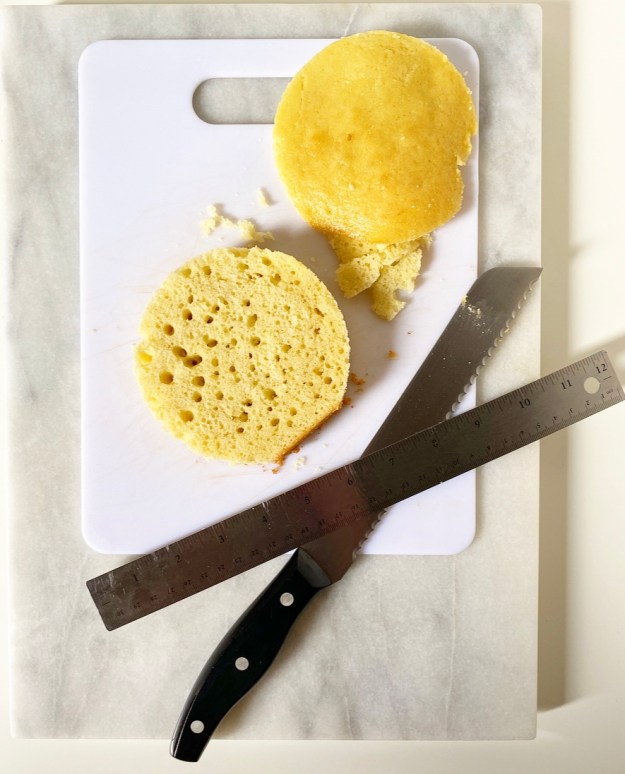 Use your ruler to measure your layers for height. There is a good chance your layers will have an incline, as cakes tend to dome a bit as they bake. Grab your serrated knife and even out the top of one layer. Make sure it’s even (or very close) and measure it again—this how tall you want your other layer to be. Repeat that process to even out that second layer, until they’re identical in height (or very close). Mine are all about an inch tall.
 Next up, stacking. Swipe a tiny bit of buttercream on your plate or cardboard round, then place one of your layers on top. If you’re a messy froster like me, tuck bits of parchment under the cake all the way around for clean edges. Frost the top of your layer, then stack the second layer on top and press down lightly to adhere.
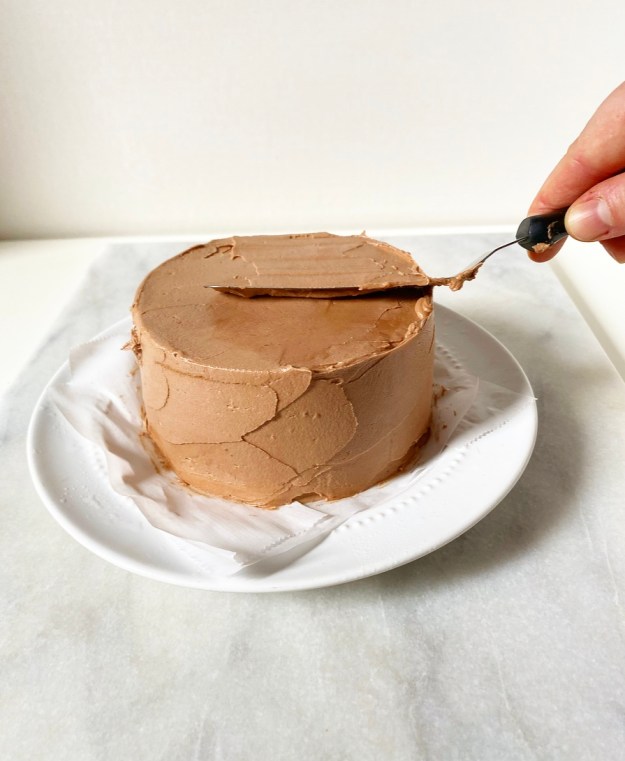
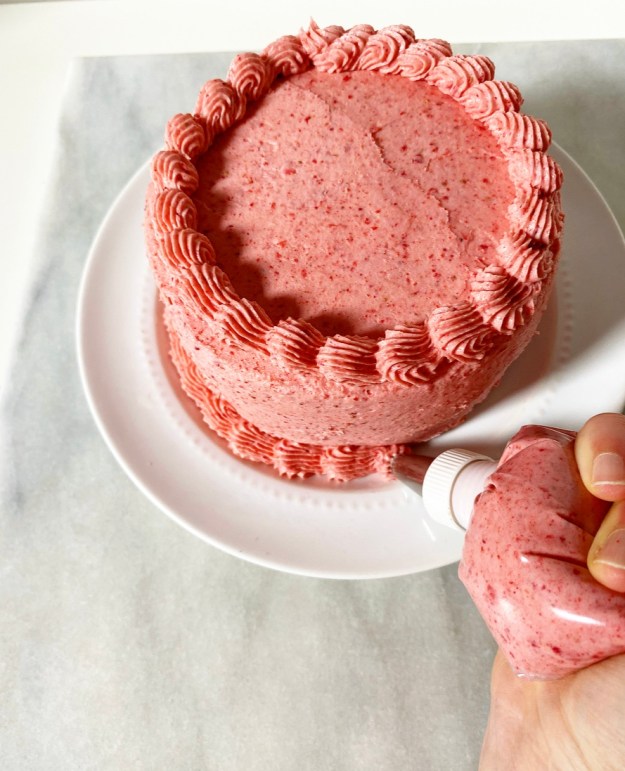 From here, frost as normal. For me, that means a very light crumb coat (thin layer of buttercream), a 20 minute chill, then a thicker layer of buttercream, piping and decor.
Keep in mind that Mini Layer Cakes are smaller and lighter-weight than what most of us are used to, and therefore cannot take as much physical pressure as a larger cake, particularly when frosting around the sides. Be gentle with the cake and with yourself, and remember that there is no shame in having to move layers back into place and frost over flaws. Buttercream is a surprisingly forgiving medium.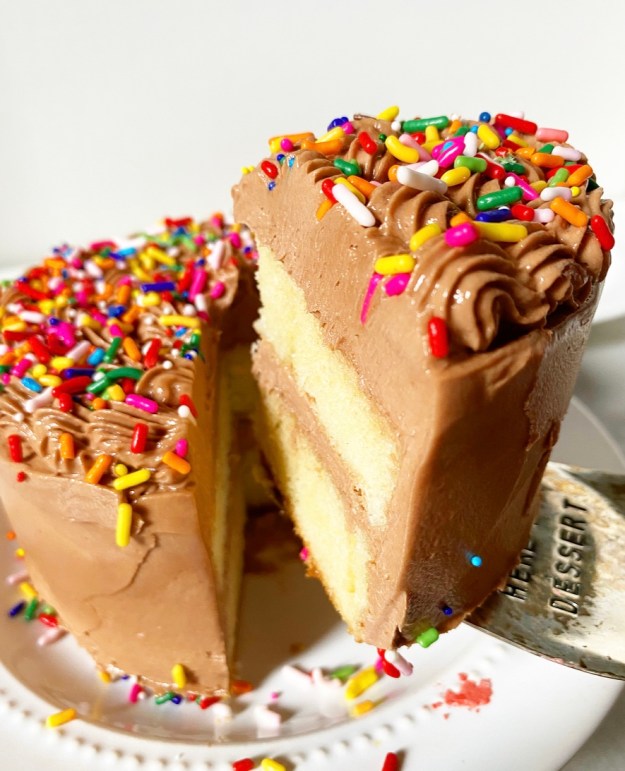
 At this point you can serve your cake. I, however, like to let mine sit for an hour or two ahead of serving, just to let everything adhere nicely. This isn’t strictly necessary, but I find it makes slicing easier and prettier. If you’re refrigerating your cake, make sure to let it sit at room temperature for 20-30 minutes before serving.
How to Transport a Mini Layer Cake
If you’re making a Mini Layer Cake (or any layer cake), chances are you have to take it to a celebrant or they have to pick it up. In more normal times, I box and transport cakes all over NYC. The most important thing in this process is to make sure your cake fits the box beforehand—this is why I have a ruler in my kitchen. My cake boxes are 3-inches tall, so the cardboard round, both layers of cake and any filling and frosting need to be shorter than that when stacked.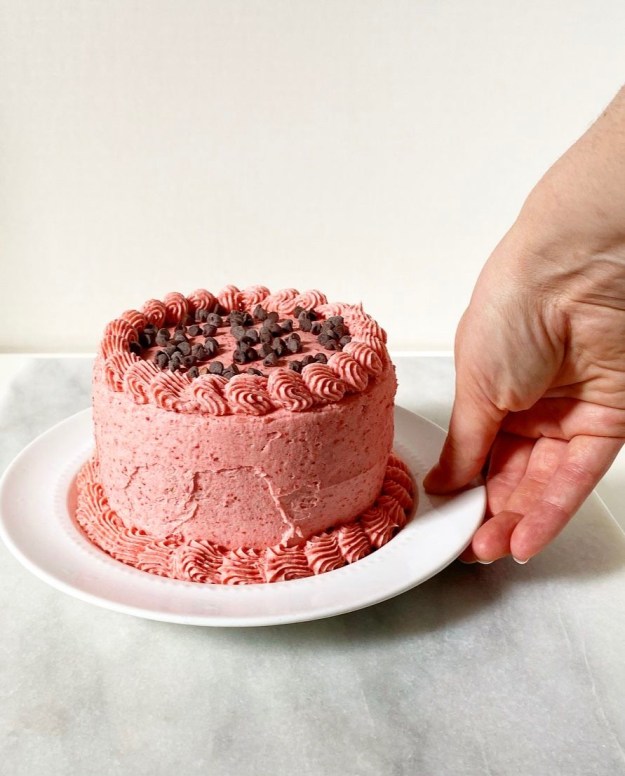 Other important things? Keep your box as level as possible. I’ve gotten pretty good at keeping them level while walking and riding in cars and on the subway. It’s just a matter of remembering that pretty much everything (your body, a car seat, etc.) has a natural slope, and then carrying/positioning your box in a way to counterbalance that. Also, remember that cold cakes are easier to transport. When delivering cakes, I refrigerate them as soon as I’m done assembling, and then let them come back to room temp while en route to wherever I’m going.
Please know that I have shown up a few times with cakes that did not look the way they did when I left the house. This is a hazard of the job–rest assured that ugly cake is still delicious. If you make somebody a cake and they don’t like it because it’s a little disheveled, take it back. You don’t need that negativity.
And on that note, if you are inspired to make a Mini Layer Cake or two and need a place for them to go, I’m gladly accepting donations.
Are there any Mini Layer Cake tutorials you’d like to see? Thinking of doing one for tiered cakes (wedding cake). Let me know what you think in the comments.
Vanilla Cake {Half Recipe}
makes 1 9-inch layer or enough for 1 mini layer cake
1 1/2 cups all-purpose flour
2 1/2 tablespoons cornstarch
1/2 teaspoon baking powder
1/4 teaspoon baking soda
1/4 teaspoon Kosher or sea salt
1/2 cup granulated sugar
1/2 cup light brown sugar, packed
1/2 cup (1 stick) unsalted butter, softened to room temperature
2 large eggs, room temperature
2 teaspoons pure vanilla extract
1 cup buttermilk, room temperature
1/2 batch Nutella Buttercream or other buttercream
Preheat oven to 325F. Grease a 9-inch round or square pan. Line the bottom with parchment. Grease again. Set aside.
Make the cake batter. In a medium mixing bowl, whisk together flour, cornstarch, baking powder, baking soda, salt, granulated sugar and light brown sugar. Set aside.
In a large mixing bowl, cream butter with an electric mixer until light and fluffy, about two minutes. Add eggs one at a time, beating completely after each addition. Mix in half the dry ingredients, followed by half the buttermilk. Add remaining dry ingredients followed by the remaining buttermilk. Scrape down the bowl as necessary.
Pour batter into prepared pan. Tap full pan on the counter five times to release any large air bubbles. Bake cakes 35 minutes, or until a toothpick inserted in the center comes out clean. Let cake cool in its pan for fifteen minutes. Run a small thin knife around the edge of the pans and invert the cakes onto a rack to cool completely. Peel off and discard parchment.
For a Mini Layer Cake, follow instructions detailed in the post above. Fill and frost with Nutella Buttercream or other buttercream.
Chocolate Cake {Half Recipe}
makes 1 9-inch layer or enough for 1 mini layer cake
3/4 cup + 2 tablespoons all-purpose flour
6 tablespoons natural unsweetened cocoa powder (not Dutch process)
1 1/2 teaspoons espresso granules (optional, but recommended)
1/2 cup granulated sugar
6 tablespoons light or dark brown sugar, packed
1/2 teaspoon baking powder
1 teaspoon baking soda
1/2 teaspoon Kosher or sea salt
1/4 cup canola oil
1 large egg, room temperature
1 teaspoon pure vanilla extract
1/2 cup buttermilk, room temperature
1/2 cup boiling water
1 batch Strawberry Buttercream or other buttercream
Preheat the oven to 325F. Grease a 9-inch round or square pan. Line the bottom with parchment. Grease again. Set aside.
Make the cake batter. In a large mixing bowl, whisk together flour, cocoa powder, espresso granules, granulated sugar, brown sugar, baking powder, baking soda, and salt. Set aside.
In a separate large mixing bowl, whisk together oil and egg, followed by vanilla and buttermilk. Whisk in half the dry ingredients, followed by half the boiling water. Whisk in remaining dry ingredients, followed by remaining boiling water.
Pour batter into the pans. Tap full pan on the counter five times to release any air bubbles. Bake 25-27 minutes, or until a toothpick inserted in the middle comes out clean.
Let cake cool in pan for fifteen minutes before running a small, thin knife around the edge. Invert cake onto a cooling rack and allow to cool to room temperature. Peel off and discard parchment.
For a Mini Layer Cake, follow instructions detailed in the post above. Fill and frost with Strawberry Buttercream or other buttercream.


 Full disclosure, I am tired. Like in-my-bones tired. It’s been a long week and I haven’t been sleeping well and I just can’t seem to get my brain to concentrate on this blog post. I would say I’m trying my best, but I am actually trying as much as I absolutely have to and not the tiniest bit more. It’s that sort of day.
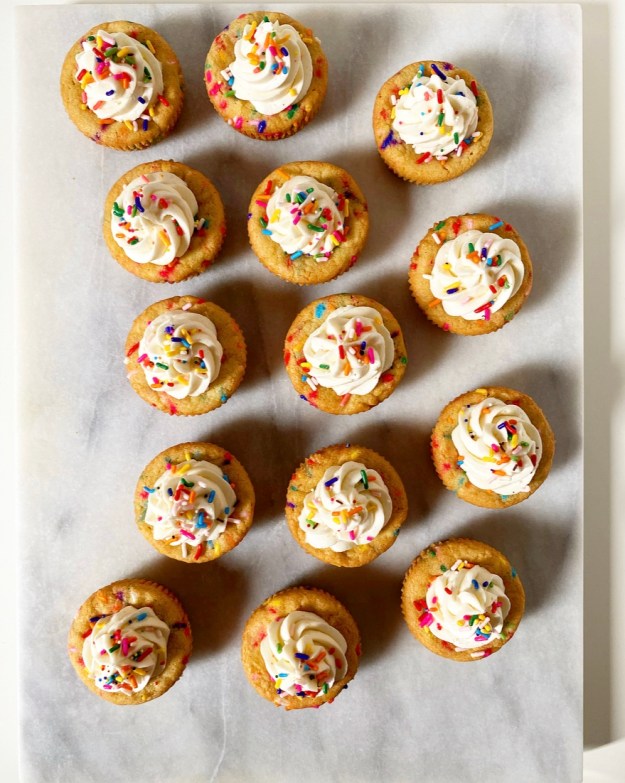
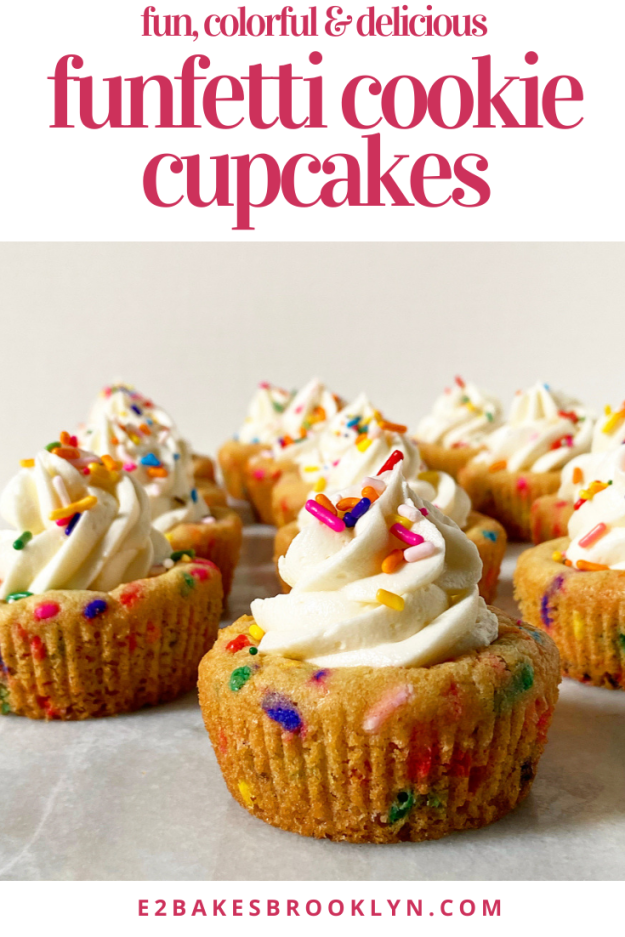
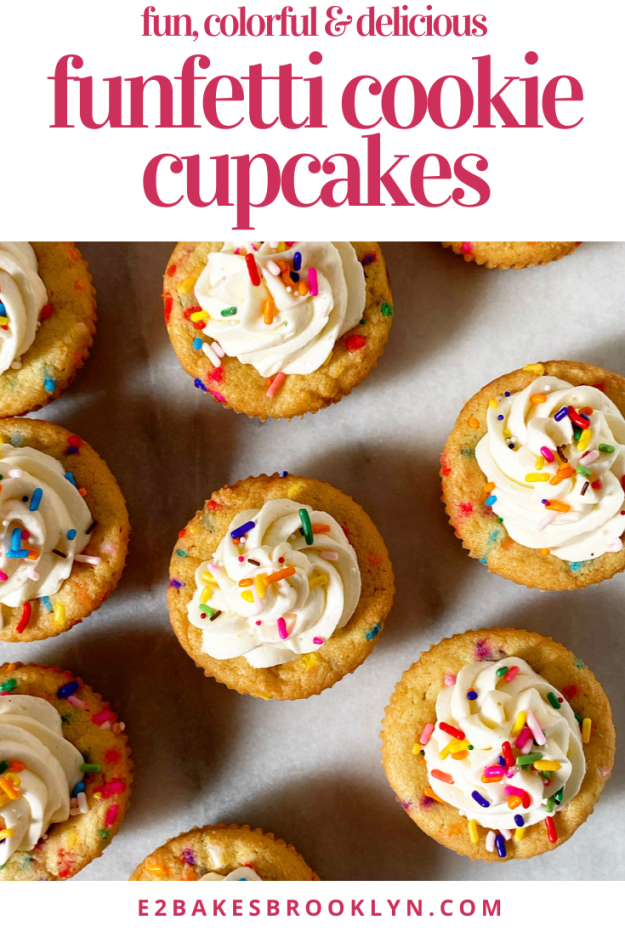
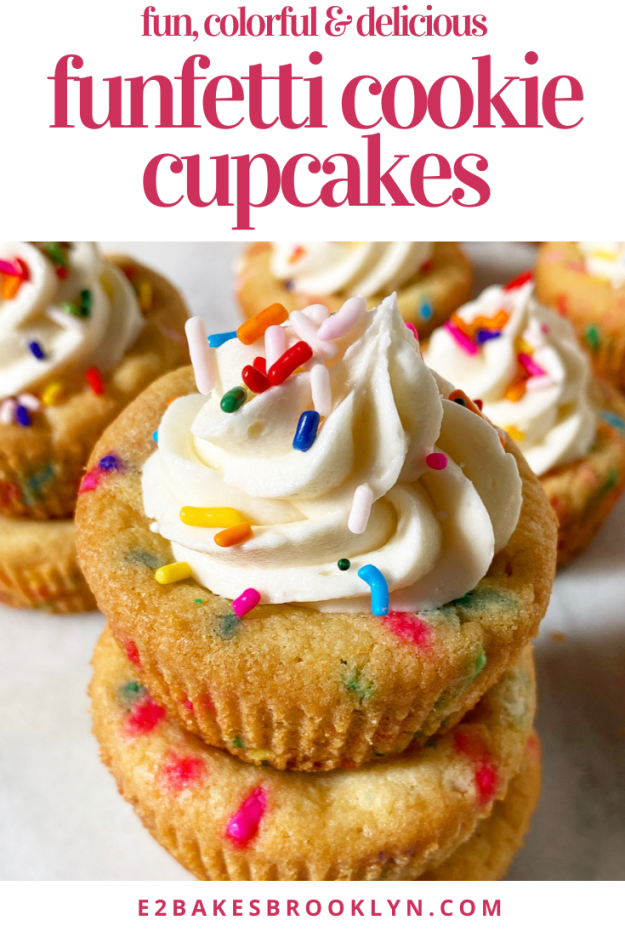
 I usually take pride in writing a “real” blog post, but was tempted today to just leave it at “Um, hi. I took cookie cake and threw sprinkles in there and made it smaller. Oh, and there’s a plume of vanilla buttercream on each one. Funfetti Cookie Cupcakes, y’all!” …and leave it at that. I mean, that about sums it up, right?
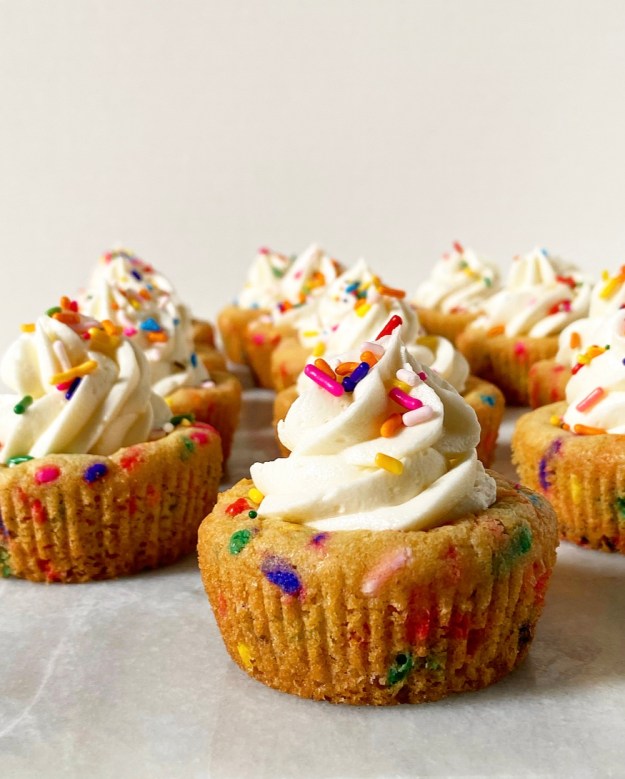 Well, almost. It doesn’t tell you that these Funfetti Cookie Cupcakes were born because I deeply miss baking for groups. I really wanted to make a cookie cake for weeks, but resisted because who would I share it with?
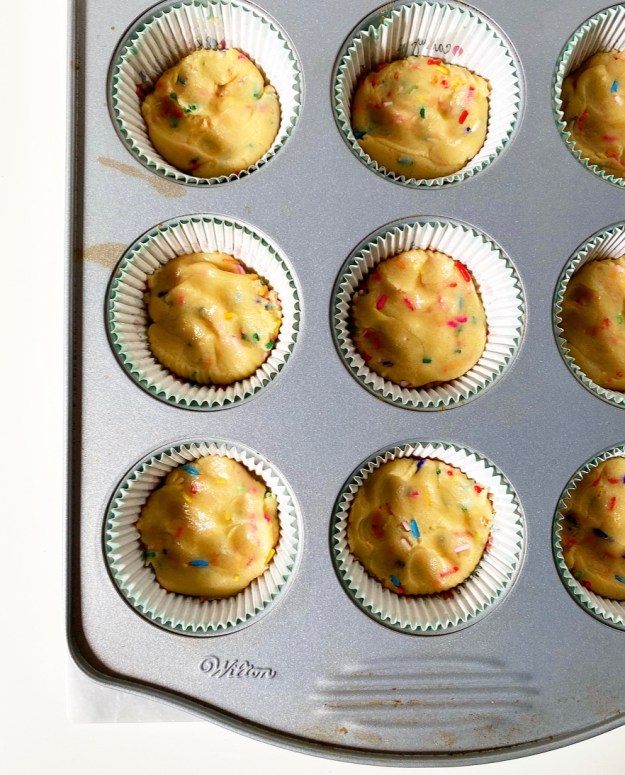
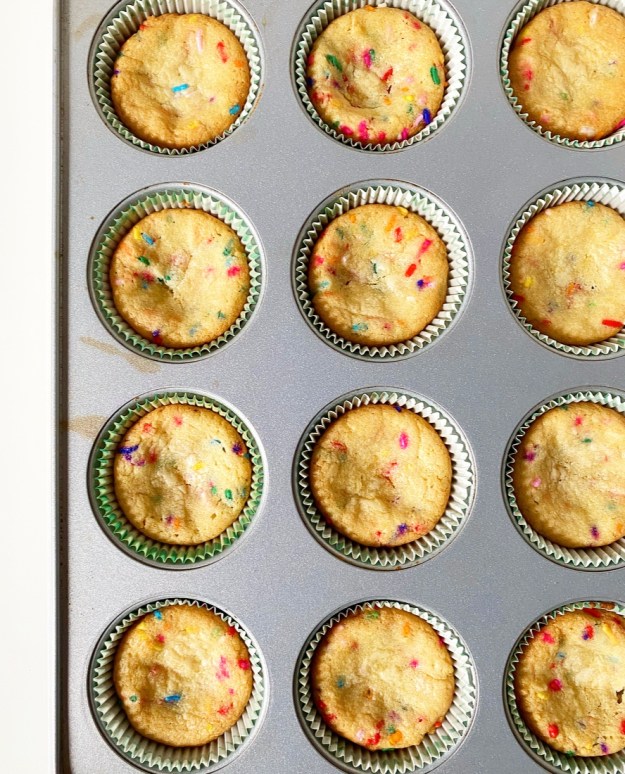 That rambling, incoherent, grammatically incorrect blurb says nothing of how the exteriors of these little cookie cakes crackle ever-so-slightly against your teeth when you first bite in, or how the centers are a tad underbaked and chewy like
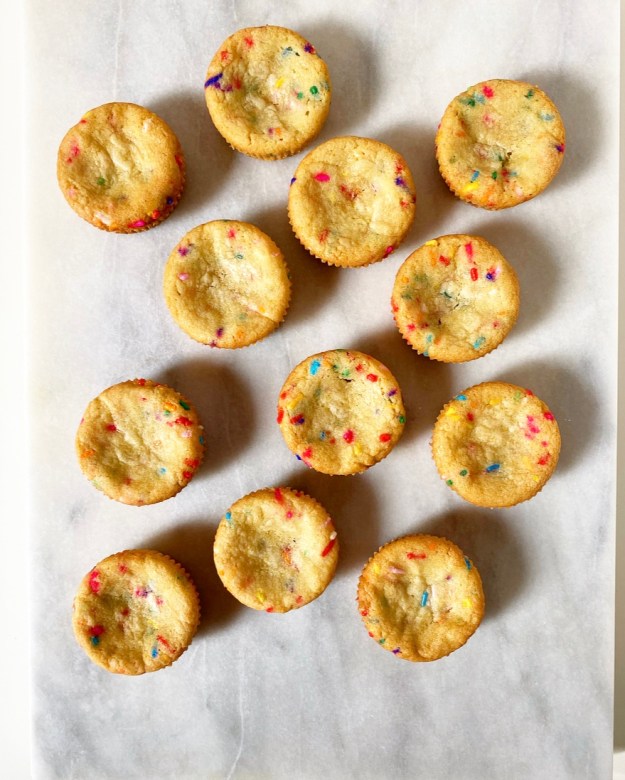
 There’s no mention of how much I absolutely love
 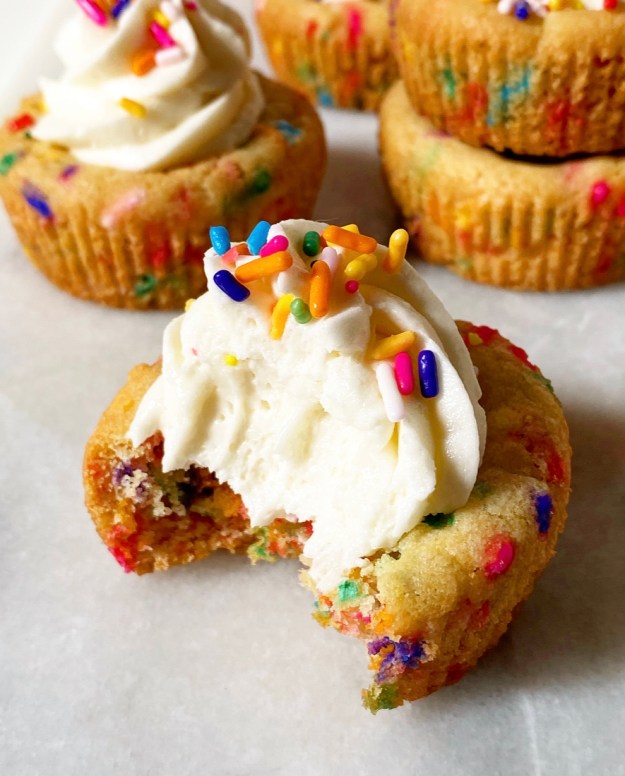 And speaking of single servings, that half-assed blog “post” I wanted to write has one more gross oversight. These are perfect for socially-distanced celebrating or for delivering to someone you love and can’t really see right now. It doesn’t tell you that even though you bake all the time, even when you are tired and feel uninspired, making these will feel nothing like work and completely like joy. And how even when you’re a completely depleted puddle of a human who needs a weekend so badly it’s ridiculous, you’ll find a way to find the words to say it all.
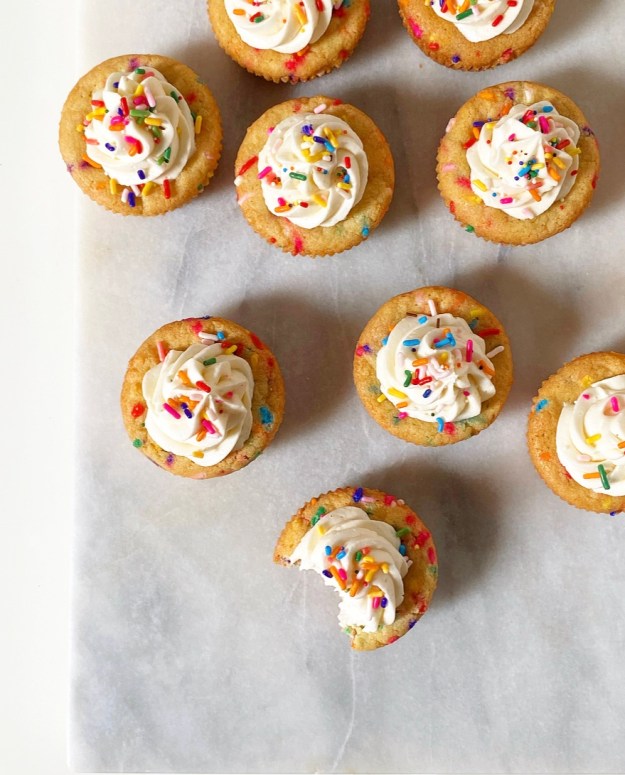
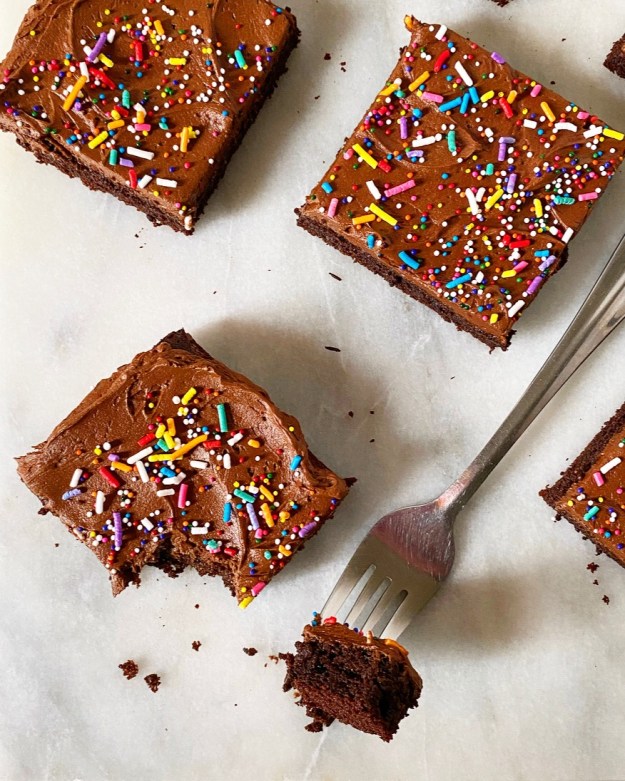 Cake with frosting seems like it’s almost not allowed right now, but this is not just any cake and this is not just any day. Coronavirus be damned.
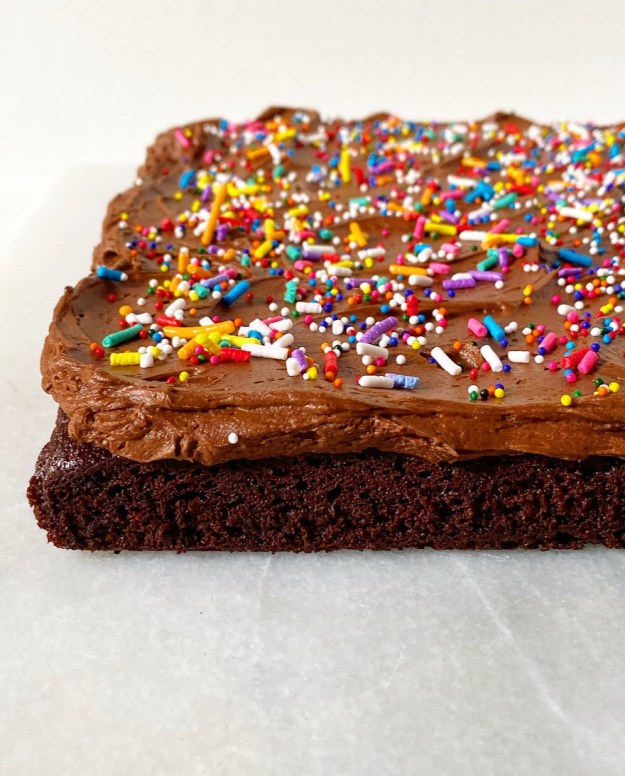 If you’re scratching your head wondering what today is…well, it’s Earth Day, and that is important. But there’s also something that I don’t talk about much on here because it seems mostly irrelevant to the daily operation of a food blog…but it’s actually completely relevant because there would be no E2 Bakes without it. Today marks seven years since I took a drink or a drug. Yep, I’m that sober home-baking food blogger that nobody warned you about.
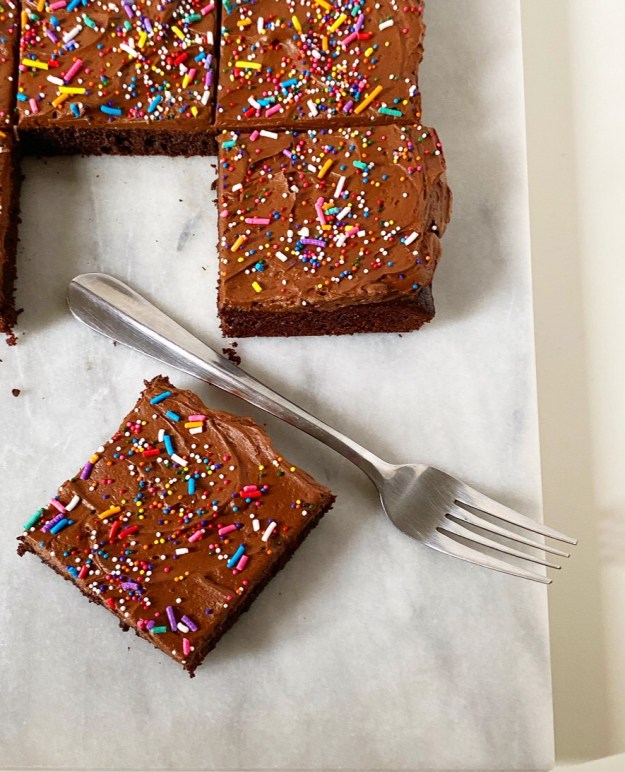 Quitting drinking and putting mind-altering substances in my body is the kindest thing I’ve ever done for myself and the people I love. I’ve gained so much more from that one decision (and many moments of grace and a lot of trudging) than I will ever be able to adequately express, least of all the ambition to run a baking blog. And, well, now you know why there is never liquor in my bakes or wine in my sauces–I can’t post something I can’t test.
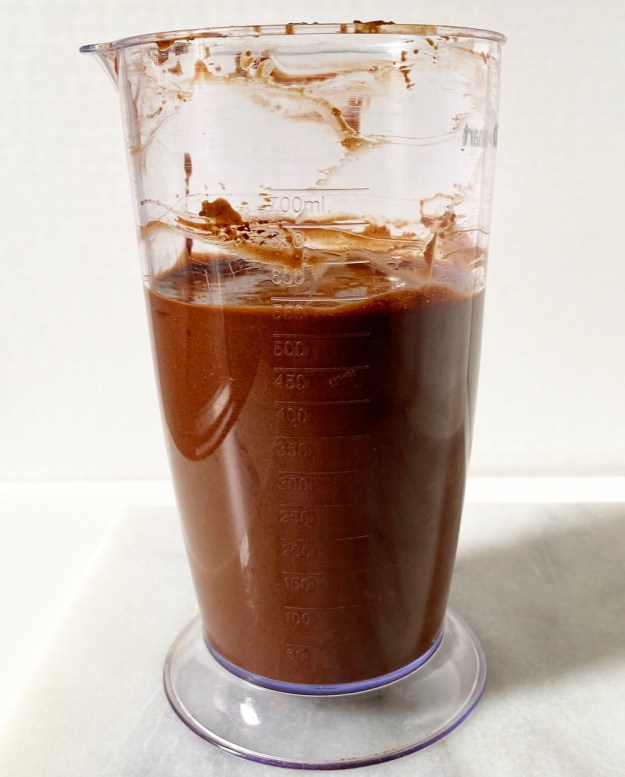
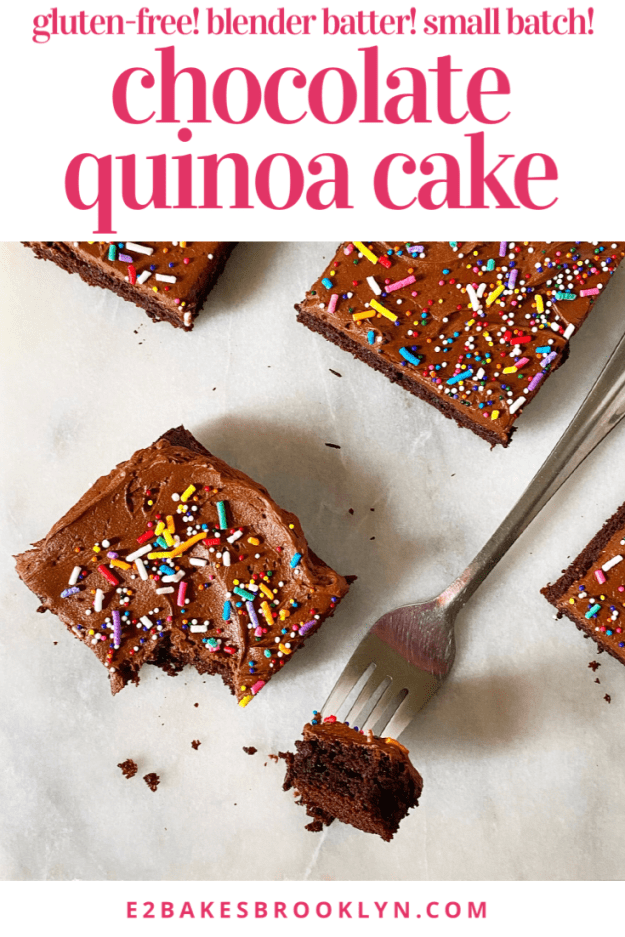
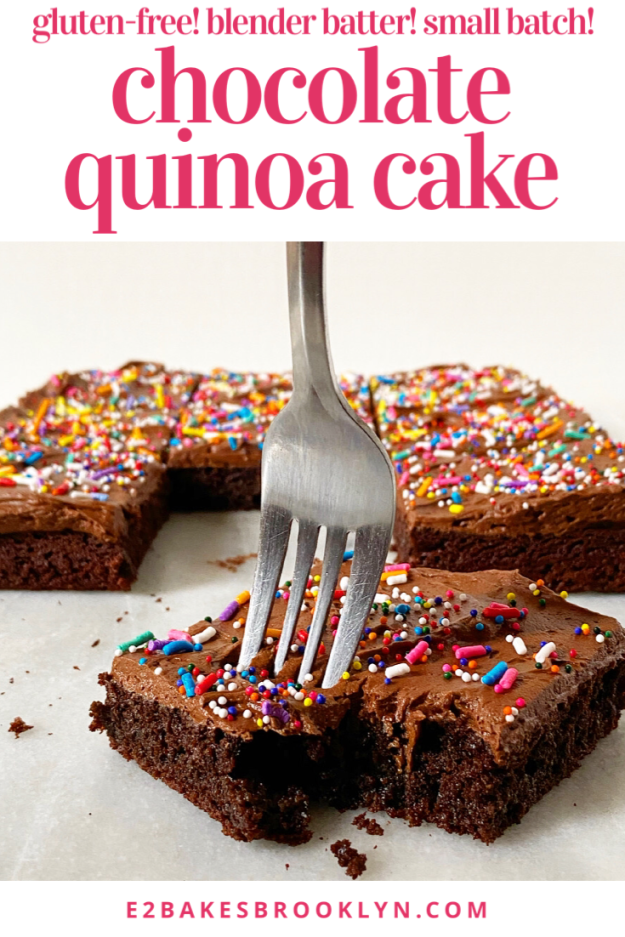
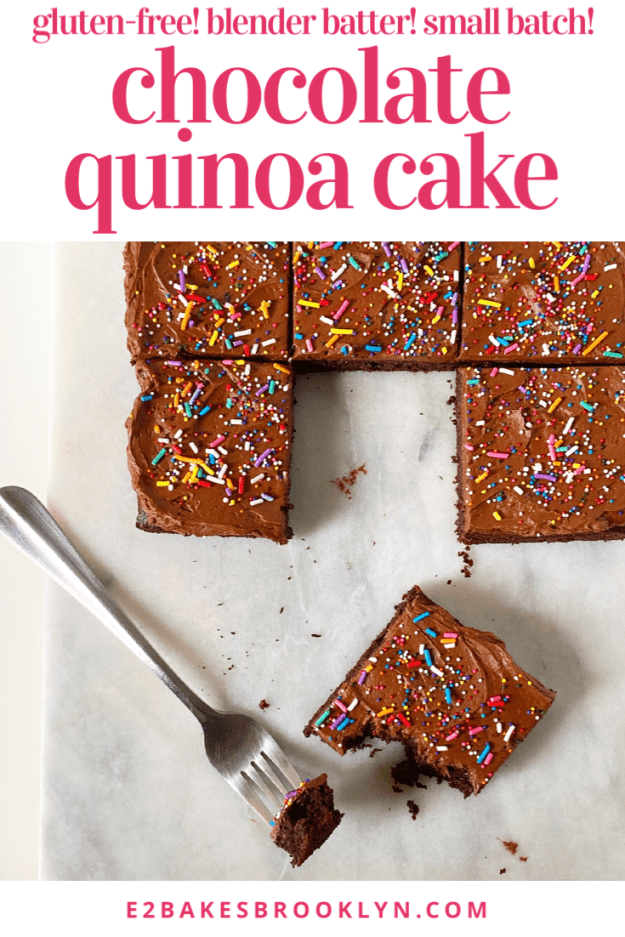
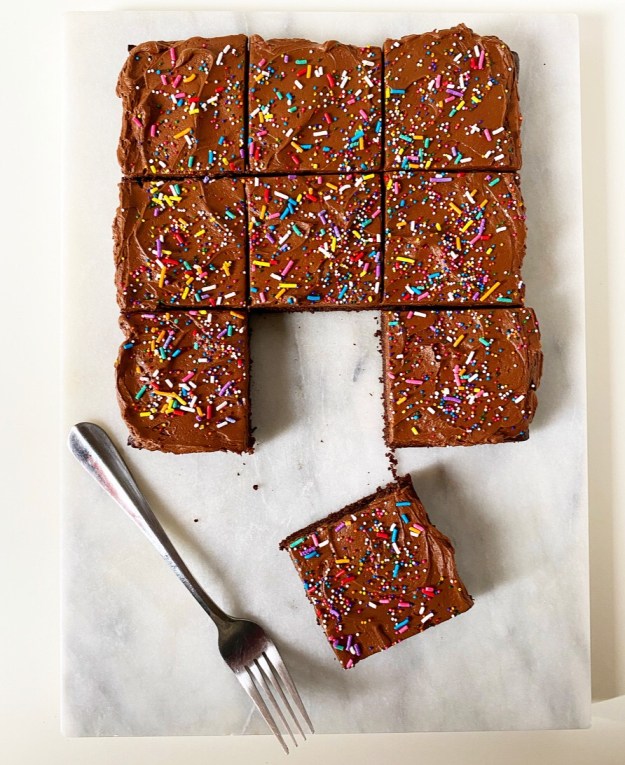 Layer cakes are out for now and flour is difficult to find, but chocolate and frosting (and sprinkles!) are always welcome in my kitchen. Today’s cake is one of the best chocolate cakes I have ever had—so tender and chocolaty! If I weren’t telling you right now, I bet you’d never guess that it’s made with a cup of cooked quinoa instead of flour. For real.
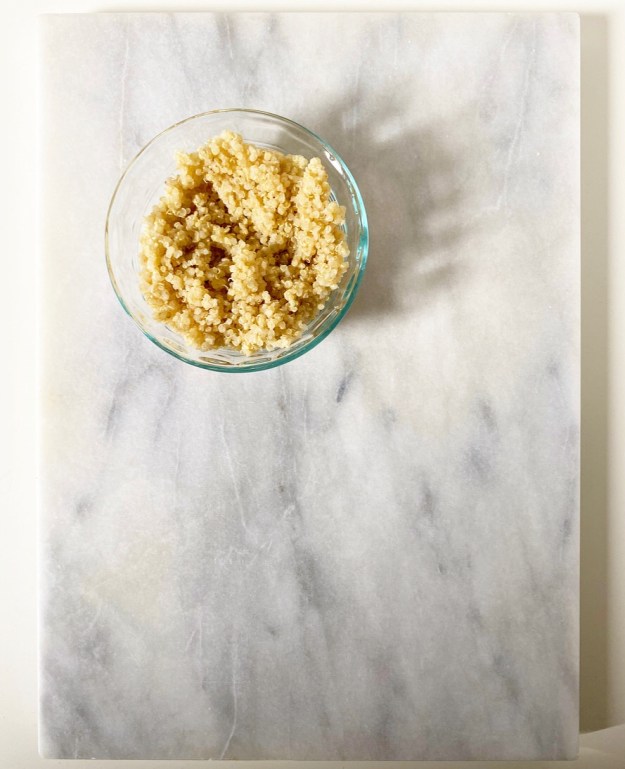 The batter—which includes cocoa powder, a hint of coffee, eggs and milk—is made in a blender to eliminate any whole pieces of quinoa. I wouldn’t recommend making most cake batters in a blender, but since this cake is naturally gluten-free, there’s no need to worry about overmixing or tough cake. Score!
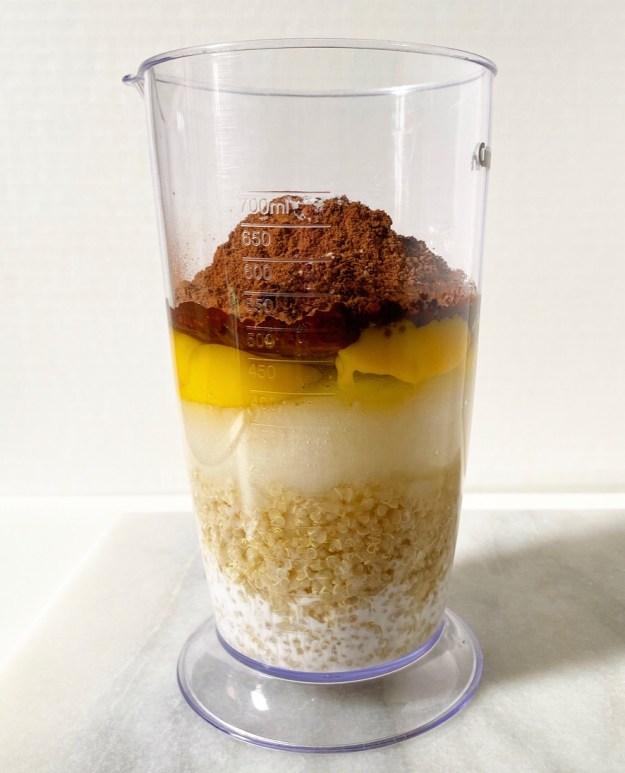
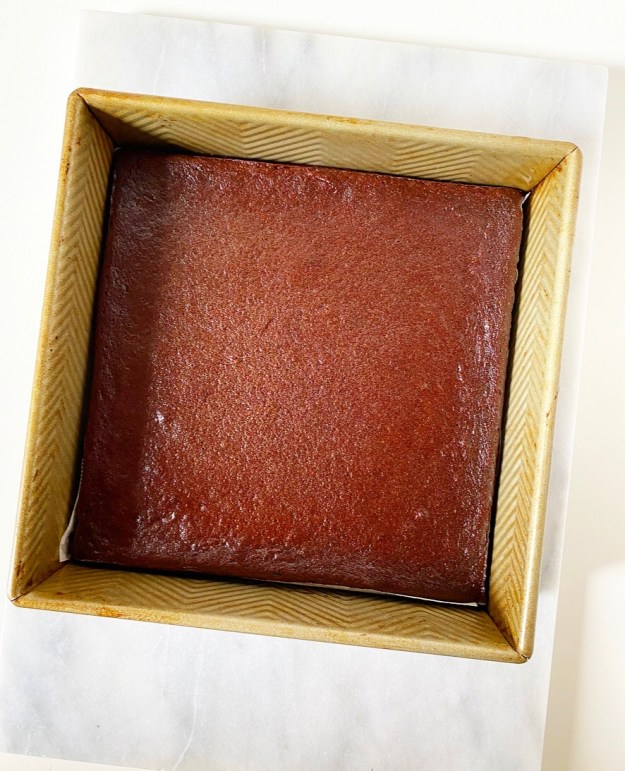 Chocolate Quinoa Cake bakes up in 30 minutes and is thin enough that it cools within an hour. I topped it off with a small batch of chocolate buttercream and dug into my stash of rainbow sprinkles for the occasion.
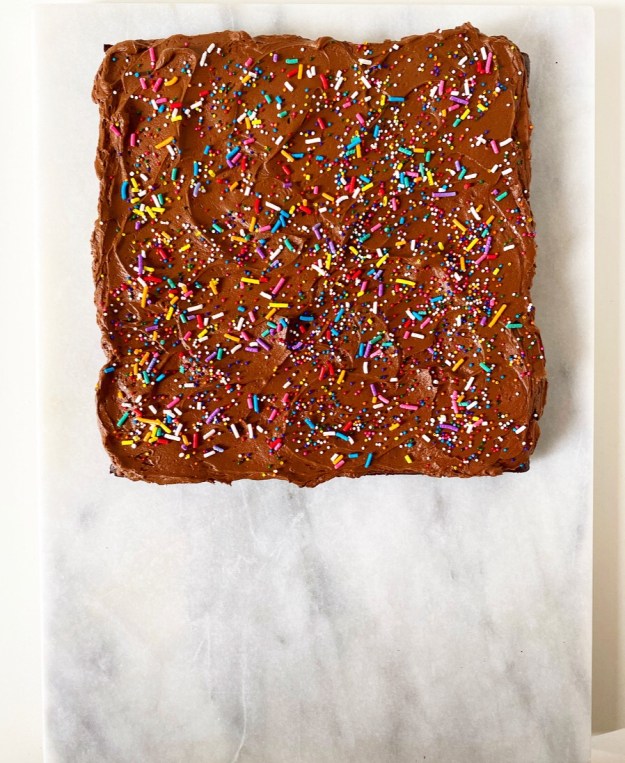 Oh yeah, that’s the stuff.
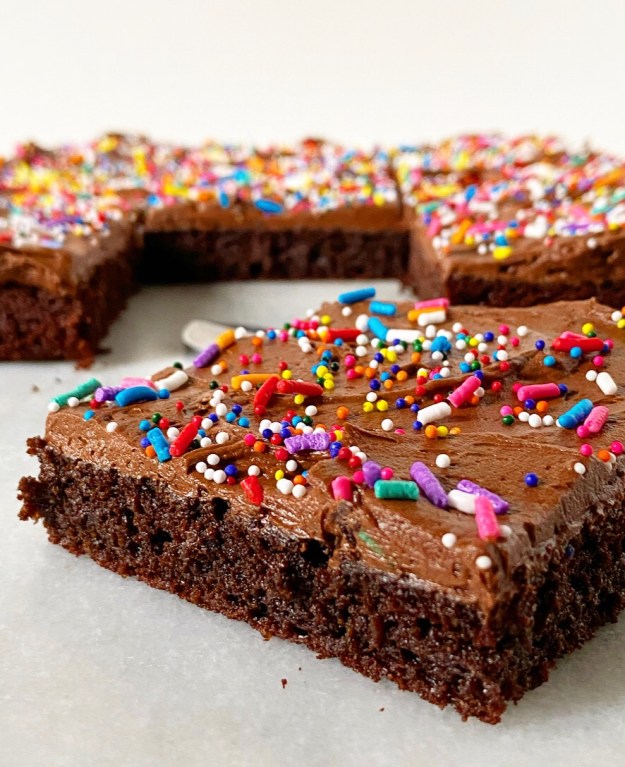 As for quarantine substitutions:
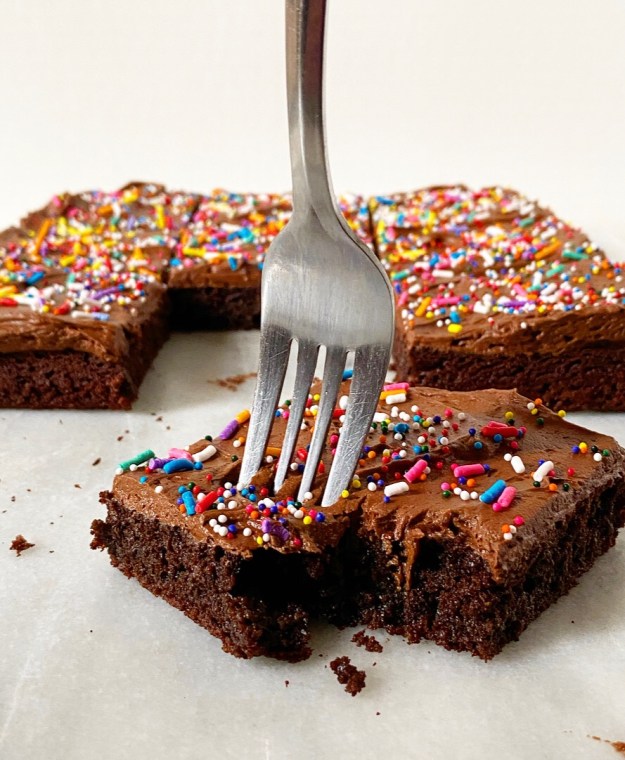 Whew! Okay. Now that you’re armed with everything you need to make a kickass gluten-free chocolate cake, go find something to celebrate. I promise you will.
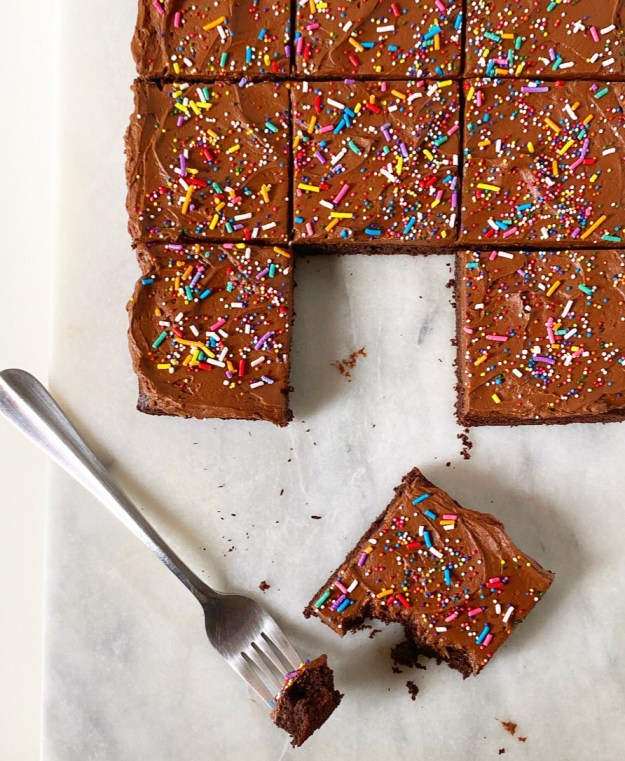
 Happy Valentine’s Day ❤ If you are looking for holiday-appropriate treats, click
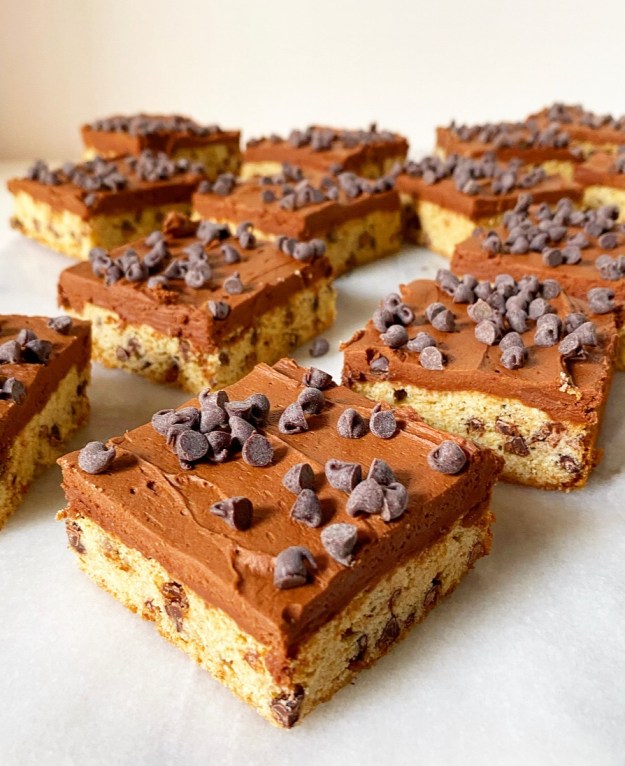
 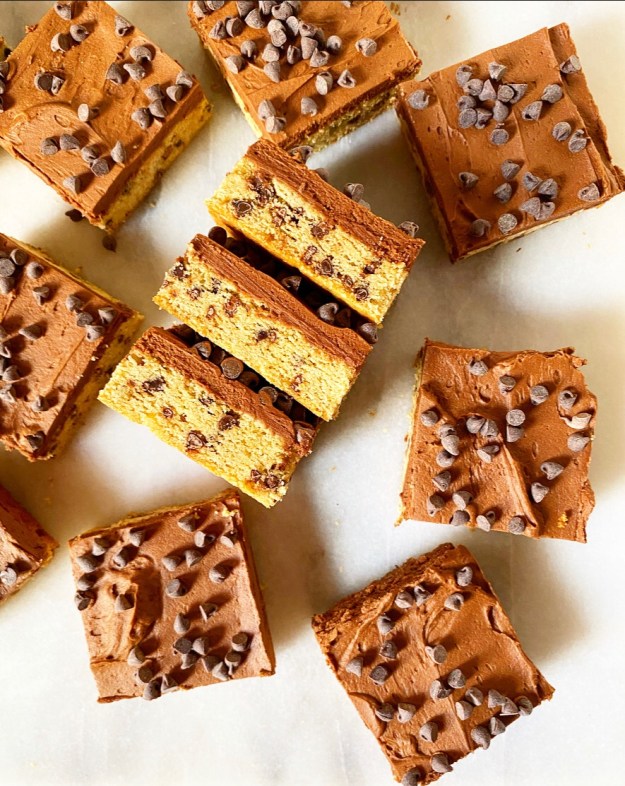 If, however, you are over the heart-shaped baked goods—or, more likely, are looking for something to bake after Valentine’s Day is over—look no further than these very good, anything but boring, extremely square Chocolate Chip Cookie Squares.
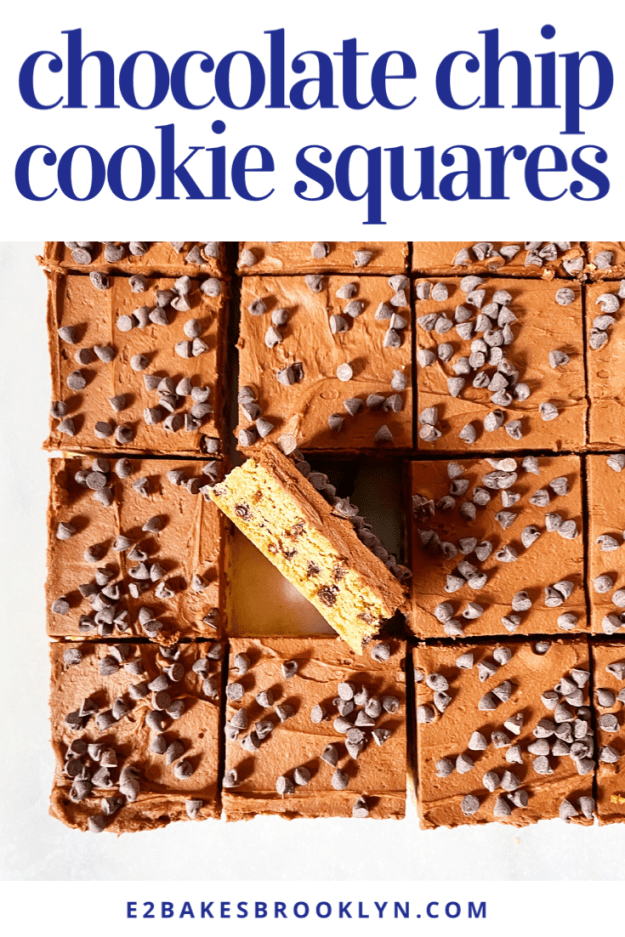
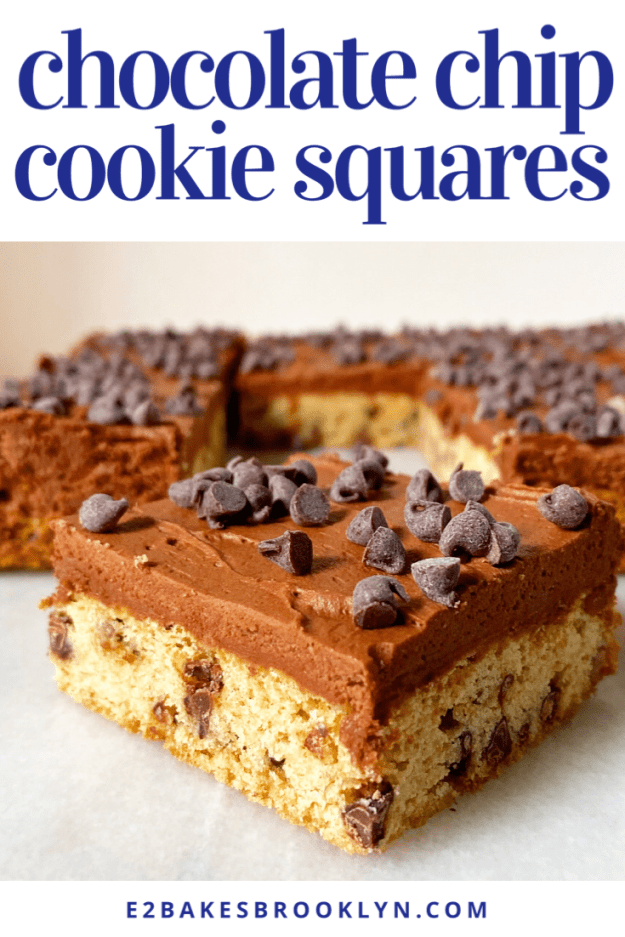
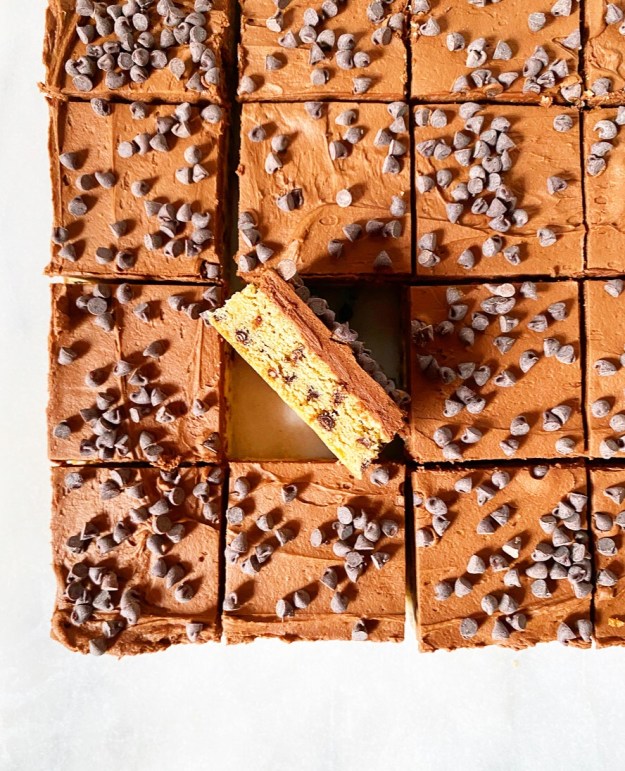 We’re talking about a thick, soft layer of cookie studded with miniature chocolate chips, topped with a blanket of chocolate buttercream, and scattered with more miniature chocolate chips. Always more chocolate chips, am I right?!
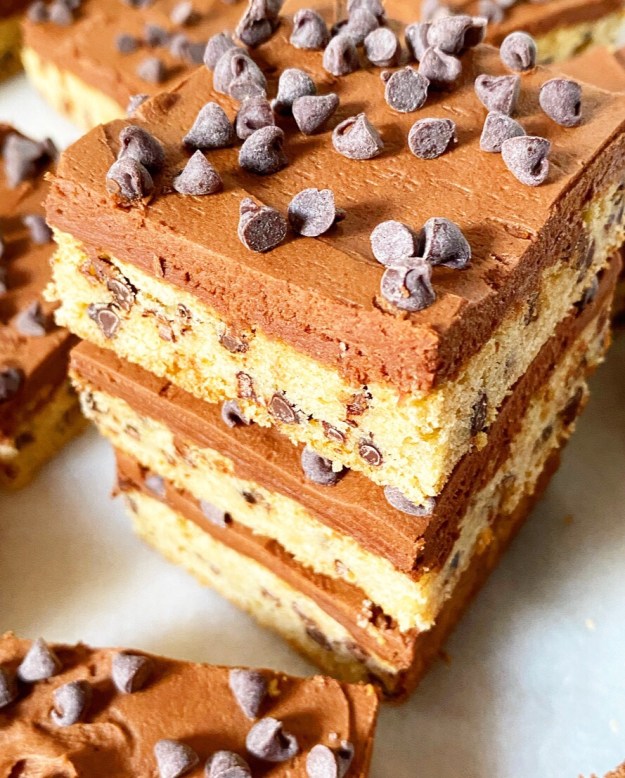 These sweet squares are perfect for a multitude of occasions. They’re one of those recipes to keep in your back pocket for a game or movie night, class party, office break room pick-me-up, friend who needs a treat, picnic, casual birthday #stickacandleinit, or just…Saturday.
 And while they are not red, strawberry-flavored, rolled into truffles or cut into hearts, I know I’d be hard-pressed to pass one up on this fine, frigid Friday Valentine’s Day.

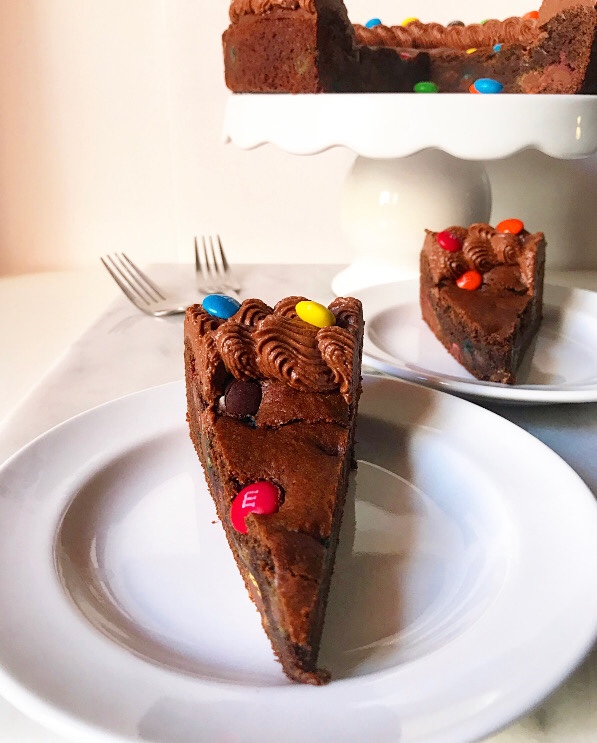
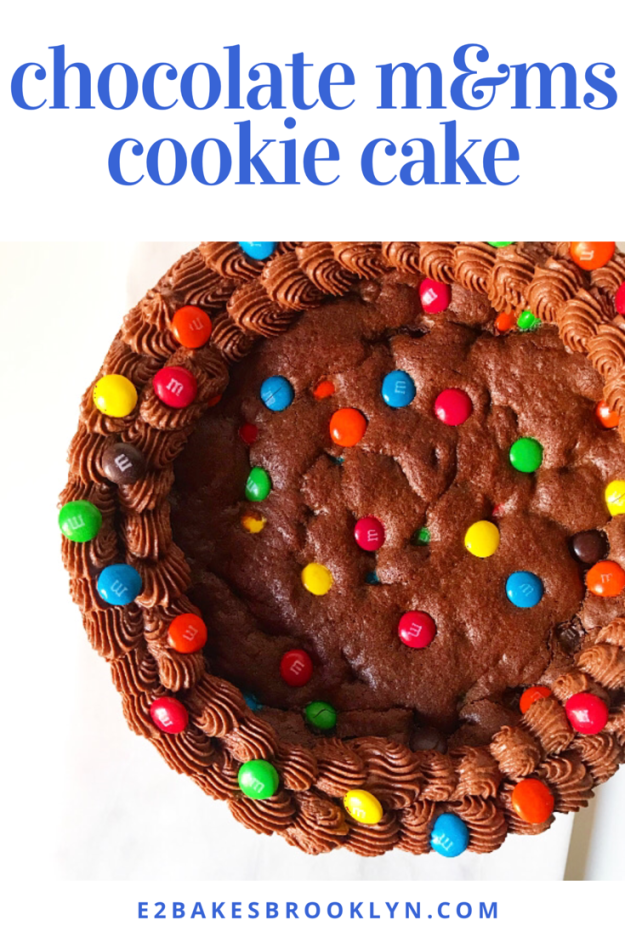
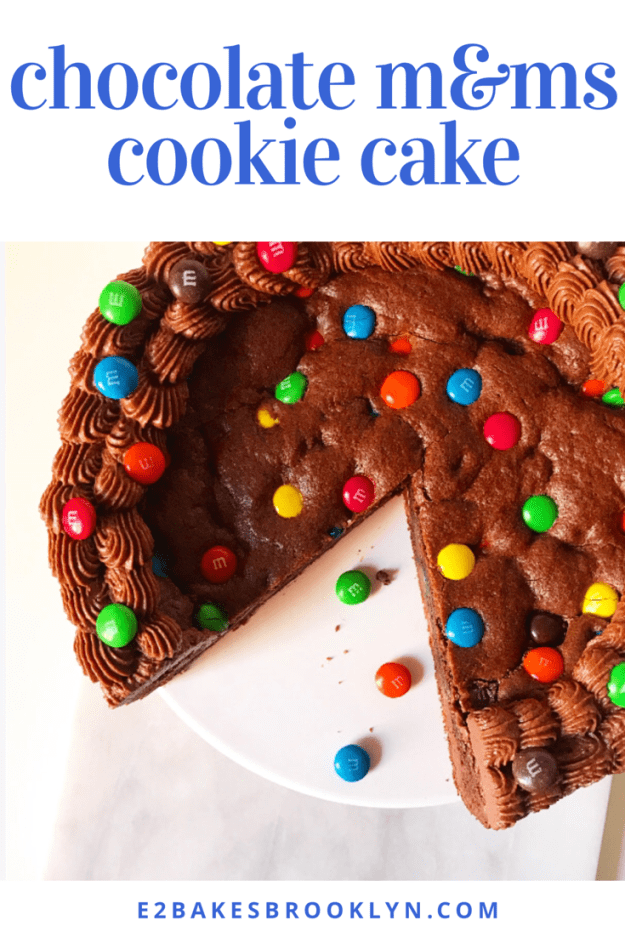
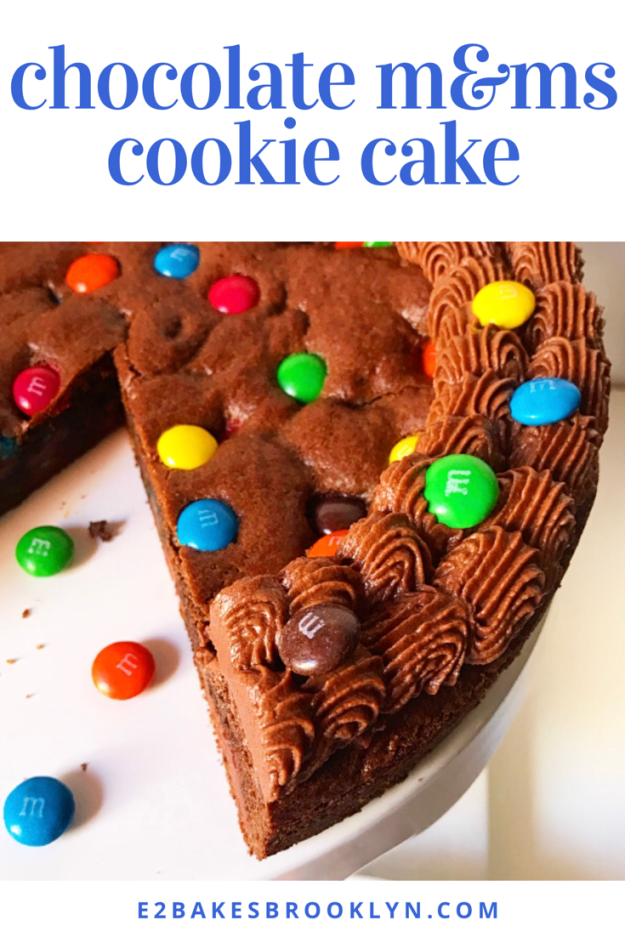
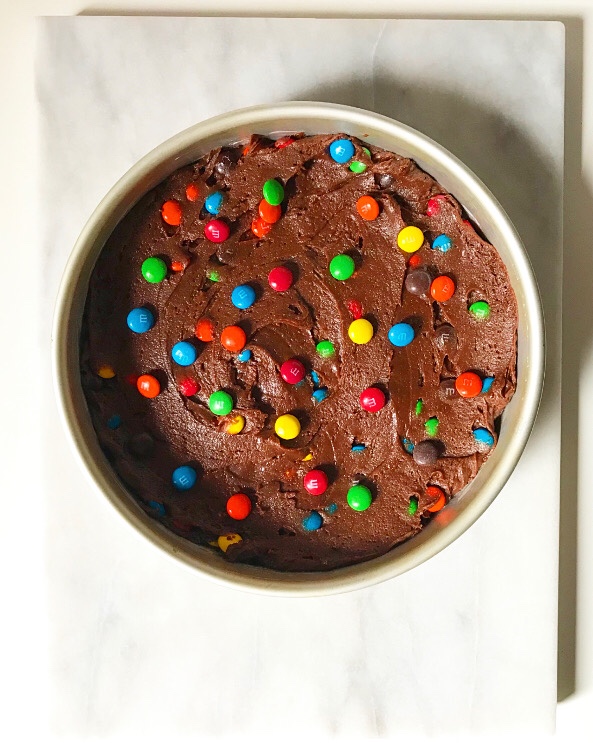
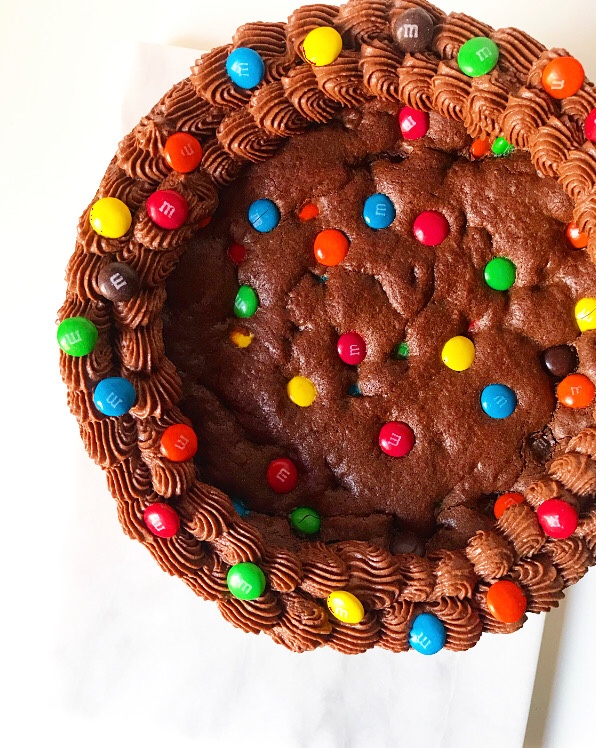 Back in November, I made this Chocolate M&Ms Cookie Cake for a friend’s birthday. I thought it was cute, so I posted a picture of it on my
 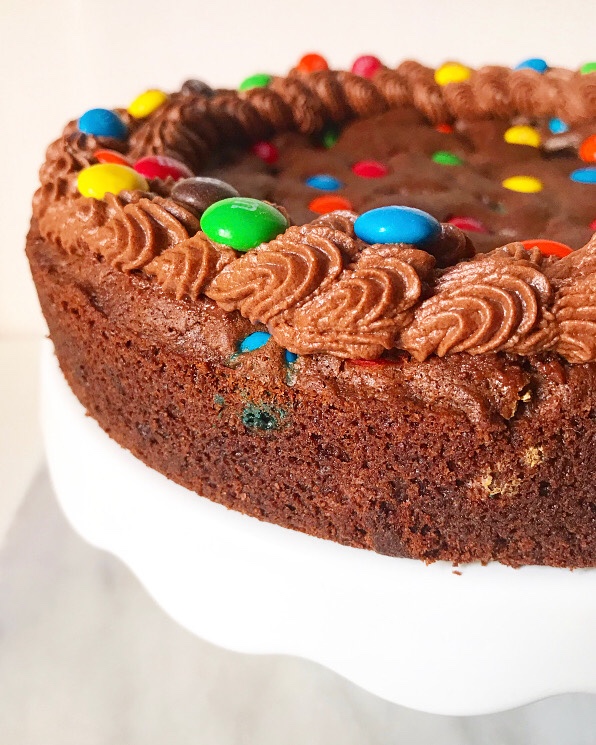 But I remembered now. Seven months later than anticipated, but I remembered. I promise you, Chocolate M&Ms Cookie Cake is worth the wait.
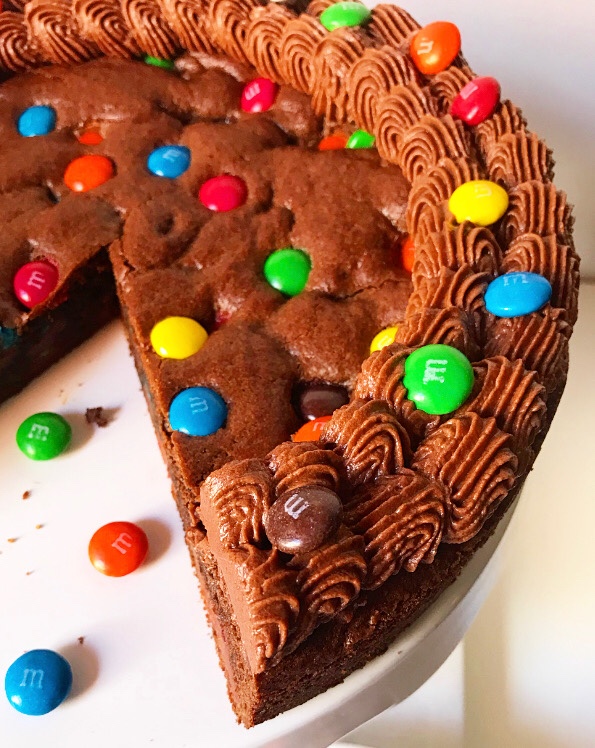 We’re talking about a rich, thick chocolate cookie studded with colorful candy and finished off with a flourish of chocolate buttercream. What’s not to love?!
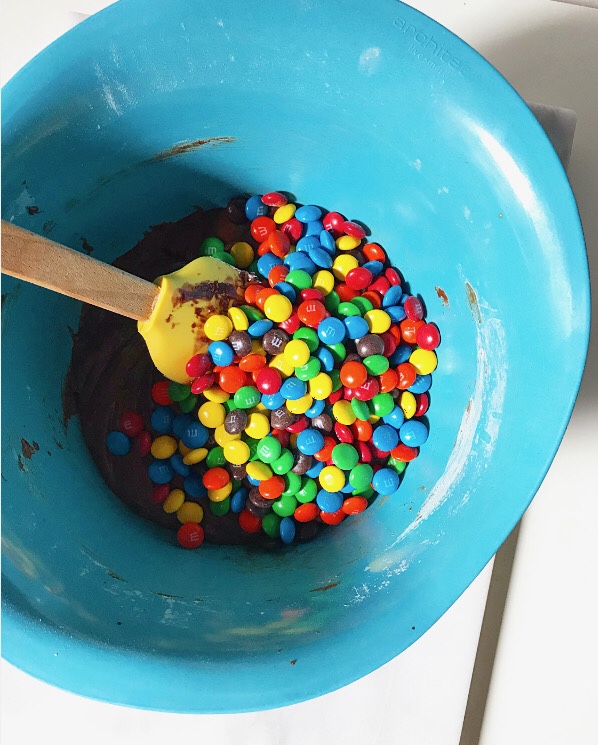
 It’s easy too—it’s basically just a slightly smaller batch of my
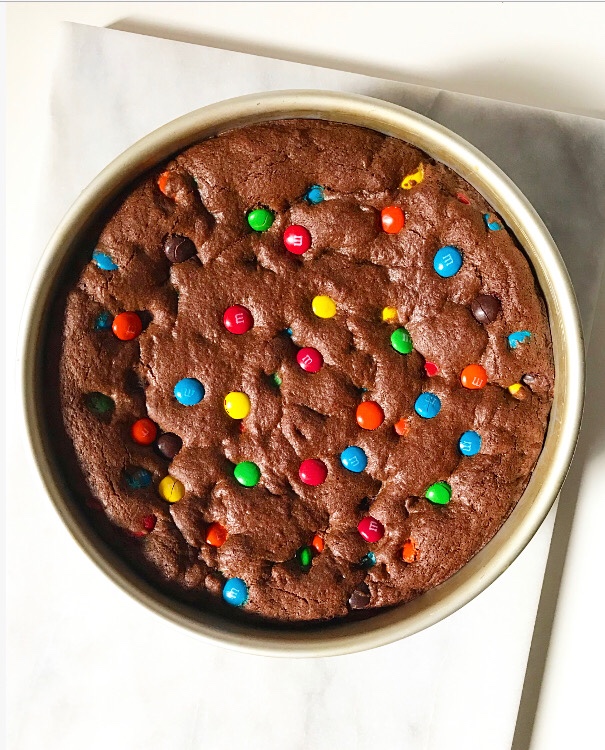
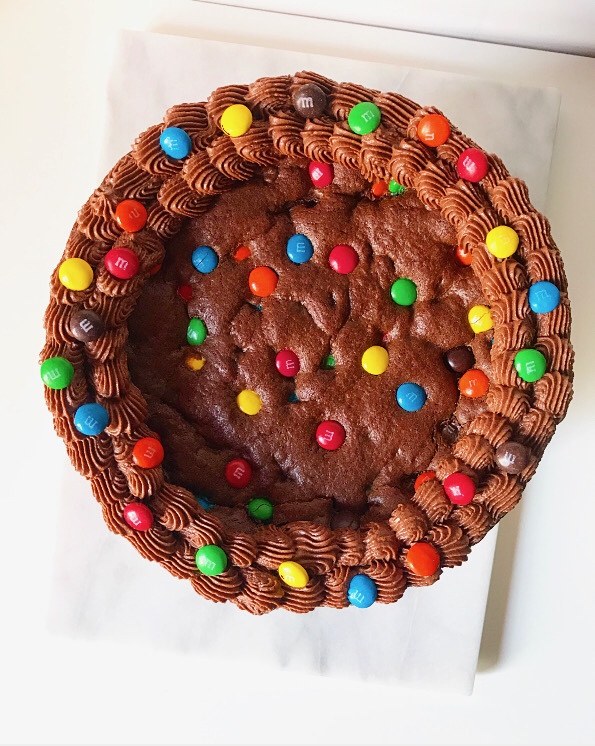 Bake it up in a cake pan, let it cool, and pipe on a buttercream border. In my opinion, that last step is the thing that takes this recipe from “giant cookie” to “cookie cake.” Not that there’s a thing in the world wrong with a giant cookie, am I right?!
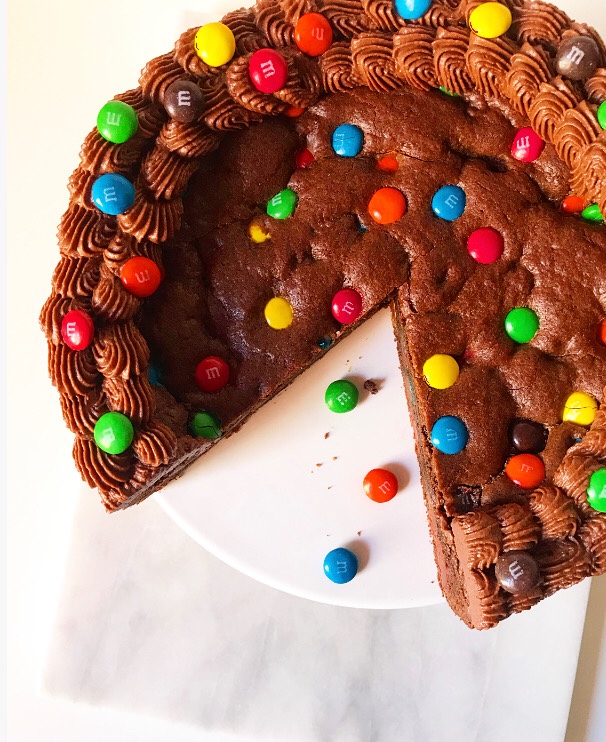 Slice it up and share with people you love this weekend or for the Fourth of July (with