Tag Archives: chocolate

Pecan Florentines

Pecan FlorentinesIf you’ve never seen or heard of Florentine cookies, you’re probably not alone. I rarely see these ultra-crispy, nutty, chocolaty cookies in bakeries, but on the occasion that I do, I just have to have one.

Pecan FlorentinesMy love of Florentines began when I tried an almond version at Blue Bonnet Bakery in my hometown (they must have been out of Gingerbread Men that day 😉). I was intrigued by the non-traditional appearance of the cookie (let’s be real–I was mostly in it for the chocolate). After one bite, I knew I’d found a favorite.

Pecan FlorentinesFlash forward fifteen years and I’ve finally tried my hand at making them. And you know what? I wish I had made them sooner. I’m always so intimidated by lace cookies, but they’re actually some of the simplest to make. Exhibit A: Apple Cider Snaps.

Pecan FlorentinesHere’s what you need to know about Florentines: if you start now, you can have dough ready for the oven in ten minutes. That dough will bake in all of five minutes. And the finished cookies get filled and topped with dark chocolate. So…what are you waiting for?!

Pecan FlorentinesPecan FlorentinesMeasure out a cup of pecans and then pulse them in the food processor until they become a rubble. You could use almonds or walnuts if you prefer, but given a choice, I will always go for pecans. It’s a Texan thing, I suppose. I would like more things to taste like pecan pie, Florentines included. I don’t think that’s too much to ask.

Anyway…mix the pecan rubble with 1/2 cup of flour, cinnamon, nutmeg, and salt.

Pecan FlorentinesPecan Florentines
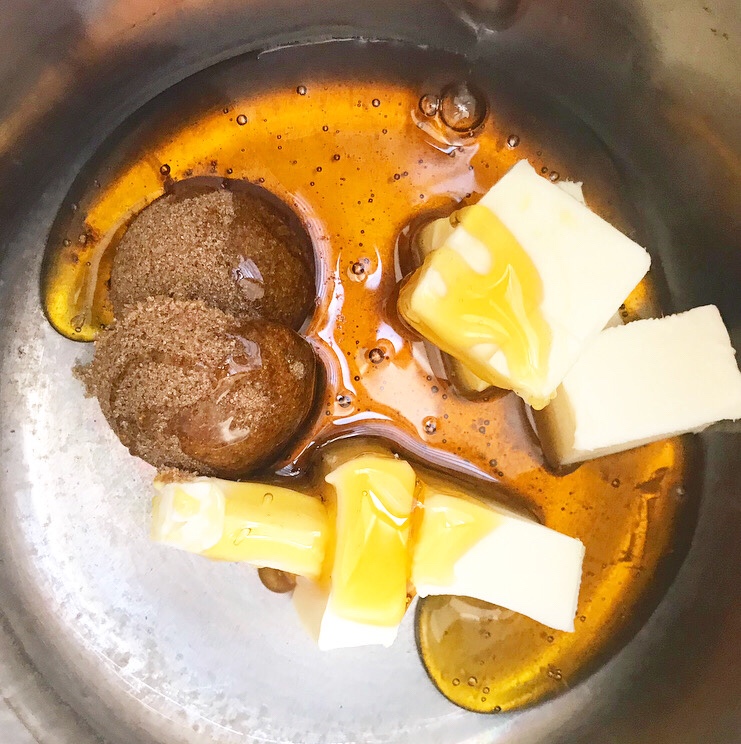
Next up, bring some butter, dark brown sugar, and Lyle’s Golden Syrup to a boil. Golden syrup is an invert sugar with a slight caramel flavor; I usually find it on the baking or international aisles (it’ll be with the British foods). If you can’t find golden syrup at your grocery store, light corn syrup works just fine.

Pecan FlorentinesPecan FlorentinesBack to the recipe…combine the wet and dry ingredients and voilà! Cookie dough. It will be thin and a little, uh, gloppy, but it will be cookie dough.

Pecan FlorentinesPecan FlorentinesDrop teaspoons of dough onto lined baking sheets and flatten them into circles. Bake them for 5 1/2-6 minutes, until lacy and turning golden at the edges. Keep an eye on ‘em and make sure to rotate the pans halfway through–since these cookies are mostly sugar, butter, and nuts, they can go from perfection to charcoal in seconds. I made six batches last week and you can see that I still had a few close calls. Rotate, rotate, rotate. It’s crucial to your Pecan Florentine success.

Pecan FlorentinesPecan FlorentinesPecan FlorentinesPecan FlorentinesOnce all the cookies are baked and cooled, sandwich them together with dark chocolate. The melted chocolate may seep through some of the holes in the cookies. To mitigate this, I like to spread the chocolate onto one cookie, top it with a second cookie, and flip it over. That seems to contain any overflow.

Pecan FlorentinesAs a finishing touch, I like to drizzle a little more chocolate onto each Pecan Florentine. It’s entirely optional, but I think it’s pretty. After that, just let the chocolate set at room temperature (or if you’re impatient, throw them into the freezer for a few minutes).

(I’m impatient.)Pecan Florentines

Pecan Florentines
makes about 20 sandwich cookies

1 cup raw pecan halves
1/2 cup all-purpose flour
1/2 teaspoon ground cinnamon
1/4 teaspoon ground nutmeg
pinch of Kosher or sea salt
6 tablespoons unsalted butter, cut into small pieces
1/3 cup Lyle’s Golden Syrup or light corn syrup
2 tablespoons dark brown sugar, packed
1 teaspoon pure vanilla extract
8 ounces bittersweet chocolate, chopped

Place racks in the top and bottom thirds of the oven. Preheat oven to 350F. Line two rimmed baking sheets with parchment or silicone baking mats. Set aside.

Place pecan halves in the bowl of a food processor. Pulse until they become a rubble. Transfer to a bowl and stir in flour, cinnamon, nutmeg, and salt. Set aside.

Combine butter, golden syrup (or corn syrup), and dark brown sugar in a small saucepan over medium heat. Stir constantly until the mixture comes to a boil. Remove from heat and pour into the bowl with the pecan mixture. Fold together with a silicone spatula or wooden spoon.

Drop teaspoons of dough at least 3 inches apart on the prepared pans. Flatten the dough into circles. Bake 3 minutes. Rotate the pans top-to-bottom and front-to-back. Bake an additional 2-3 minutes (I do 2 1/2 minutes), until golden at the edges. Let cool on the pan five minutes before removing to a rack to cool completely. Discard and replace parchment between batches.

Once all the cookies have been baked, chop the chocolate and place it in a microwave-safe bowl. Heat in 30 second increments, stirring in between, until smooth. Let cool five minutes.

Line a surface (or two baking sheets) with parchment. Place half the cookies underside-up on the parchment. Top each with about 1/2 teaspoon of melted chocolate. Spread it into a thin layer and top with another cookie. Carefully turn sandwich cookies over. Use a fork to drizzle remaining chocolate over the tops. Let sit at room temperature for about 30 minutes, or until set.

Store in an airtight container at room temperature.

Pecan Florentines

Peppermint Mocha Buttercreams

Peppermint Mocha ButtercreamsDo you listen to the Stuff You Should Know podcast? My sister turned me onto it a few months ago and it was love at first listen. As my job is very solitary, I spend my days listening to Josh and Chuck talk about all sorts of things I have never given a passing thought. Imagine my surprise to find that yesterday’s episode was about something that I know all about: cake!

Yes, I spend many waking hours thinking about cake. Really. At any given moment, I am thinking about baking, layering, decorating, or eating cake. If you listen to the podcast (which you should!), it sounds like Josh, Chuck, and I may have that in common…the eating part anyway 😉

Peppermint Mocha ButtercreamsOne thing we definitely agree on though is that we all occasionally eat cake solely as a vehicle for frosting. For some *unknown* reason, it’s socially unacceptable to eat a bowl of frosting, so we eat cake to get our fix 😉 Until now, anyway…

Peppermint Mocha ButtercreamsEnter buttercream candies: literally frosting coated in chocolate.

Peppermint Mocha ButtercreamsFrosting. coated. in. chocolate.

Peppermint Mocha ButtercreamsFrosting for frosting’s sake.

Peppermint Mocha ButtercreamsIf you’re anything like me (or Josh and Chuck, apparently), this is basically the best news ever. These are the no-bake treat of my dreams.

Peppermint Mocha ButtercreamsYou can make buttercreams using any flavor of frosting you can imagine–if it can be whipped into buttercream frosting, it can be rolled into candy. As we’re just a few weeks out from Christmas, I’ve decided to go with Peppermint Mocha Buttercreams today 😊

The frosting base of these candies is a classic American chocolate buttercream that I’ve souped up with 1/4 teaspoon of peppermint extract and some instant espresso. It comes together in just a few minutes and is super fluffy and luxurious.

Peppermint Mocha ButtercreamsChill the peppermint mocha frosting before scooping it by the teaspoon and rolling it into balls. This is not a glamorous process, but it is helped greatly by coating your hands in confectioner’s sugar.

After another chill, it’s time for a dip in melted chocolate…

Peppermint Mocha Buttercreamsand a smattering of crushed peppermints, or perhaps some holiday sprinkles.

Peppermint Mocha ButtercreamsPeppermint Mocha ButtercreamsOne more quick chill later, the Peppermint Mocha Buttercreams are ready to eat. And oh, are they good. I mean, how could the combination of a chocolate shell and a melty espresso-mint center be anything but delicious?!

Peppermint Mocha ButtercreamsThey’re basically holiday perfection in a mouthful.

Peppermint Mocha ButtercreamsLooking for more Peppermint Mocha? Try my Peppermint Mocha Cookies ❤️💚❤️💚

Peppermint Mocha ButtercreamsPeppermint Mocha Buttercreams
inspired by and heavily adapted from Sally’s Baking Addiction
makes about 4 dozen candies

1 tablespoon instant espresso granules
2 teaspoons warm tap water
1/2 cup (1 stick) unsalted butter, softened to room temperature
1 1/4 cup confectioners sugar
6 tablespoons unsweetened cocoa powder
pinch of Kosher or sea salt
1 teaspoon pure vanilla extract
1/4 teaspoon pure peppermint extract (NOT mint extract)
2 tablespoons heavy cream
16 ounces dark chocolate (not chocolate chips)
crushed peppermints, for decorating (optional)
sprinkles, for decorating (optional)

In a small bowl, use a fork to whisk together espresso granules and warm water. Set aside.

In a large mixing bowl, use an electric mixer to beat butter until light and fluffy (about two minutes). Beat in confectioner’s sugar, followed by cocoa powder and salt, scraping down the bowl as necessary. Add in vanilla and peppermint extracts, followed by espresso mixture. Add heavy cream. Beat on high for 1-2 minutes, until very fluffy. Press plastic wrap to the surface of the frosting. Chill one hour in the refrigerator.

Line a rimmed baking sheet with parchment. Remove chilled frosting from the refrigerator and discard the plastic wrap. Scoop frosting by the teaspoon, roll into balls, and place on prepared pan. Coating your palms in confectioner’s sugar may help the rolling process. Chill rolled frosting uncovered for one hour.

Use a large, sharp chef’s knife to chop chocolate. Place in a microwave-safe bowl. Melt chocolate in 30 second increments, stirring between, until smooth. Alternatively, melt chocolate in a double boiler. Let cool five minutes.

Line a rimmed baking sheet with parchment. Remove buttercreams from the refrigerator.

To dip, drop one ball of buttercream into the melted chocolate. Use a fork to coat buttercream in chocolate. Drain briefly by scraping the tines of the fork on the edge of the bowl. Use the fork to gently lay the buttercream on the prepared pan. Immediately top with crushed peppermints or sprinkles. Continue until all buttercreams have been coated and topped.

Chill buttercreams for at least fifteen minutes before serving. Store in an airtight container in the refrigerator.

Chocolate Buttermilk Pie

Chocolate Buttermilk PieThe first time I made this Chocolate Buttermilk Pie, it cracked down the middle just minutes after it came out of the oven. I have a history of making ugly pies (my motor skills leave something to be desired), but a giant crescent-shaped crater was a little much, even for me.

Chocolate Buttermilk PieOnce that pie cooled though, I cut a sliver for myself and promptly fell in love. What’s not to love about soft, fudgy chocolate filling baked into a flaky pie crust?! Nevertheless, I couldn’t post a cracked pie on here and expect any of you to come back ever again. Lucky for you, I have plenty of pie dough in my fridge this time of year and entirely too much time on my hands 😉

Chocolate Buttermilk PieChocolate Buttermilk PieSo, how do I get my Chocolate Buttermilk Pies to stay in one piece? Well, it’s actually really easy. 

Chocolate Buttermilk PieIt all starts with room temperature ingredients. I recommend using room temperature ingredients in many of the recipes on this site, but it’s especially important in custard pies like this one. Cold ingredients just don’t incorporate and bake the way their room temperature counterparts do.

Chocolate Buttermilk PieEggs, in particular, should almost always be room temperature. They provide tons of structure in baking–in this recipe, they do nearly all the heavy lifting! I bring my eggs to room temperature by letting them sit in a bowl of hot tap water for five minutes before proceeding with the recipe.

Chocolate Buttermilk PieThe buttermilk needs to be room temperature, too. You can measure it out and let it sit on the counter for 30-60 minutes, or you can speed up the process by microwaving it in 15 second increments, stirring in between, until it no longer feels cold to the touch.

Chocolate Buttermilk PieChocolate Buttermilk PieChocolate Buttermilk PieMix your room temperature eggs and buttermilk together with some vanilla and a tiny bit of flour. Whisk that into a chocolaty combination of cocoa, sugar, butter, and salt that’s been bloomed* together on the stove.

*Note: for more on blooming, click here.

Chocolate Buttermilk PieRoll out a (chilled! Not room temperature!) pie crust and fit it in a pie plate. Crimp the edges and dock it with a fork before pouring in the filling. Bake it on the bottom rack of a 375F oven for 50 minutes, until puffed at the edges.

Turn off the oven, crack the door open, and let the pie sit for 10-15 minutes. This allows the pie to finish baking and begin cooling without any major changes in temperature. Don’t skip this step! This is the last step in insuring that your pie stays in one piece. Once time is up, let the pie cool on a rack before slicing and serving. Preferably with ice cream.

Chocolate Buttermilk PieChocolate Buttermilk PieChocolate Buttermilk PieChocolate Buttermilk PieChocolate Buttermilk PieChocolate Buttermilk PieI know Pumpkin Pie is king this time of year, but this Chocolate Buttermilk Pie just might steal the spotlight at your Thanksgiving celebration! I’ve given slices of this pie to fifteen of my friends and every last one of them wanted more. All that’s to say, you might need to make two of these.Chocolate Buttermilk Pie

Looking for more pie? Check out my Salted Butterscotch Pie, Maple Pecan Pie, and Cranberry Crumb Pie! Oh, and this Maple Pear Tart 🍁🍐💙

Chocolate Buttermilk Pie
makes one 9-inch pie 

1/2 recipe Cream Cheese Pie Dough or other good crust
10 tablespoons unsalted butter
1/3 cup cocoa powder (preferably Dutch process)
1 1/2 cups granulated sugar
1/2 teaspoon Kosher or sea salt
4 large eggs, room temperature 
1 cup buttermilk 
2 teaspoons pure vanilla extract
2 tablespoons all-purpose flour

Roll out the pie dough, and fit it in the pan. Cut it to 1/2-inch of overhang, then fold the excess under and crimp. Dock the bottom of the crust with a fork. Place the prepared crust in the refrigerator while you make the filling.

Position a rack in the bottom third of your oven. Preheat the oven to 375F.

Combine butter, cocoa powder, sugar, and salt in a small saucepan over medium heat. Once butter is melted, remove from heat–mixture will be thick and grainy. Transfer to a large mixing bowl.

In a small-medium mixing bowl, whisk eggs until frothy, about 2 minutes. Add buttermilk and vanilla, followed by flour. Add the egg mixture to the chocolate mixture in two installments, whisking until combined. 

Place prepared crust on Pour filling into prepared crust.

To make egg wash, use a fork to whisk together egg and water. Paint egg wash over any exposed crust.

Bake 45-50 minutes, or until filling is puffed at the edges. Turn off the oven and open the door slightly. Let pie sit in oven for 10-15 minutes before removing to a rack to cool completely. 

Let pie cool completely on a rack. Pie may be served warm, at room temperature, or cold. Pie will keep covered at room temperature for up to three days, or in the refrigerator for up to five days.Chocolate Buttermilk Pie

Chocolate Mousse Cake

Chocolate Mousse Cake {Grain-Free}A friend of mine ordered a Chocolate Mousse Cake a couple of weeks ago. I had never made one, but said yes and then figured it out. I occasionally like to live on the edge.

Chocolate Mousse Cake {Grain-Free}As with most baking experiments, I anticipated that it’d either be terribly difficult/never to be made again, or I’d pick up a new skill. What I didn’t expect was how easy this cake would be.

I mean really, really easy.

Like so easy, you’re going to wonder why you haven’t been making this for years.

Chocolate Mousse Cake {Grain-Free}Chocolate Mousse Cake does take time–the cake base has to cool and there’s a long chill once the mousse layer is added–but none of the steps are difficult at all. And at the end, you have this three-layered beauty of a cake that’s airy on the top, rich on the bottom, and completely loaded with chocolate flavor. Oh. My. Goodness.

Chocolate Mousse Cake {Grain-Free}The base of this cake is my grain-free version of Molly Wizenberg’s Winning Hearts & Minds Cake. This seven-ingredient, no-mixer cake is delightfully easy and so delicious, it’s stupid. I have made it so many times that I have memorized the recipe–once I make it for someone, they request it over and over. I’ve yet to find anyone who doesn’t love it! It’s really hard to improve on this chocolate cake, but piling it high with chocolate mousse is a good start 😊

Chocolate Mousse Cake {Grain-Free}Chocolate Mousse Cake {Grain-Free}And speaking of chocolate mousse, this one is super simple to make. There’s no gelatin or egg whites here–this recipe is basically just chocolate, whipped cream, and a cocoa powder slurry. Just gently fold it all together and pile into the pan with the cake. Press some plastic wrap to the top and chill it until the mousse is firm.

Chocolate Mousse Cake {Grain-Free}Chocolate Mousse Cake {Grain-Free}Chocolate Mousse Cake {Grain-Free}When the mousse is ready, run a knife around the edge of the pan and release the springform. Whip some cream, pile it onto the mousse and spread it into an even layer. Smooth the edges, scatter some chocolate curls over the top, and try not to eat the whole thing. With dense cake, fluffy chocolate mousse, and whipped cream, it’s a real concern 🤣

Chocolate Mousse Cake {Grain-Free}Y’all. Y’all! Chocolate Mousse Cake is going to be my new go-to for all occasions. The ease-to-“OMG” ratio is off the charts! This cake is just as at home at a casual fall picnic as it is at a dinner party. And since it’s gluten-free, it might be one dessert that everyone at your Thanksgiving table can agree on.

Chocolate Mousse Cake {Grain-Free}Chocolate Mousse Cake: it brings people together.Chocolate Mousse Cake {Grain-Free}

Chocolate Mousse Cake {Grain-Free}
mousse adapted from Brown Eyed Baker
makes one 9-inch round cake

Cake:
7 ounces bittersweet chocolate, chopped
7 ounces unsalted European-style butter, cut into small pieces
1 1/3 cups granulated sugar
5 large eggs, room temperature
1/2 teaspoon pure vanilla extract
1 tablespoon cocoa powder (natural or Dutch process)
1/2 teaspoon Kosher or sea salt

Mousse:
7 ounces bittersweet chocolate, chopped
2 tablespoons cocoa powder (natural or Dutch process)
3 tablespoons hot tap water
1 1/2 cups heavy cream, cold
1 teaspoon pure vanilla extract
1 1/2 tablespoons confectioner’s sugar
pinch of Kosher or sea salt

Whipped Cream & Garnish:
1 1/2 cups heavy cream, cold
2 tablespoons confectioner’s sugar
chocolate curls, for garnish (optional)

READ THE ENTIRE RECIPE BEFORE PROCEEDING.

Preheat oven to 375F. Grease a 9-inch springform pan with butter. Line the bottom with parchment and grease again. Set aside.

In a double boiler or the microwave, melt dark chocolate and butter together, stirring occasionally, until smooth. Whisk in sugar. Allow to cool slightly.

Whisk in one egg at a time, combining completely after each addition. Stir in vanilla. Whisk in cocoa powder and salt, scraping down the bowl as necessary. Pour batter into prepared pan. Bake for 20-25 minutes, until the center jiggles just slightly when the pan is jostled. Let cool completely in the pan on a rack, about 90 minutes to 2 hours. Do not remove the springform. Cake may be made up to a day in advance.

Make the mousse. In a double boiler or the microwave, melt dark chocolate, stirring occasionally, until smooth. Let cool to room temperature.

In a small bowl, whisk together cocoa powder and hot tap water.

In a large mixing bowl, combine heavy cream, vanilla, confectioner’s sugar, and salt. Use an electric mixer to whip the mixture on low for 30 seconds before whipping on high for 1-2 minutes, or until stiff peaks form.

Transfer melted chocolate to a medium-large mixing bowl. Use a silicone spatula or wooden spoon to stir the cocoa powder mixture and 1/3 of the whipped cream into the chocolate. Gently fold the remaining whipped cream into the chocolate until no white streaks remain.

Pile the mousse on top of the cooled cake (still in the pan). Spread it into an even layer and tap the pan on the counter a few times to release any large air bubbles. Stick a layer of plastic wrap to the surface of the mousse. Refrigerate for at least 3 hours or overnight.

Remove cake from the refrigerator and let sit at room temperature for 30 minutes. Remove plastic wrap. Run a thin, flexible knife dipped in warm water around the edge of the pan before removing the springform.

Make the whipped cream. Combine heavy cream and confectioner’s sugar in a large mixing bowl. Use an electric mixer to whip the mixture on low for 30 seconds before whipping on high for 1-2 minutes, or until stiff peaks form.

Pile whipped cream onto the cake before spreading it into an even layer. Use a knife dipped in warm water to smooth the outer edge of the cake. Garnish with chocolate curls, if desired.

Serve cake immediately or refrigerate. For clean slices, dip the knife in warm water and wipe dry between cuts.

Chocolate Mousse Cake

Pumpkin Chocolate Chunk Cookies {Vegan}

Before I get to the recipe, I just want to say thank you for the overwhelming response to On Self-Care & Food Blogging. I’m so fortunate to have such thoughtful and supportive readers.

Pumpkin Chocolate Chunk Cookies {Vegan}While reorganizing my Recipe Index last week, I was astonished at the lack of vegan pumpkin recipes in my repertoire. Besides being a delicious vehicle for warm autumnal spices, pumpkin is an excellent egg replacer–something about the water content and fibrous innards, I suppose. All I know is that if you use 1/4 cup of the stuff in place of each large egg in a cookie recipe (and add a little pumpkin pie spice), you’ll likely escape the cakey cookie problem that plagues so many home bakers this time of year. And if you substitute melted coconut oil for the usual butter…well, you might suddenly have a lot of vegan friends asking about Pumpkin Chocolate Chunk Cookies. Not that I’d know anything about that 😊

Pumpkin Chocolate Chunk Cookies {Vegan}Pumpkin Chocolate Chunk Cookies {Vegan} come together easily–no need for a mixer. Just whisk together some melted coconut oil, light brown sugar, granulated sugar and vanilla, before folding in a mixture of flour, pumpkin pie spice, baking soda, and salt.

Pumpkin Chocolate Chunk Cookies {Vegan}At this point, you could add anything you like to the dough–dried fruit, nuts, candy, you name it. I’m usually all for that sort of thing, but sometimes simple is best. Pumpkin and chocolate are wonderful together; I made that pairing into some killer blondies a couple of weeks ago and I’m bringing back again today. I mean, why mess with perfection? Vegans like pumpkin and chocolate too.

Pumpkin Chocolate Chunk Cookies {Vegan}Chill the dough for a couple of hours before rolling it into balls and baking at 350F for about ten minutes. They won’t spread much, remaining tall and puffy after they come out of the oven. Let them cool on a rack for a few minutes before enjoying.

Pumpkin Chocolate Chunk Cookies {Vegan}Pumpkin Chocolate Chunk Cookies {Vegan}I am crazy about these cookies, y’all. They have chewy edges and soft centers, and the chocolate somehow stays a little melty long after it has reached room temperature. For those of you concerned about these cookies having a coconut flavor from the coconut oil, know that it’s very mild, especially if you use the refined stuff. As with most pumpkin baked goods, the autumnal flavor of these cookies intensifies the day after they’re made, easily masking any tropical undertones and making this a quality make-ahead recipe.

Pumpkin Chocolate Chunk Cookies {Vegan}A pumpkin recipe that’s packed with chocolate, vegan, and is best if made ahead?! I’d be running to the kitchen right now if I were you.Pumpkin Chocolate Chunk Cookies {Vegan}

Pumpkin Chocolate Chunk Cookies {Vegan}
makes about 22 medium cookies

3 cups all-purpose flour
2 1/2 teaspoons Pumpkin Pie Spice
1/2 teaspoon ground cinnamon
1 teaspoon baking soda
1/2 teaspoon Kosher or sea salt
1 cup coconut oil, melted (use refined for a milder flavor)
3/4 cup light brown sugar, packed
1/2 cup granulated sugar 
1/2 cup pure pumpkin purée
1 teaspoon pure vanilla extract
6 oz dark chocolate, chopped

In a large mixing bowl, whisk together flour, pumpkin pie spice, cinnamon, baking soda, and salt. Set aside.

In a separate mixing bowl, whisk together coconut oil, light brown sugar, and granulated sugar. Mix in pumpkin purée and vanilla. Use a silicone spatula (or wooden spoon) to fold dry ingredients into wet. Fold in chopped dark chocolate. Cover dough with plastic wrap and refrigerate at least two hours or up to three days.

Preheat oven to 350F. Line two baking sheets with parchment. Scoop dough in two tablespoon increments. Roll into balls and place them at least 2.5 inches apart on prepared pans. Bake 5 minutes before rotating the pans top to bottom and baking an additional 4-5 minutes. Let cookies cool on pans for five minutes before removing to a rack to cool completely. Repeat baking process with any remaining dough.

Cookies will keep in an airtight container at room temperature for up to a week. Pumpkin flavor will intensify as the days go on.

Pumpkin Chocolate Chunk Cookies {Vegan}