Category Archives: berry

No-Bake Strawberry Cream Pie

No-Bake Strawberry Cream Pie​

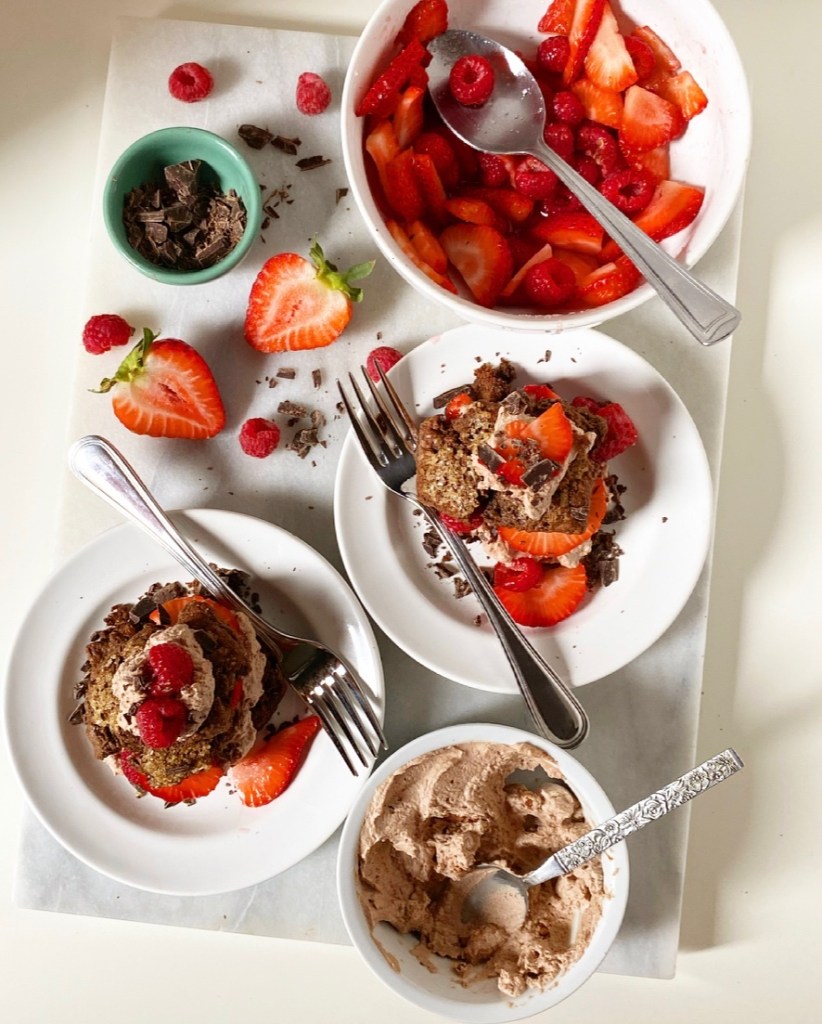
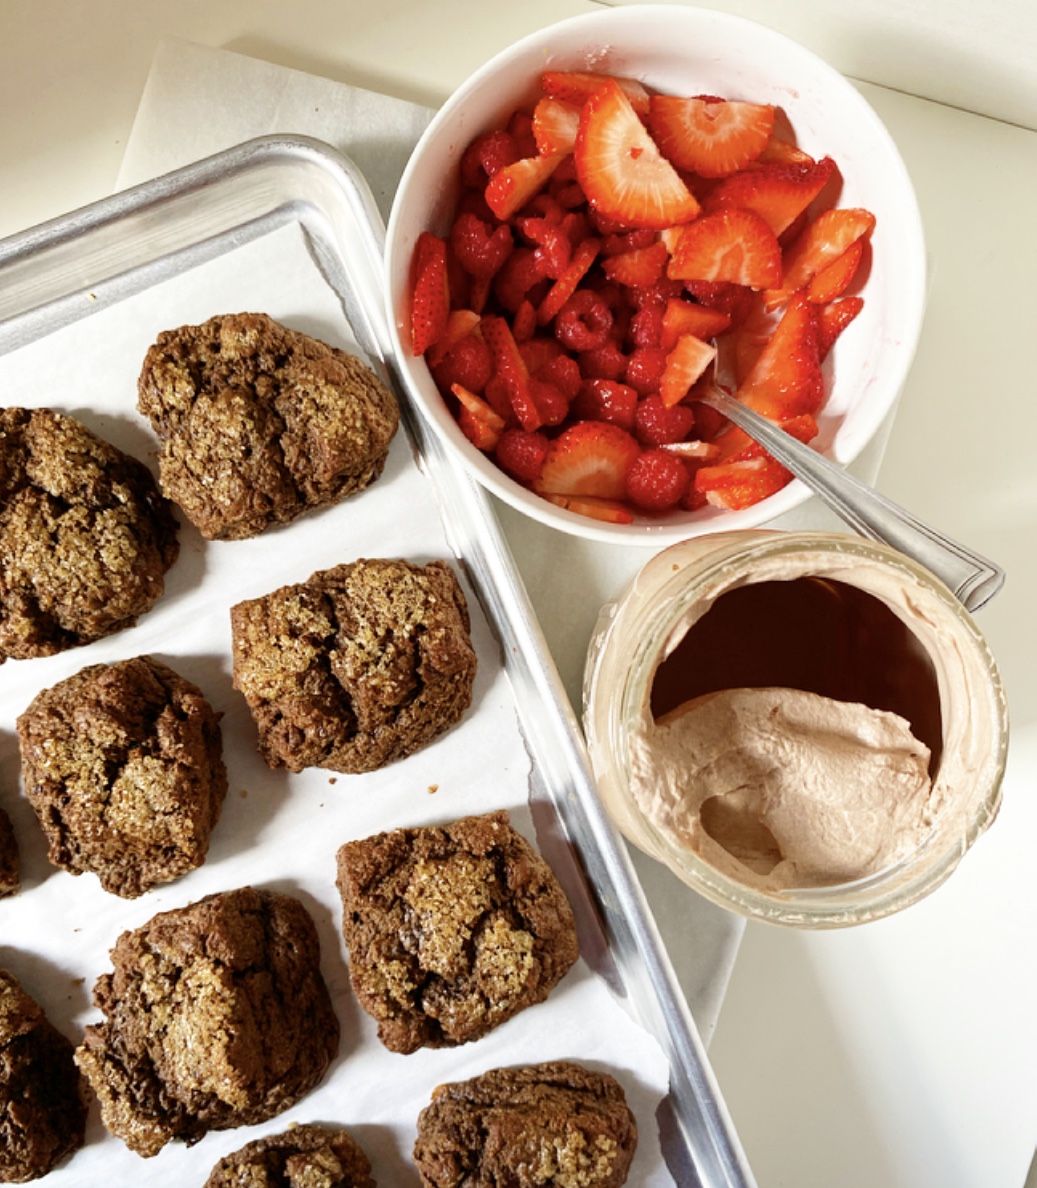
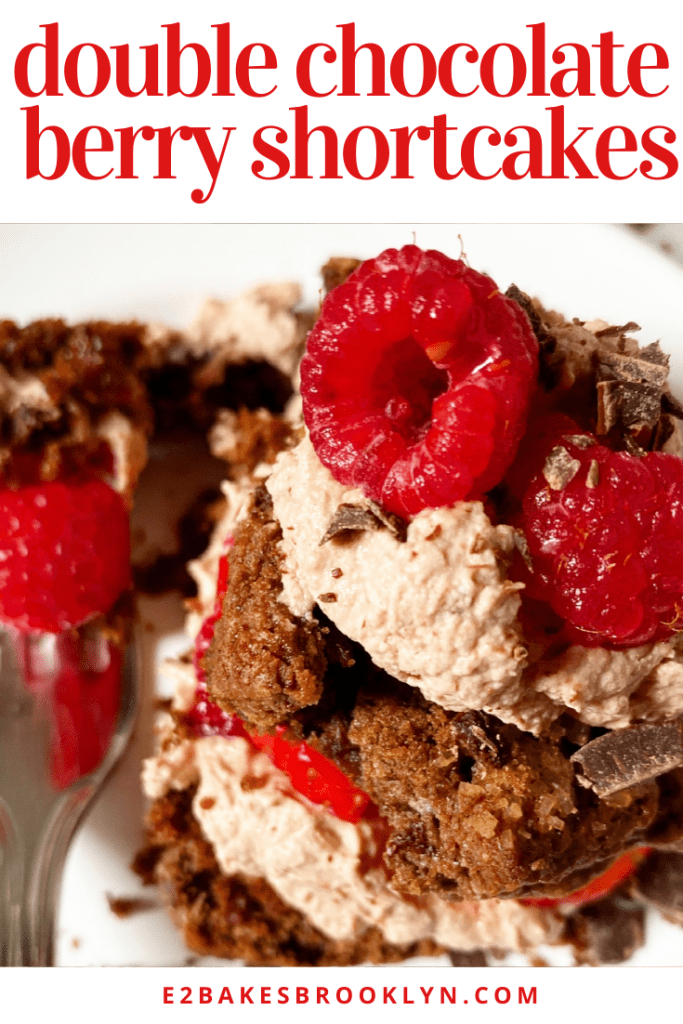
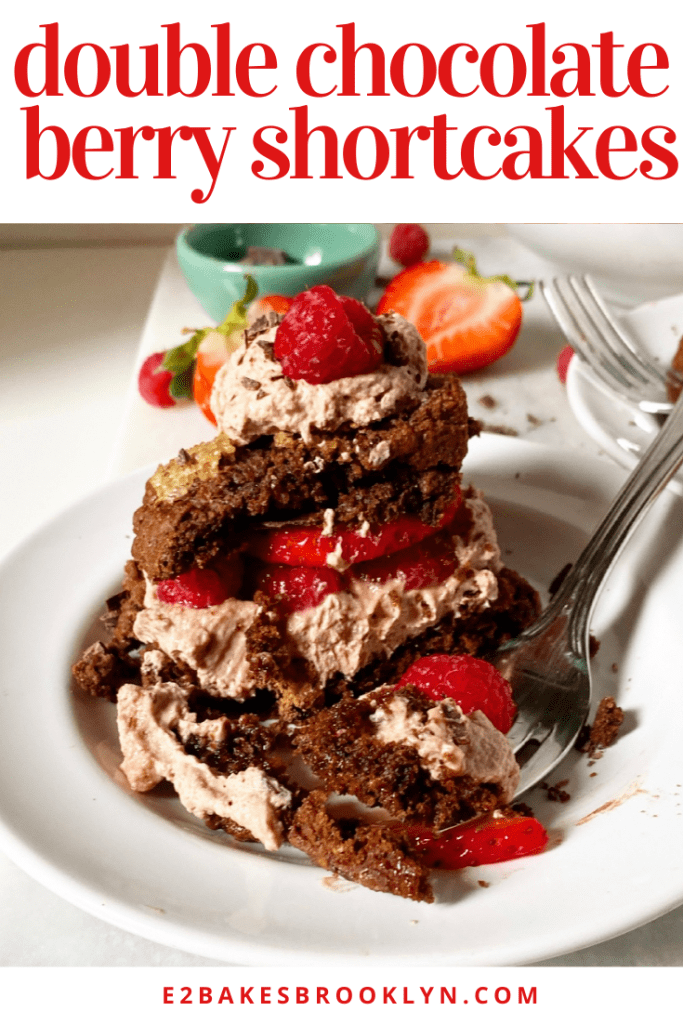
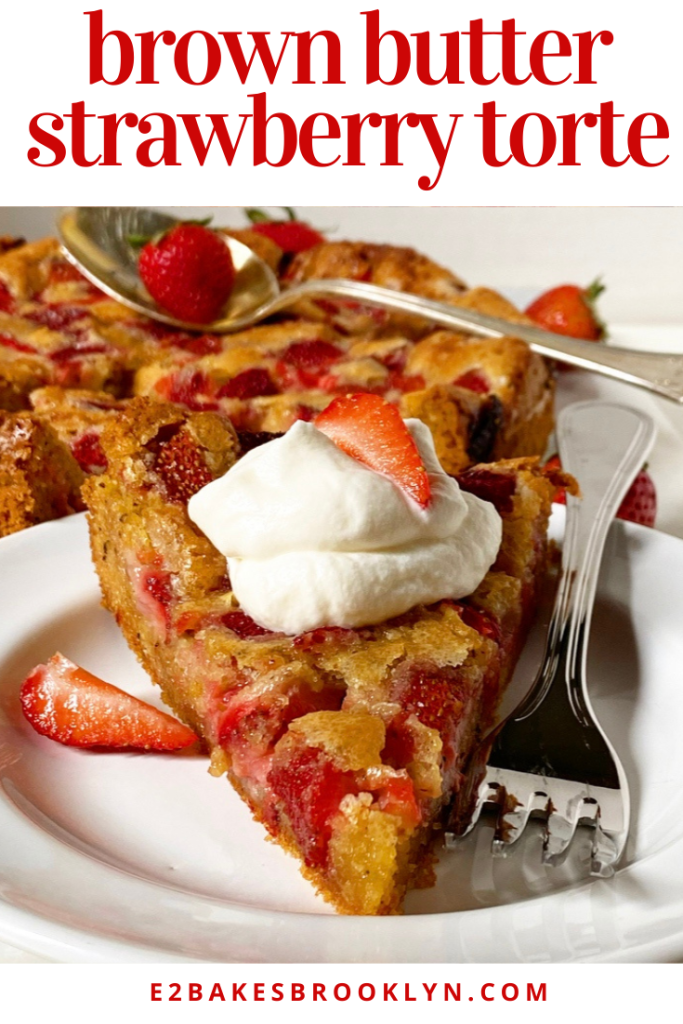
If you can’t tell, I am all about baking with berries right now. Or no-baking with them, in this case.

That’s right! This lush pink strawberry pie is a completely oven-free operation. It’s cold and creamy with huge strawberry flavor, and just enough chocolate to please anyone who says they don’t like fruit desserts. This is a recipe you’ll be delighted to have in the warmer months. Anything to keep the oven off, right?

No-Bake Strawberry Cream Pie​

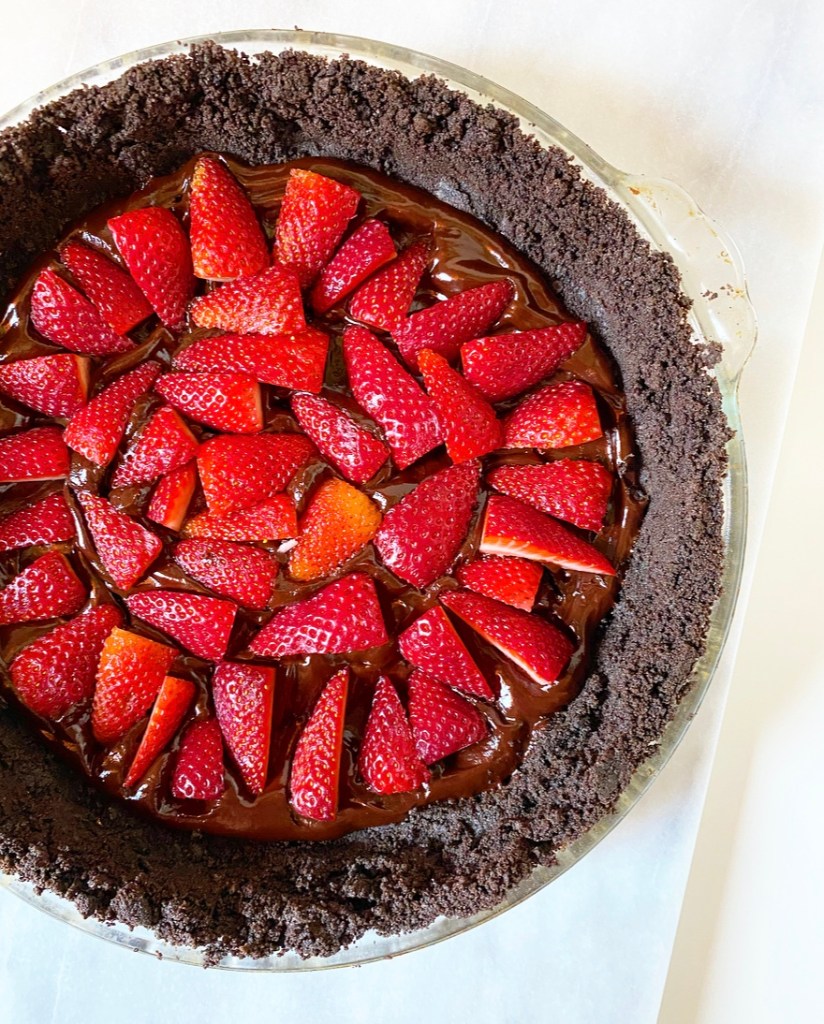
No-Bake Strawberry Cream Pie starts with an Oreo crumb crust filled with dark chocolate ganache AKA a “black bottom.” Fresh strawberries are pressed into the chocolate for flavor an texture, though you can skip this particular adornment if you need to make the pie more than a day in advance.

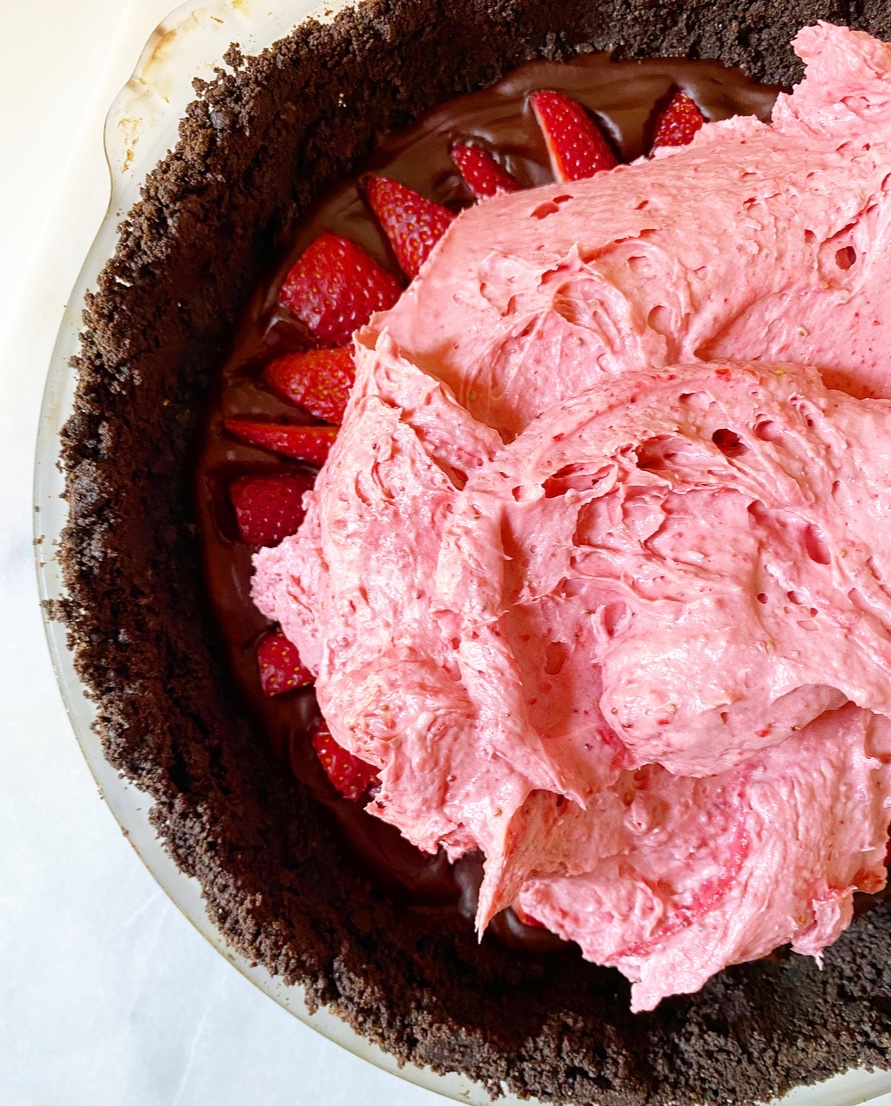
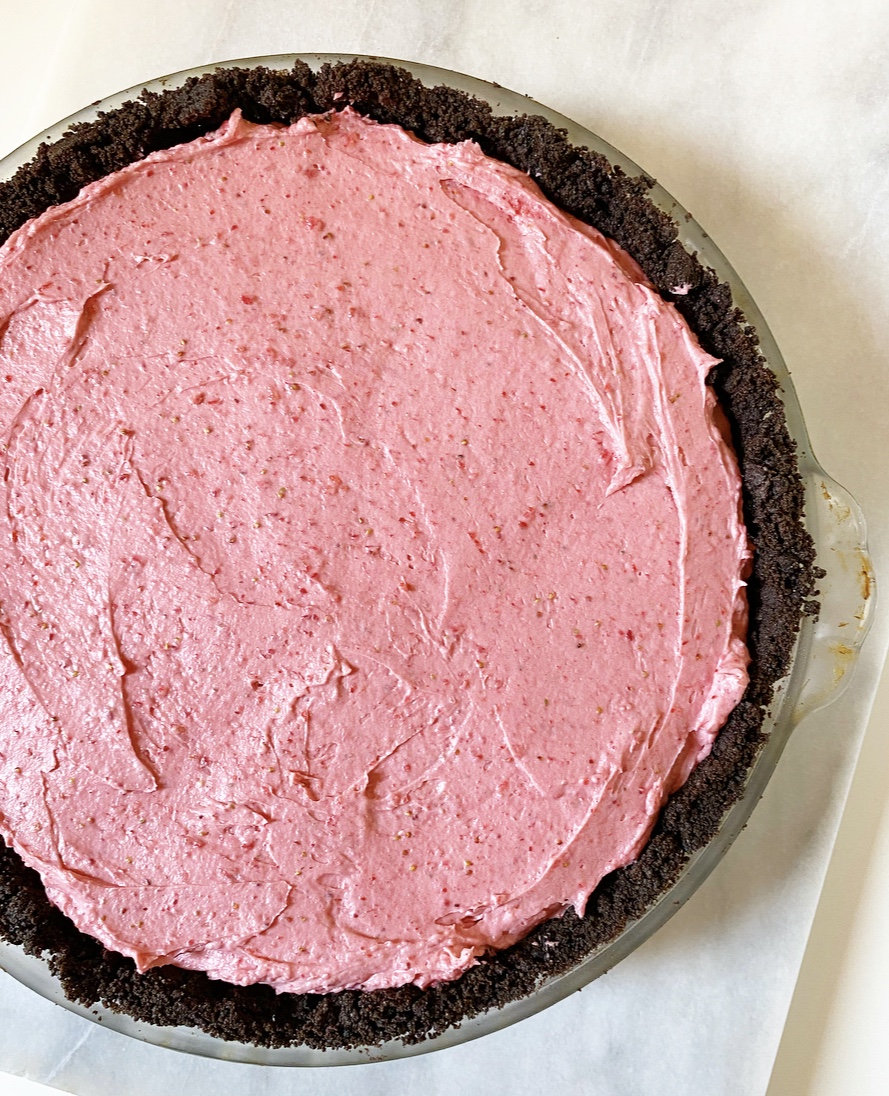
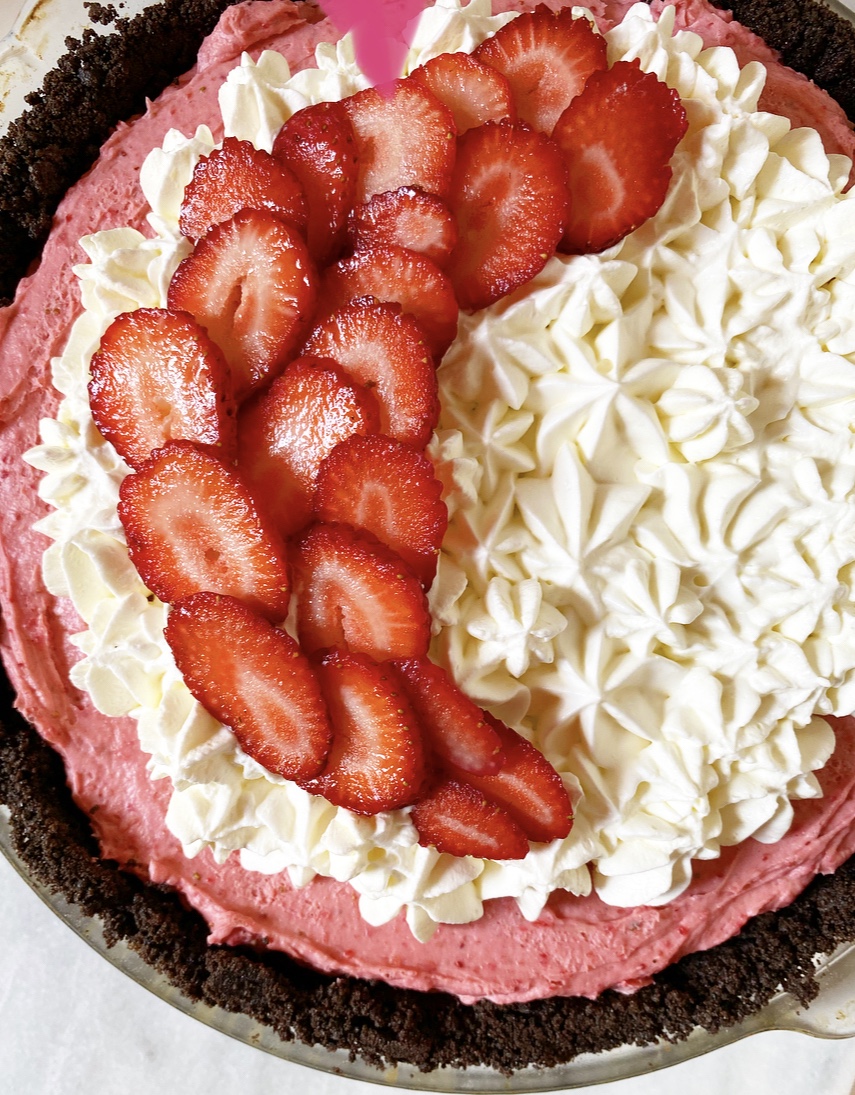
Next up is the titular strawberry cream. I’m sure there are plenty of ways to do this by reducing fresh strawberries, but I took the easy way out and opted for freeze-dried. They’re my go-to for strawberry-flavored desserts; they’re always excellent quality, and I love that they can be crushed and added to anything for a hefty hit of fresh berry flavor. Here, they’re pulverized and mixed with cream cheese, confectioner’s sugar and vanilla before being lightened with fresh whipped cream. In addition to providing the flavor in the filling, the freeze-dried berries also give our pie the most vibrant pink color! I just love it.

No-Bake Strawberry Cream Pie​

As with many no-bake pies, this one needs a chill to set up properly. I prefer to plan ahead and chill overnight, but you can get away with three hours if you’re in a bind. Once the chill time is up, spoon or pipe whipped cream over the top and finish with fresh strawberries. ‘Tis the season after all.

No-Bake Strawberry Cream Pie​
No-Bake Strawberry Cream Pie
makes one 9-inch pie

Oreo Crust:
24 Oreos
5 tablespoons unsalted butter

Ganache Layer:
4 ounces dark chocolate, chopped
1/4 cup heavy cream
~8 ounces (1/2 box) fresh strawberries, trimmed & quartered

Filling:
2 1.2 ounce packages freeze dried strawberries
1 1/3 cup heavy cream, very cold
8 ounces (1 brick) full-fat brick-style cream cheese, room temperature
1 1/2 cups confectioner’s sugar
pinch of Kosher or sea salt
2 teaspoons pure vanilla extract

Topping:
3/4 cup heavy cream, very cold
2-3 tablespoons confectioner’s sugar
1 teaspoon pure vanilla extract
5-6 fresh strawberries, thinly sliced

Place Oreos in the bowl of a food processor and blitz until they are crumbs. Add melted butter and pulse until the mixture can be pinched together. Press it into the bottom and up the sides of the pie plate. Refrigerate for 15 minutes to set.

Make the ganache. Combine chopped chocolate and heavy cream in a small microwave-safe bowl. Heat in 15 second increments, stirring in between, until a smooth even ganache forms (about 45 seconds total). Pour it into the crust and use the back of a spoon to carefully spread it into an even layer on the bottom. Top with quartered fresh strawberries. Refrigerate crust and ganache while you prepare the filling. If making the pie more than a day in advance, skip adding the fresh strawberries. They may lose their freshness over a long period.

Place freeze dried strawberries in a food processor and process until they are powder, about 30 seconds. Set aside.

In a large mixing bowl, use an electric mixer to whip heavy cream until stiff peaks form. Do not overwhip. Set aside.

In a separate large mixing bowl, use an electric mixer to beat strawberry powder, cream cheese, and confectioner’s sugar until combined and fluffy. Use a silicone spatula or wooden spoon to stir in 1/3 of the whipped cream. Working in 2 installments, carefully fold in remaining whipped cream until combined. Transfer to chilled pie crust and use a silicone spatula to spread to the edges. Press plastic wrap to the top. Chill for 3 hours or overnight.

Make whipped cream topping. In a medium-large mixing bowl, combine heavy cream, sugar, and vanilla. Use an electric mixer to whip cream until stiff peaks form. If you want to pipe, load it into a piping bag fitted with a star tip. Remove pie from the refrigerator and discard plastic wrap. Spoon or pie whipped cream over the top. Finish with sliced fresh strawberries.

Slice and serve. Leftover pie will keep covered in the refrigerator for a couple of days.
No-Bake Strawberry Cream Pie​

Double Chocolate Berry Shortcakes

Double Chocolate Berry Shortcakes​

I’m generally not a fruit and chocolate gal, but I’ll make an exception for these Double Chocolate Berry Shortcakes. Made with dark chocolate biscuits, chocolate whipped cream and fresh berries, this spin on the classic dessert has “delicious” written all over it!

Getting deep chocolate flavor into these biscuits was more challenging than just adding some cocoa powder. My starting point was my five ingredient cream biscuit base, but you’ll see that I deviated pretty significantly. I added cocoa, of course, but also chopped dark chocolate, granulated espresso and brown sugar for a good bittersweet flavor. Butter and heavy cream provide just enough moisture to bind the dough. Baking powder and baking soda leaven everything and produce good crackly tops, which are made all the better with crunchy coarse sugar.

I would normally encourage you to bake your biscuits close together so that they rise up instead of out, but I prefer to bake them separately here. Because cocoa powder doesn’t play by the rules of gluten, these will expand pretty dramatically. The results have distinct, crisp exteriors and tender interiors, perfect for splitting and layering with berries and cream. I tested this recipe seventeen times, and while these are not the tallest chocolate biscuits I made, they are by far the most delicious. I don’t know about your kitchen, but in mine, delicious beats aesthetic perfection every time. Craggy tops and soft centers for the win!

Double Chocolate Berry Shortcakes​

As far as assembly goes, this is a pretty run-of-the-mill shortcake operation. I like to use a fork to gently split the cooled biscuits into two thin layers, then sandwich them with chocolate whipped cream, berries and chopped dark chocolate. I add an extra flourish on top because I think it’s pretty, but feel free to leave your shortcakes unadorned if that’s more your style.

Double Chocolate Berry Shortcakes​

You’ll notice that I didn’t specify any particular berry for these shortcakes. Why limit yourself, you know? I used a mix of strawberries and raspberries because that’s what sounded good at the time. Feel free to use any berry (or other fruit) you like. We’re already twisting a classic—might as well do away with all the rules.

Double Chocolate Berry Shortcakes​
Double Chocolate Berry Shortcakes
makes about 12 shortcakes

1 3/4 cup + 2 tablespoons all-purpose flour
6 tablespoons natural unsweetened cocoa powder
1 1/2 teaspoons granulated espresso (optional)
6 tablespoons light or dark brown sugar, packed
2 1/4 teaspoon baking powder
3/4 teaspoon baking soda
3/4 teaspoon Kosher or sea salt
6 tablespoons unsalted butter, very cold
2.5 ounces dark chocolate, finely chopped
1 cup + 2 tablespoons heavy cream + more for brushing, very cold
1 tablespoon coarse sugar

Berries:
20-24 ounces fresh berries (about 4-5 cups)
1/4 cup granulated sugar

For assembly:
Chocolate Whipped Cream (recipe below)
2 ounces dark chocolate, finely chopped

Preheat oven to 425F. Line a rimmed baking sheet with parchment.

In a medium mixing bowl, stir together flour, cocoa powder, espresso granules, brown sugar, baking powder, baking soda and salt. Using your fingertips (not your palms!) or a pastry blender, cut cold butter into flour mixture until it is roughly the size of peas. Stir in chopped dark chocolate.

Pour in heavy cream. Stir with a rubber spatula or wooden spoon until a shaggy dough forms. You may need to knead it in the bowl a couple of times. If it seems too dry (“dusty”), add more cream by the tablespoon.

Turn dough out onto a floured (or cocoa powdered) surface. Give it 1-2 kneads before patting into a 1-inch thick rectangle. Flour a large, sharp chef’s knife before slicing the rectangle into 12 biscuits. Be sure to slice directly down—do not saw.

Evenly space biscuits on prepared pan, leaving 2.5 inches between each. Brush the tops with more heavy cream and sprinkle each with coarse sugar. Bake for 14-15 minutes, or tops are craggy and they have spread somewhat dramatically. Let biscuits cool completely the pan.

While the biscuits are cooling, fold berries and sugar together in a medium mixing bowl. Cover the bowl with plastic wrap and let sit (macerate) at room temperature for up to an hour.

When the biscuits are cool and the berries are ready, make the chocolate whipped cream (recipe below).

Assemble shortcakes. Use a fork to gently split biscuits in half equatorial (it’s okay if they’re not perfect). Gently move the bottom half of a biscuit to a plate. Top with chocolate whipped cream and berries. Place the top half of the biscuit over the top. Garnish with more chocolate whipped cream and berries, if desired. Serve immediately.

Leftovers are best eaten within a day or so.

Chocolate Whipped Cream
makes ~1 1/2 cups (enough for 6-8 desserts)

2 cups heavy cream, very cold
4 tablespoons natural unsweetened cocoa powder
4 tablespoons confectioner’s sugar, depending on preference

In a medium-large mixing bowl, combine heavy cream, cocoa powder and confectioner’s sugar. Use an electric mixer to whip cream until stiff peaks form. Do not over whip (but if you do, just add a little more cream).

Load whipped cream into a piping bag fitted with a tip or scoop with a spoon and use as desired.
Double Chocolate Berry Shortcakes​

Brown Butter Strawberry Torte

Brown Butter Strawberry Torte

I firmly believe that you can never, ever have too many everyday cake recipes. Ever. And even if you can, you should add this Brown Butter Strawberry Torte to the list anyway.

Brown Butter Strawberry Torte

This is one hell of a cake, y’all. Rich brown butter batter is topped with tons of quartered fresh strawberries, then baked until golden and studded with little jammy berry pockets. Jammy berry pockets!!!

Brown Butter Strawberry Torte comes together with minimal effort. That’s the appeal of everyday cakes, after all: you can make them without thinking too hard or dirtying too many dishes, and then you have cake on a Tuesday or a Saturday or a Thursday or whatever. They’re great for eating in your pajamas or serving to company—a utility dessert if you will.

The most taxing part of this recipe is browning the butter, which requires five whole minutes of staring at a pan and occasionally swirling it until the butter is dark and nutty and wonderful. After that, it’s just whisking up batter, pressing in sliced strawberries and throwing it in the oven for an hour. In that time, the fruit softens and buckles into the batter, resulting in a rustic craggy little cake. I know I’m biased, but I think it’s really beautiful.

Brown Butter Strawberry Torte

I think this goes without saying, but you can use any fruit you like in this cake with excellent results. I chose strawberries because they’re right on the verge of being in season, but blueberries, blackberries, mango, pineapple or any other fruit that goes with brown butter would all be good variations.

Pro tip: pretty much everything goes with brown butter.

Brown Butter Strawberry Torte
makes one 9-inch torte

1/2 cup (1 stick) unsalted butter, cut into pieces
2/3 cup granulated sugar + 1 tablespoon, for sprinkling
1/3 cup light brown sugar, packed
2 large eggs, room temperature
2 teaspoons pure vanilla extract
1 cup all-purpose flour
1 teaspoon baking powder
1/4 teaspoon Kosher or sea salt
12 ounces fresh strawberries, hulled & quartered (about 3/4 of a 16 oz box)

For serving (optional):
whipped cream
fresh strawberries, quartered

Preheat oven to 350F. Grease a 9-inch springform pan. Line the bottom with parchment and grease again. Set aside.

Brown the butter. Place butter in a light-colored saucepan over medium heat. Let butter melt. Butter will bubble and crackle as the water content evaporates. Swirl the pan frequently for 5-7 minutes, keeping an eye on the color. When the solids are turning brown and the butter is nutty and fragrant, remove the pot from the heat and immediately pour the brown butter into a large mixing bowl and let cool 5 minutes.

Meanwhile, In a small-medium bowl, whisk together flour, baking powder, and salt. Set aside.

Returning to the large mixing bowl, whisk granulated and brown sugars into the brown butter. Mix in eggs one at a time, followed by vanilla. Add dry ingredients and whisk until combined.

Transfer batter into the prepared pan, then use a silicone spatula or wooden spoon to smooth it to the edges. Scatter strawberries over the top and lightly press them into the batter. Sprinkle the additional tablespoon of granulated sugar over the top. Bake 60-65 minutes, or until a toothpick inserted near the center comes out with only a few moist crumbs (not batter). Let cake cool in the pan on a rack for 15 minutes before running a small, thin knife around the edge and releasing the springform.

Serve warm or room temperature with whipped cream and/or fresh strawberries, if desired. Leftovers will keep covered in the refrigerator for a few days.
Brown Butter Strawberry Torte

Friday Favorites: Everyday Cakes {Spring Edition}

Friday Favorites: Everyday Cakes {Spring Edition}Everyday Cakes are probably my favorite desserts to make and eat. I’m sure I’ve said that about at least one other category of dessert, but I promise it’s true.

Like their name implies, these are cakes that can be made any ol’ day with limited fuss. Theyre single layer, have short ingredient lists and can almost always be adapted to work with whatever you have on hand. They’re the sort of thing you can bake on the fly when you need to let out some stress after work, or want to make a cake on a Saturday afternoon but don’t want to deal with frosting and layering. Even better, they’re the kind of super-classy-but-still-low-maintenance dinner party dessert that will make you look like Ina Garten (hydrangeas optional, but recommended). Their versatility simply cannot be matched.

It will come as no surprise that I have tons of Everyday Cakes in my archives—too many for one post—so this is my spring Everyday Cake round-up. Five cakes that are far more than the sum of their parts. Try out one or two before summer’s here and it’s too hot to bake!Friday Favorites: Everyday Cakes {Spring Edition}Boterkoek {Dutch Butter Cake}

My friend, David, introduced me to this Dutch dessert a few years ago and it’s quickly become one of my favorite cakes of all time. With plenty of butter, bits of ginger strewn throughout and a signature golden lid, it might just become your favorite too!

Ginger not your thing? Feel free to leave it out, or make my almond variation.Friday Favorites: Everyday Cakes {Spring Edition}Flourless Almond Cake

The nectarines in this picture won’t be in season for a few more months, but don’t let that stop you from making this dreamy Flourless Almond Cake! It’s perfect for eating with your fingers as a mid-afternoon snack, but it can also be dressed up with berries or chocolate or whatever for post-vaccine get-togethers.Friday Favorites: Everyday Cakes {Spring Edition}Blueberry Torte

A torte is just a low maintenance cake by another name. This one is super easy to make, tender and buttery and chockablock with fresh blueberries.Friday Favorites: Everyday Cakes {Spring Edition}Mango Upside-Down Cake

Pineapple is the reigning queen of upside-down cakes, but I’d like to make a petition for this mango number to be a princess or a duchess or something. The combination of brown sugar cake and fresh mango baked in caramel is absolutely divine.Friday Favorites: Everyday Cakes {Spring Edition}Winning Hearts & Minds Cake

Everyone needs a good flourless chocolate cake recipe in their back pocket. This one is the slightest take on Molly Wizenberg-Choi’s gem of a recipe. I’ve made it approximately a thousand times—I’ve got the recipe memorized—and am still not over the crackly top and dense chocolaty middle. Consider my heart and mind won.

Have you made these or any of my other everyday cakes? Let me know in the comments or on social media!

Black & Blueberry Galette

Black & Blueberry Galette
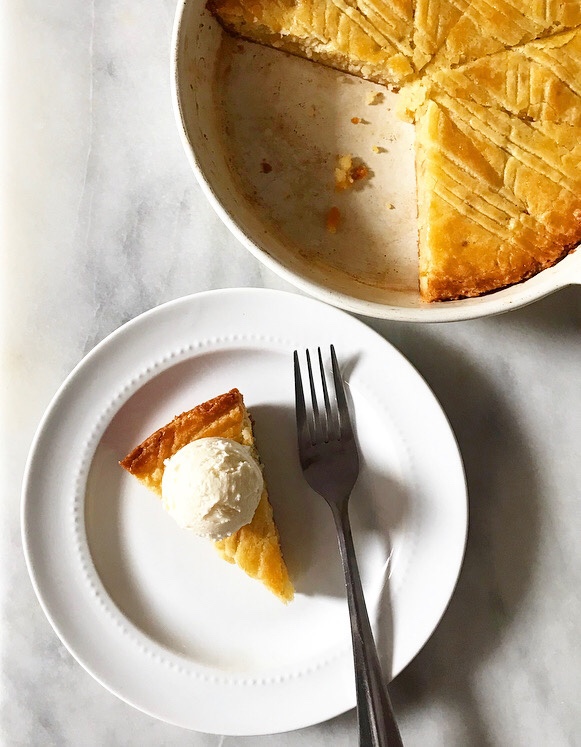
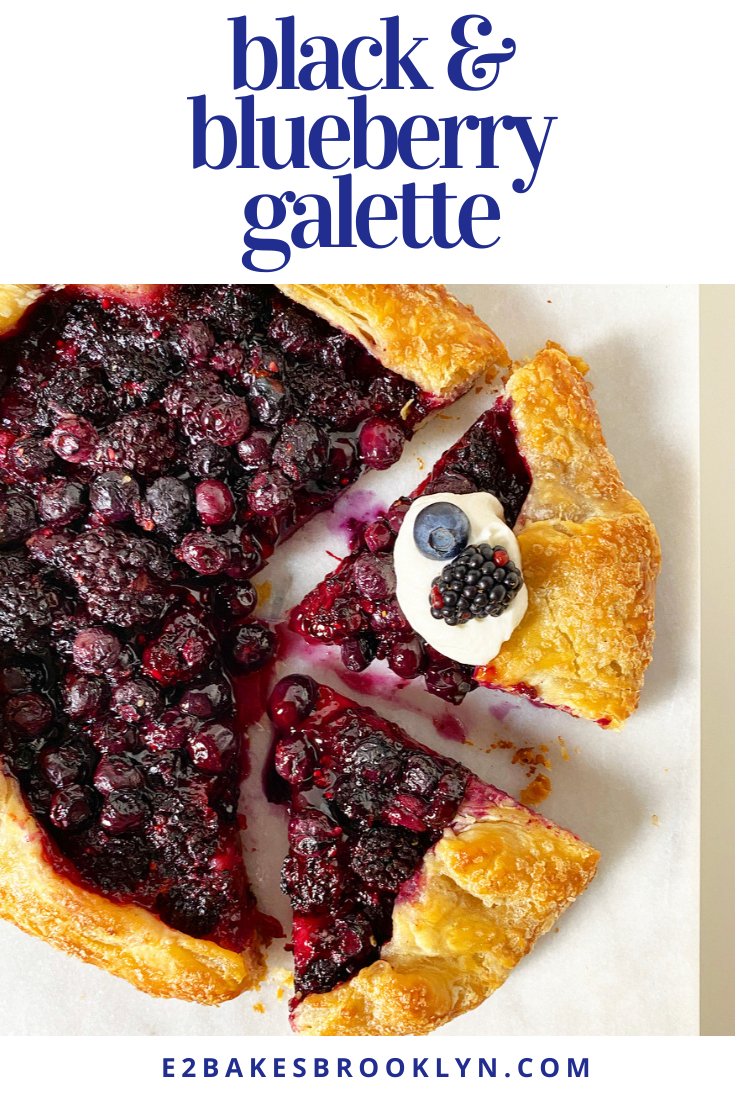
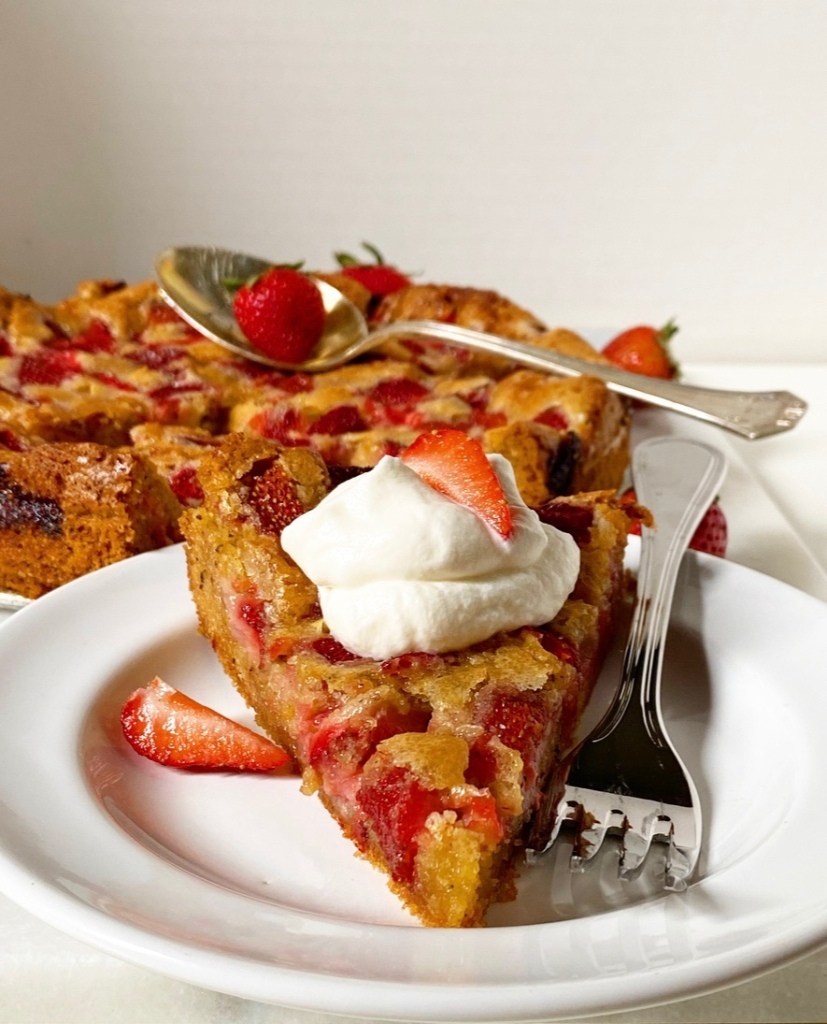
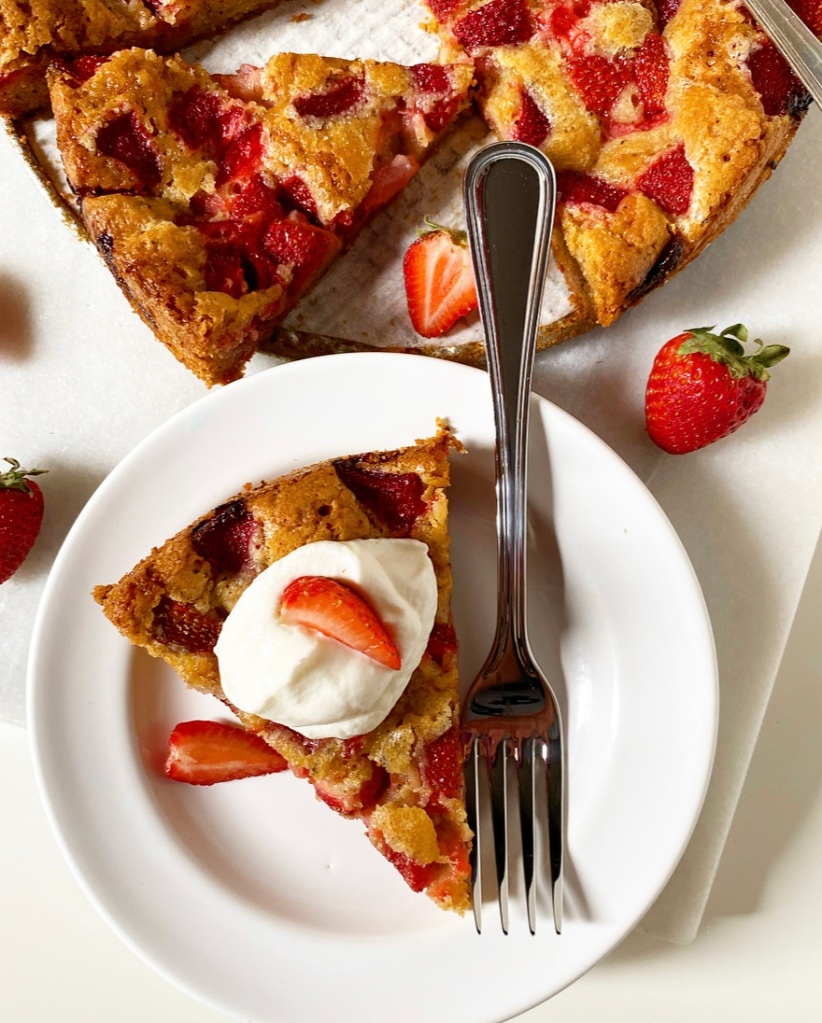
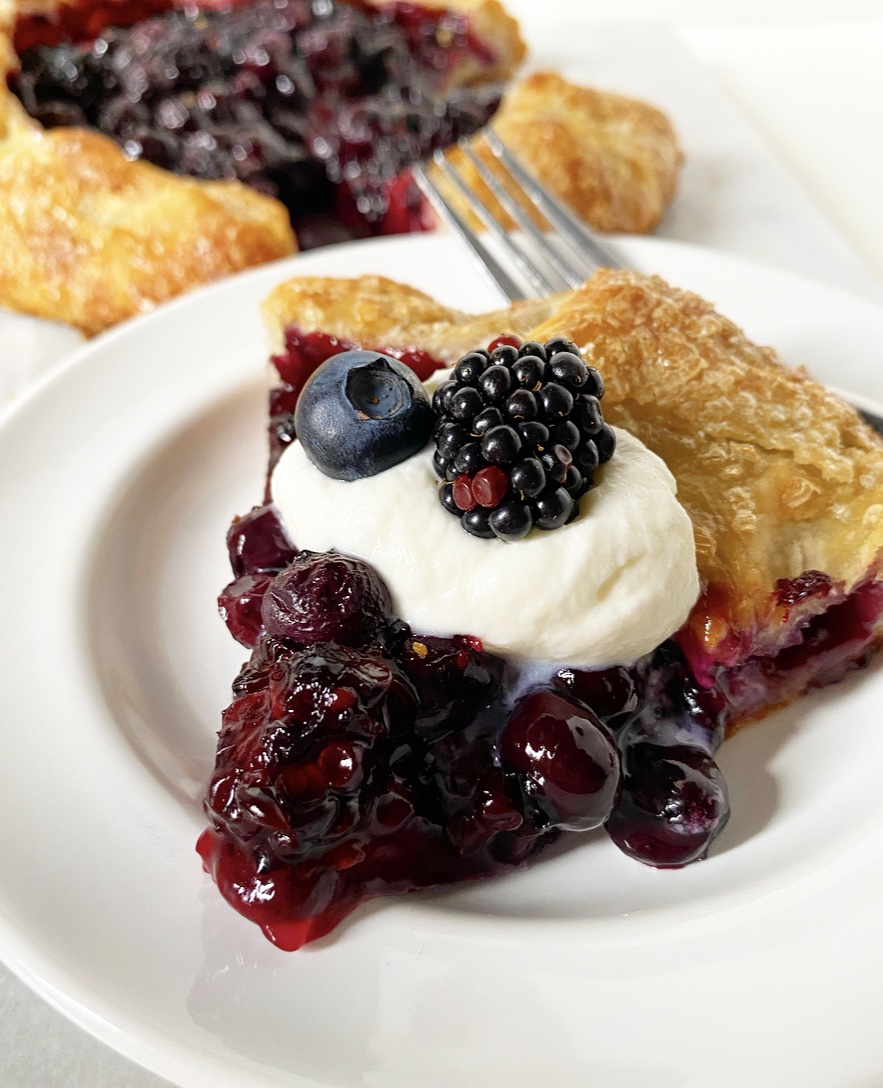
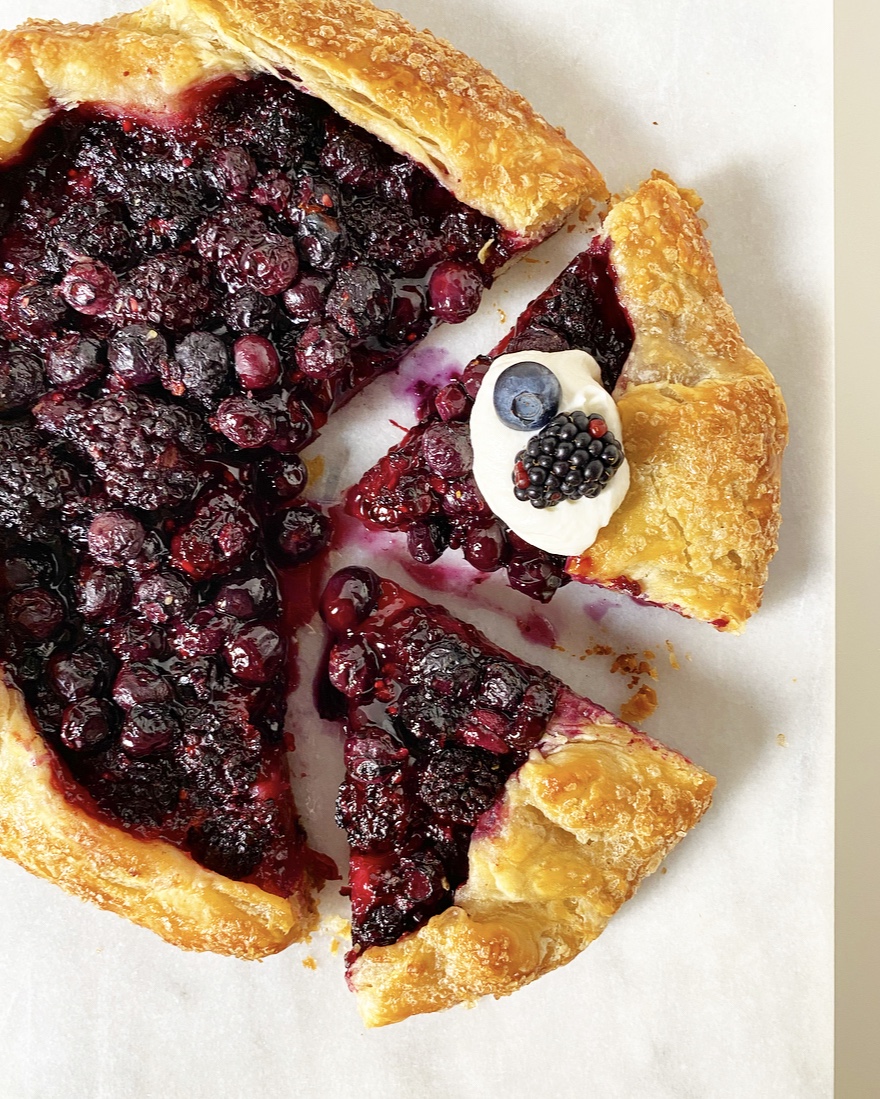
While there is a time and place for a traditional crimped and latticed pie, my kitchen in the middle of a heatwave is not it. That said, there are a ton of berries at the markets right now, and it would be a real shame to miss tucking them all into a flaky shell, now wouldn’t it?Black & Blueberry GaletteBlack & Blueberry GaletteGalettes to the rescue! They’re pie’s no-nonsense, rustic sisters–we’re talking all the flavor and beauty of pie with less than half the work. You don’t even need a pie plate! Simply roll out some pie dough, mound a fruit filling in the middle, fold up the edges and bake ‘til golden and bubbly. Boom, done, galette.Black & Blueberry GaletteI used my All-Butter Pie Dough for this glossy beauty, but I know pie dough scares the bejeezus out of some of you. Also, I can’t blame anyone for not wanting to mess with temperature-dependent dough in the middle of summer. I’ll admit that trying to keep tiny bits of butter from melting is not my favorite warm-weather activity either, but when all is said, done, sliced & served, it sure is worth the effort.Black & Blueberry Galette
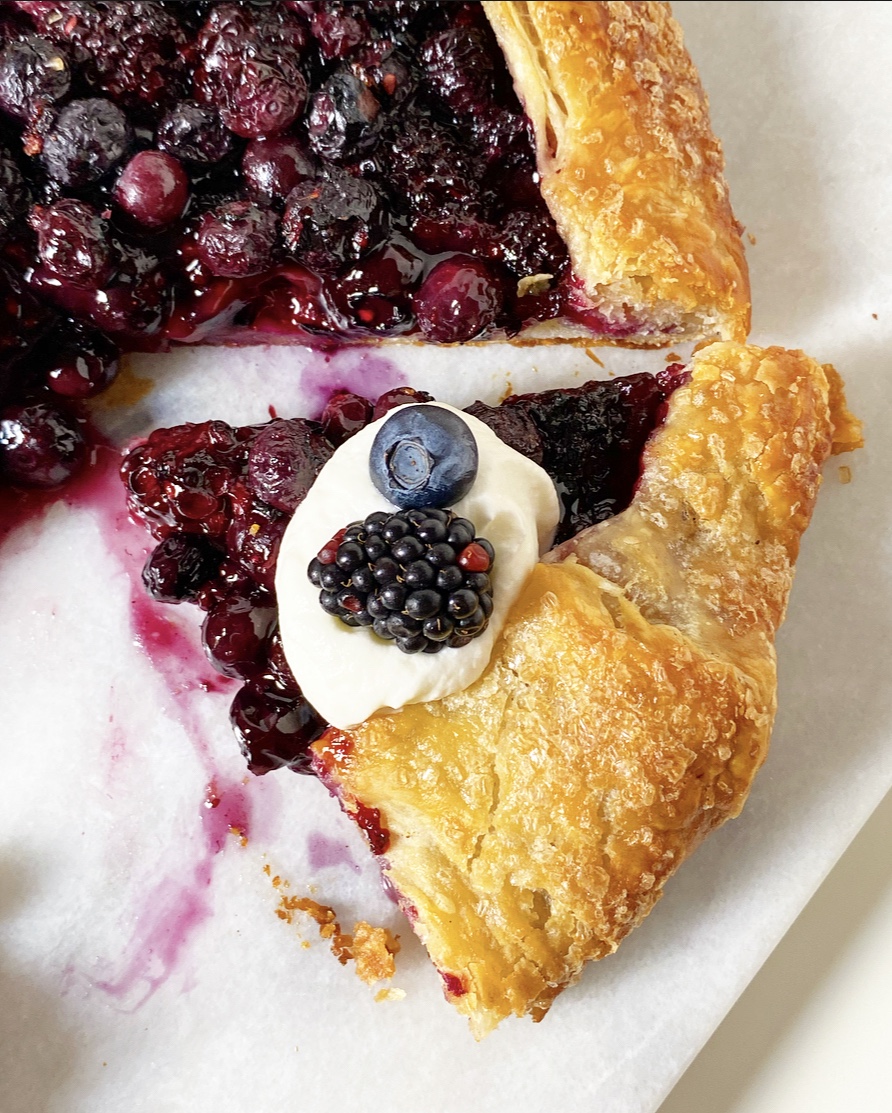
Generally speaking, I think baking should be an enjoyable process, so if making dough from scratch is going to ruin the fun of making a galette, by all means, take the easy way out. Use whatever pie dough you like here, even the refrigerated store-bought stuff. I am pretty sure a sheet of puff pastry would work, too. Whatever your dough of choice, just remember to keep your surfaces floured and your dough cold.

Cold dough = cold butter = super flaky crust.Black & Blueberry Galette 
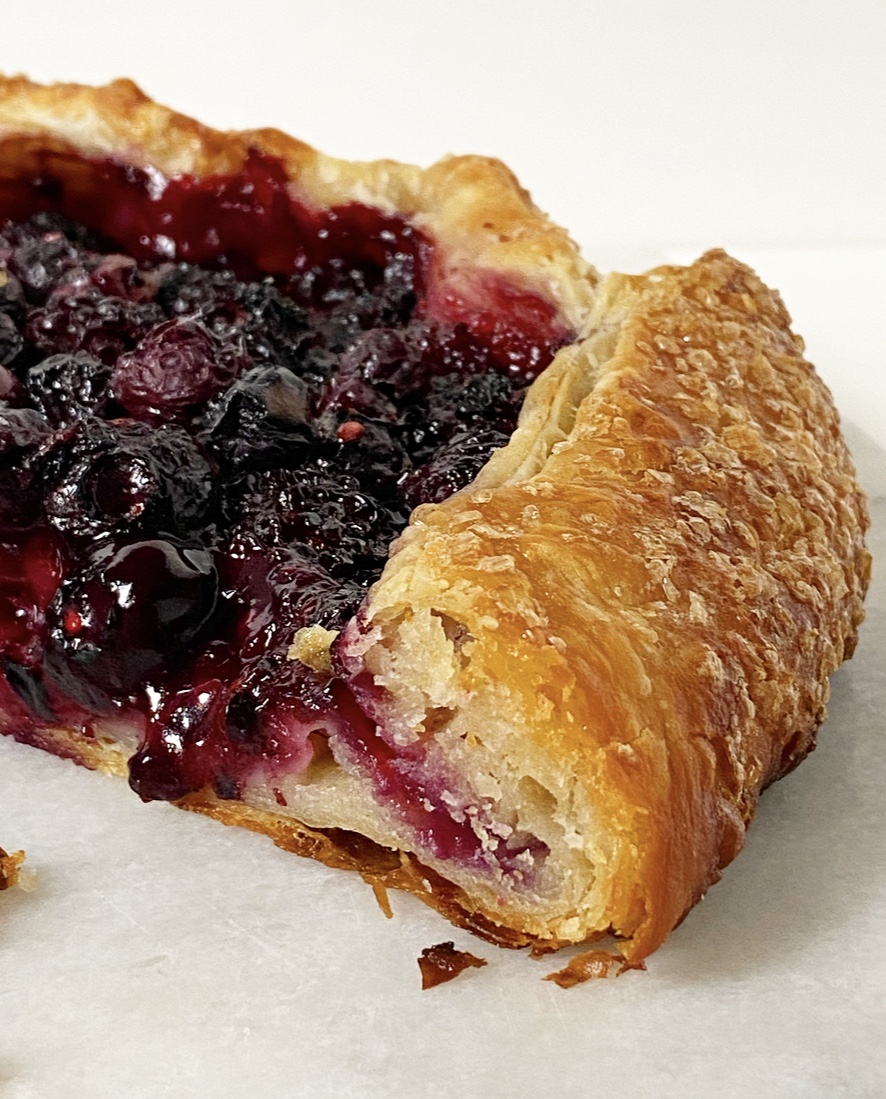
I used blackberries and blueberries in this galette for a multitude of reasons, chief amongst them that these varieties looked the best at my local green market a few weeks ago. They also happen to remind me of Maine—I love when food and nostalgia line up. I went with a 50:50 ratio of blackberries to blueberries, but you should feel free to play around with the amounts, use all of one berry or the other, or swap in some raspberries. When it comes to galettes and summer berries, there are no bad ideas.Black & Blueberry Galette

Black & Blueberry Galette
makes 1 galette, about 8 servings

1 1/2 cups fresh blackberries
1 1/2 cups fresh blueberries
1/2 cup granulated sugar
1/8 teaspoon ground cinnamon
3 tablespoons cornstarch
pinch of Kosher or sea salt
juice of 1/2 lime
1/2 recipe All-Butter Pie Dough, or other good single-crust pie dough
1 tablespoon unsalted butter, cut into small pieces
1 large egg
1 teaspoon water
coarse sugar, for sprinkling
whipped cream, for serving (optional)
vanilla ice cream, for serving (optional)

Arrange oven racks in the upper and lower positions. Preheat oven to 375F. Line a rimmed baking sheet with parchment paper. Set aside.

Combine blackberries and blueberries in a large mixing bowl. Add sugar, cinnamon, cornstarch, salt, and lime juice. Stir together with a silicone spatula or wooden spoon and let sit for 15 minutes at room temperature.

Flour a surface and a rolling pin. Roll pie dough out until it is 1/8-inch thick. Trim edges so that you have a 12-inch circle. Transfer to prepared pan. Mound filling in the middle of the dough, leaving at least 2 inches of excess on all sides. Fold dough over the sides of the filling to contain it. Scatter butter over exposed filling.

In a small bowl, whisk together egg and water. Brush mixture on exposed pie dough. Sprinkle with coarse sugar.

Bake galette on the upper rack for 25 minutes. Move to the lower rack. Bake for 20-25 more minutes, tenting with foil if anything begins to brown too quickly. Crust will firm up as the galette cools.

Let galette cool completely in the pan on a rack. Remove to a cutting board. Slice and serve with whipped cream or vanilla ice cream, if desired.

Galette will keep covered at room temperature for two days, or in the refrigerator for up to four.Black & Blueberry GaletteBlack & Blueberry Galette