 I feel like this fall is all about maple syrup. But based on last Friday’s round-up, I feel like every fall for the last four years has been about maple syrup.
What can I say? I am a maple syrup fangirl. I love its sweetness and nuance and amber color and near-undeniable deliciousness and I don’t think I’ll ever stop finding ways to spotlight it in my baking.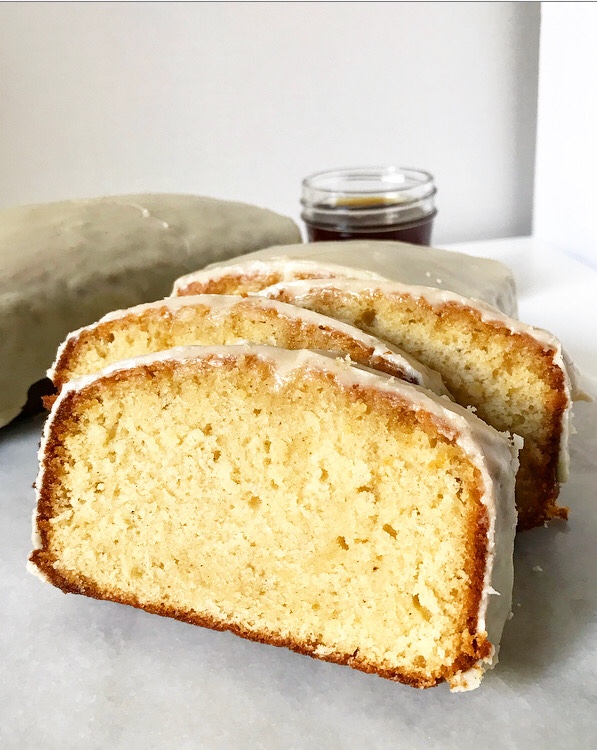 I mean, have you tried my Maple Thumbprints yet? Or my crowd-favorite Salty Maple Caramel Corn? Or the Maple Creme Sandwich Cookies I posted when I was a little baby blogger and just re-photographed last week? Because you should. But maybe start your autumnal maple-mania off with these Maple Drizzle Cakes. I’d love to give you a sentence qualifying why these cakes are somehow superior to all my other maple baked goods, but
- That’s silly. I love all maple baked goods with the same reckless abandon that I reserve for a holiday cookie platter or a puff pancake on a Saturday morning.
- Maple. Drizzle. Cakes. Need I say more???
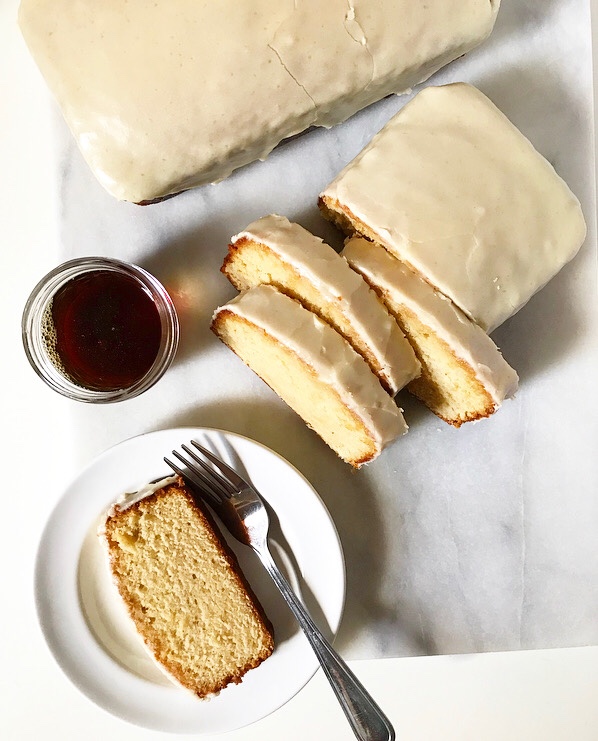
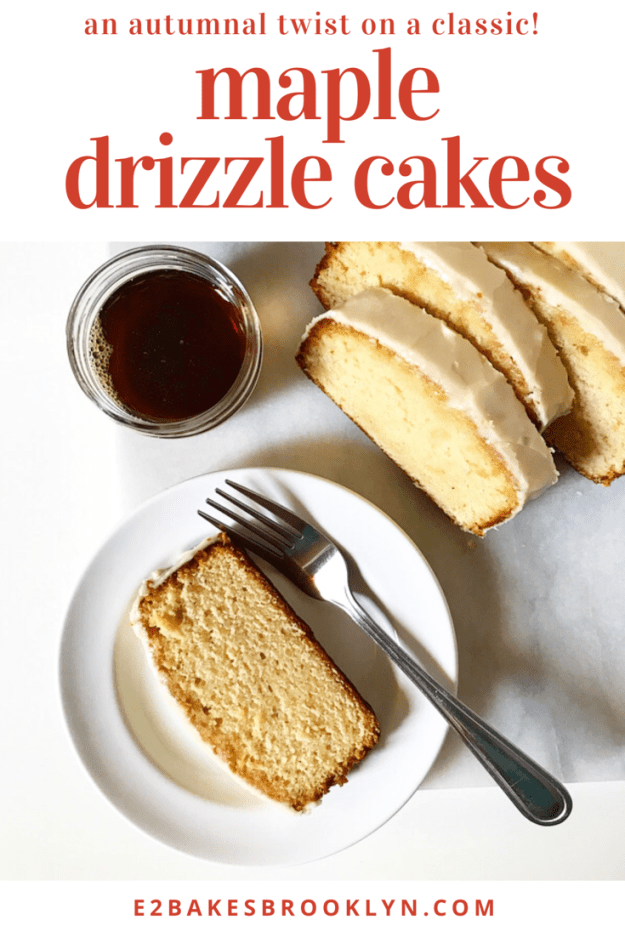
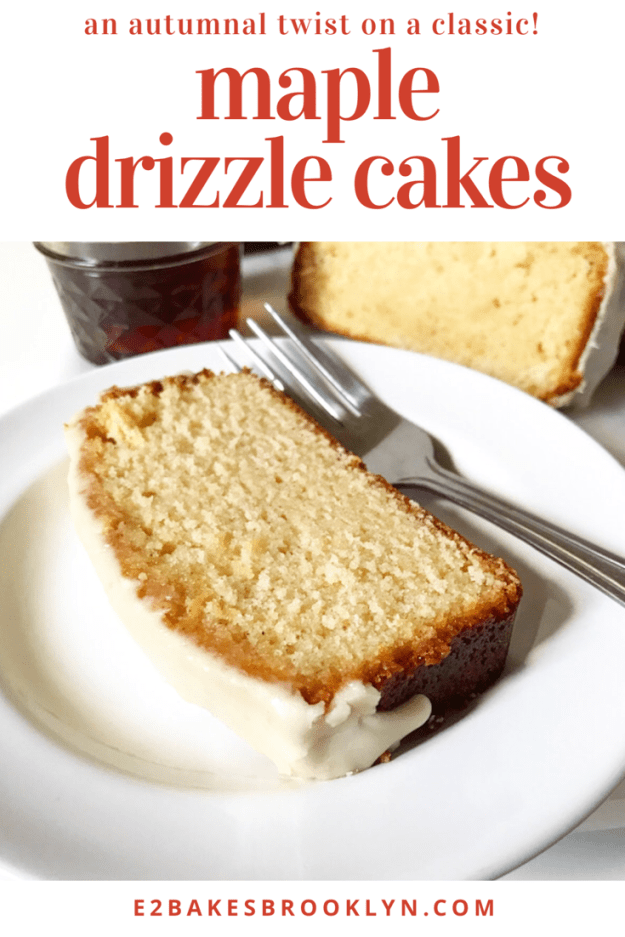
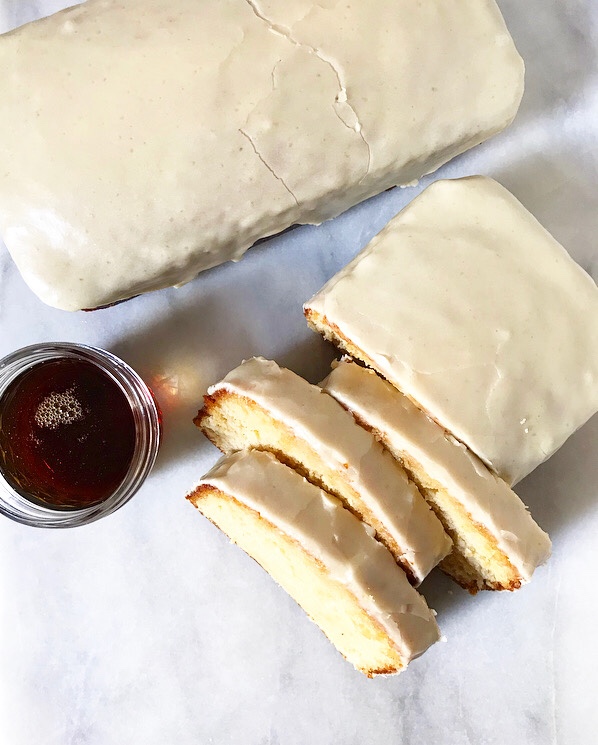 As you may have guessed, these are an autumnal take on classic Lemon Drizzle Cakes. Like those cakes, these are rich and buttery, but instead of being flavored with three hits of citrus, these have three doses of pure maple syrup! You’ll find it in the cake batter, soaked into the baked cakes, and mixed into a thick icing that’s poured over the tops.
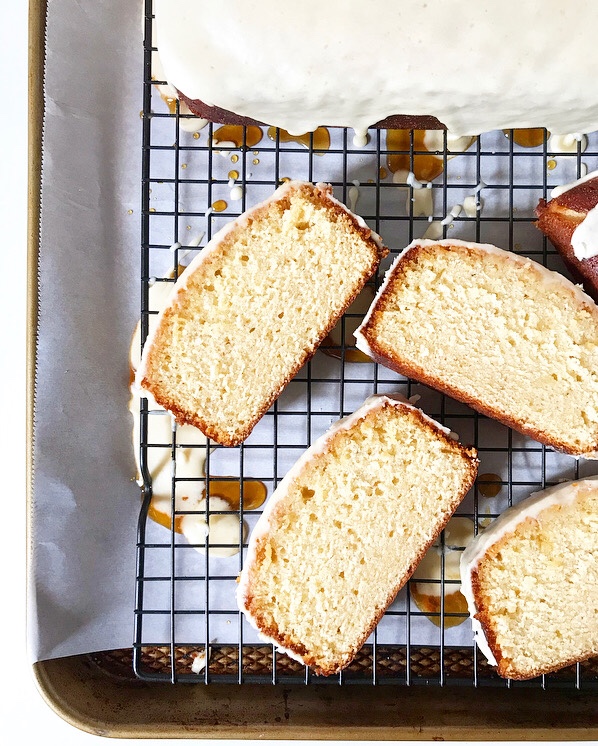
Oh, and these are easy to make. So, so easy. Just dump all the cake batter ingredients in one bowl and mix them for 3.5 minutes before dividing it among a couple of loaf pans and baking. Boom. Done.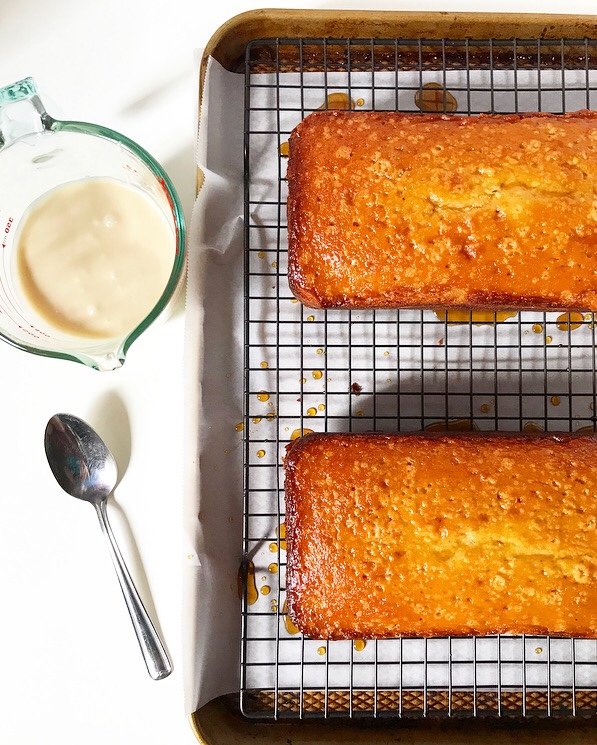 After baking, tiny holes are poked in the warm cakes and maple syrup is brushed over the tops and allowed to soak in. Alternatively, you can cool the cakes and then brush on warmed maple syrup. No matter which method you choose, this will add extra moisture and flavor, and make your cakes extra delicious.
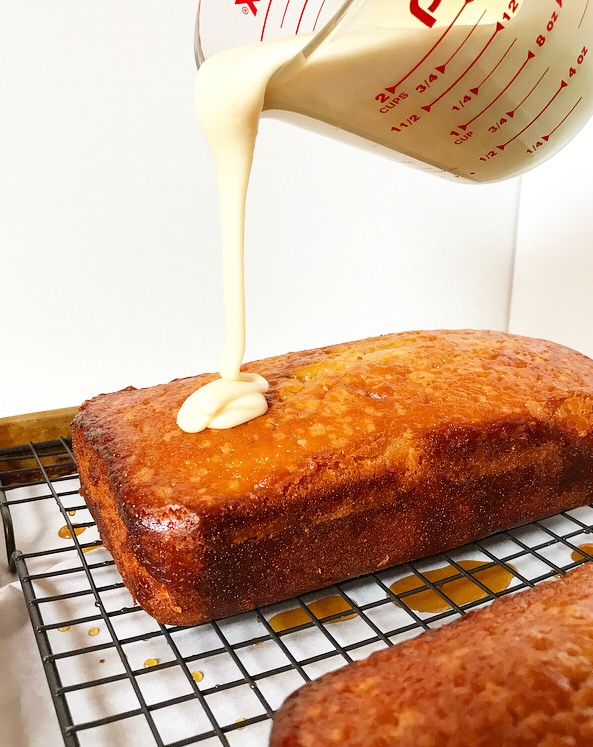
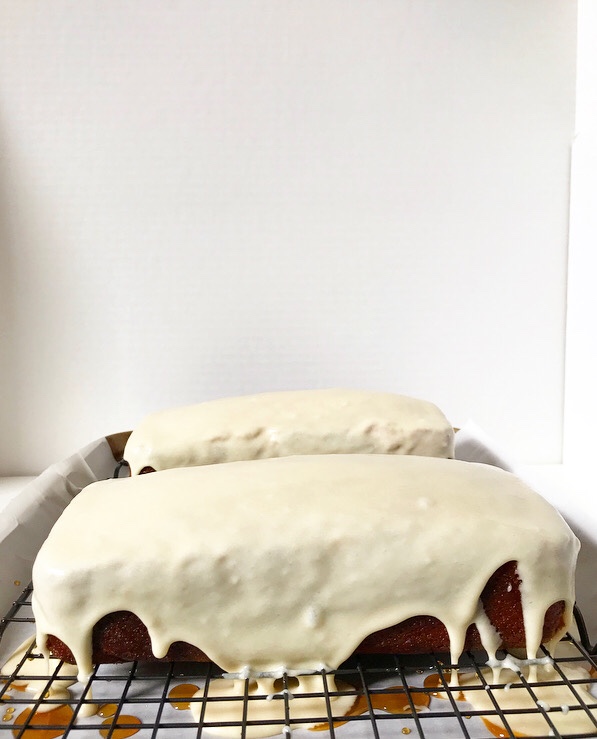 The icing is made primarily of maple syrup, confectioner’s sugar, melted butter and water. It goes on as a liquid, cascading down the sides of the cake before drying to a set finish. I like the icing recipe as written, but you could add another layer of flavor by browning the butter. You know, if you’re into things like that.
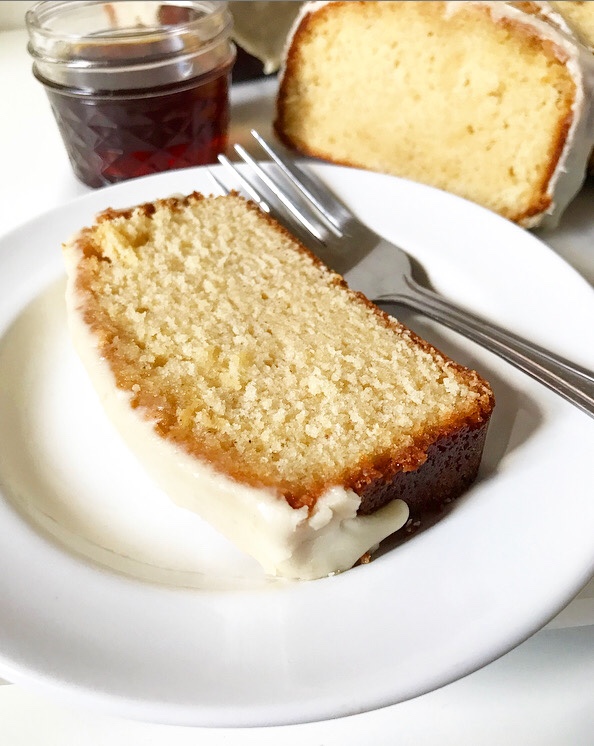 Maple Drizzle Cakes are great for any occasion. You could use them as hostess gifts, pack them carefully and mail them overnight to someone you love, leave one in the office break room, or even serve one as a non-pie Thanksgiving dessert (we all know a pie hater).
Or you can eat a thick slice with your fingers while you’re wearing your best/softest/oldest/most hideous pajamas and binging The Righteous Gemstones, and marvel at how great it is to live a life where you have both excellent cake and quality television. Or something.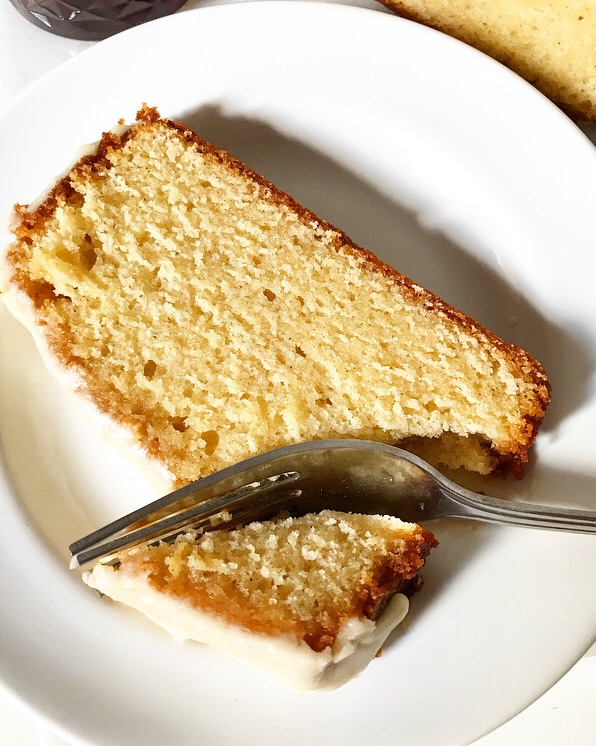
Maple Drizzle Cakes
makes 2 9×5-inch loaf cakes
Cake:
1 cup (2 sticks) unsalted butter, room temperature, cut into 16 pieces
2 cups granulated sugar
1/2 cup pure maple syrup, room temperature
4 large eggs, room temperature
2 teaspoons pure vanilla extract
3 cups all-purpose flour
1/4 teaspoon ground cinnamon
1/4 teaspoon ground nutmeg
2 teaspoons baking powder
1/2 teaspoon Kosher or sea salt
1 cup milk (preferably whole), room temperature
Syrup:
1/2 cup pure maple syrup
Icing Drizzle:
2 cups confectioner’s sugar
4 tablespoons pure maple syrup
2 tablespoons unsalted butter, melted
2 tablespoon water
pinch of Kosher or sea salt
Place an oven rack in the center position. Preheat oven to 350F. Grease two 9×5-inch loaf pans. Line with parchment, leaving overhang on the two long sides, and grease again. Set aside.
Make the cake. Combine all ingredients in a large mixing bowl. Use an electric mixer to mix on low for 30 seconds. Increase speed to medium and mix for 3 minutes. Batter will be thick.
Transfer batter to prepared pans and smooth the tops with a silicone spatula or wooden spoon. Tap full pans on the counter five times to release any large air bubbles. Bake 45-55 minutes, or until a toothpick inserted in the centers comes out clean. Let cakes cool in the pan for 15 minutes.
Stab warm cakes (still in their pans) several times with a thin, flexible knife or skewer, making sure to poke all the way to the bottom. Brush syrup evenly over the cakes, about 1/4 cup each. Let cakes soak in the syrup until they are completely cool.*
Line a rimmed baking sheet with parchment and set a cooling rack over the top. Use parchment overhang to remove soaked cakes from pans. Discard used parchment and place cakes on prepared cooling rack.
Make the icing. In a small bowl, use a fork to whisk together confectioners sugar, maple syrup, butter, water, and salt. Mixture should be very thick, but pourable. If it’s too thick, add more water by the teaspoon. Pour over the centers of the cakes—the icing should “spread” itself, but you can coax it a bit with the back of a spoon. Let sit for 20 minutes to set. Move cakes to a serving plate before slicing and serving.
Leftover cake will keep covered at room temperature for up to three days or in the refrigerator for up to five. Maple flavor will intensify over time.
Note:
You may also let the cakes cool before brushing on the maple syrup. Simply let them cool in their pans before lifting them out onto a rack that has been set over a piece of parchment (exactly as it’s written in the icing step). Poke them with a skewer. Warm the maple syrup slightly (10-15 seconds in the microwave will do the trick) before brushing it onto the cakes. Let soak 30 minutes before applying the icing.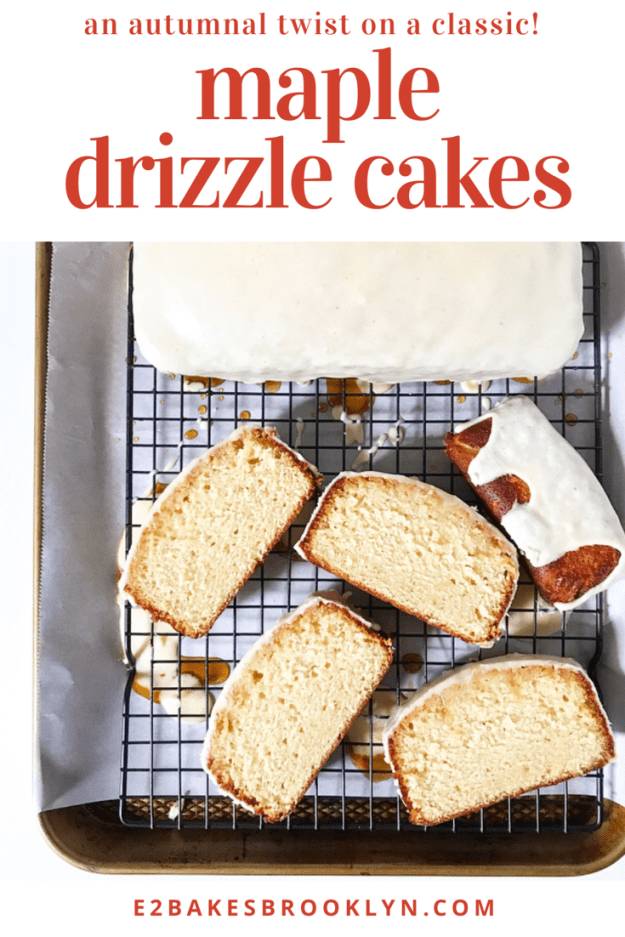
 Has anyone else’s week been five years long? Mine started with two babkas, three layer cakes and a Rosh Hashanah dinner, continued with some early morning construction in my apartment, and was followed up with a neck-ache and a midweek heatwave.
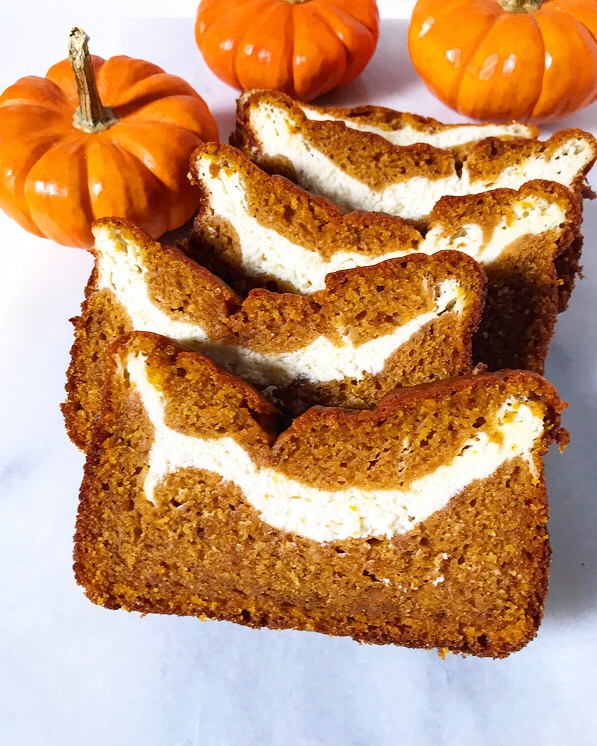
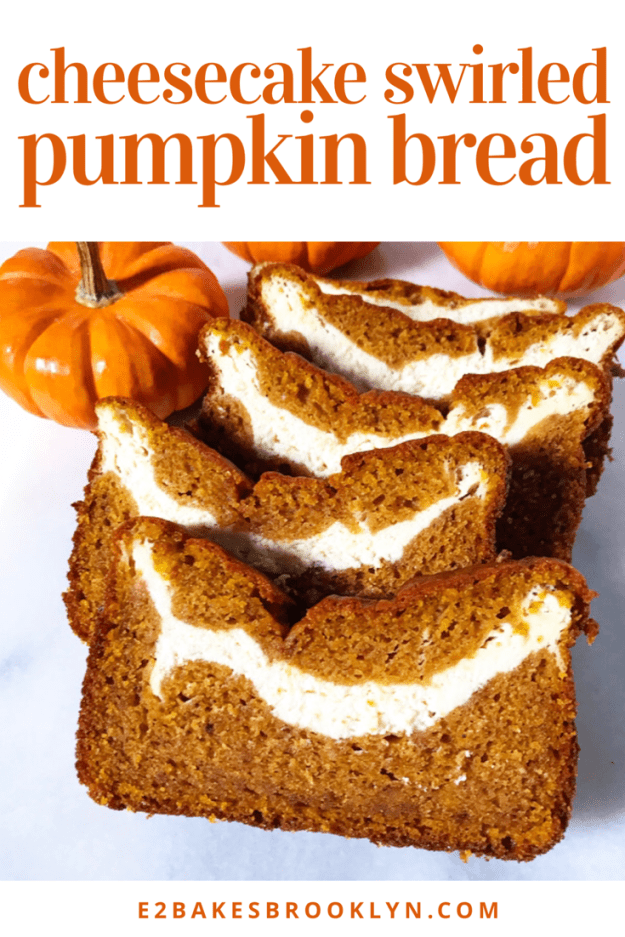
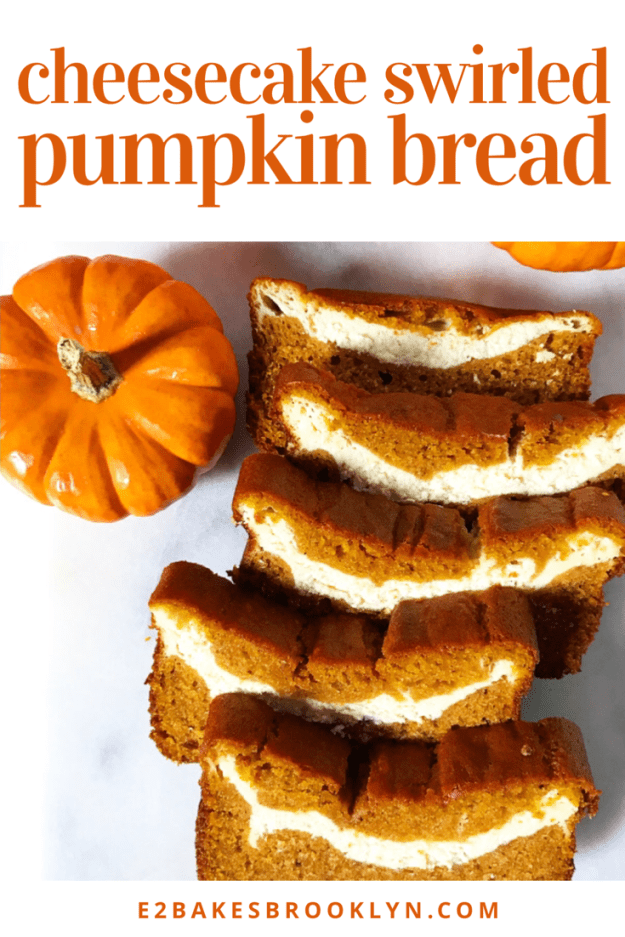
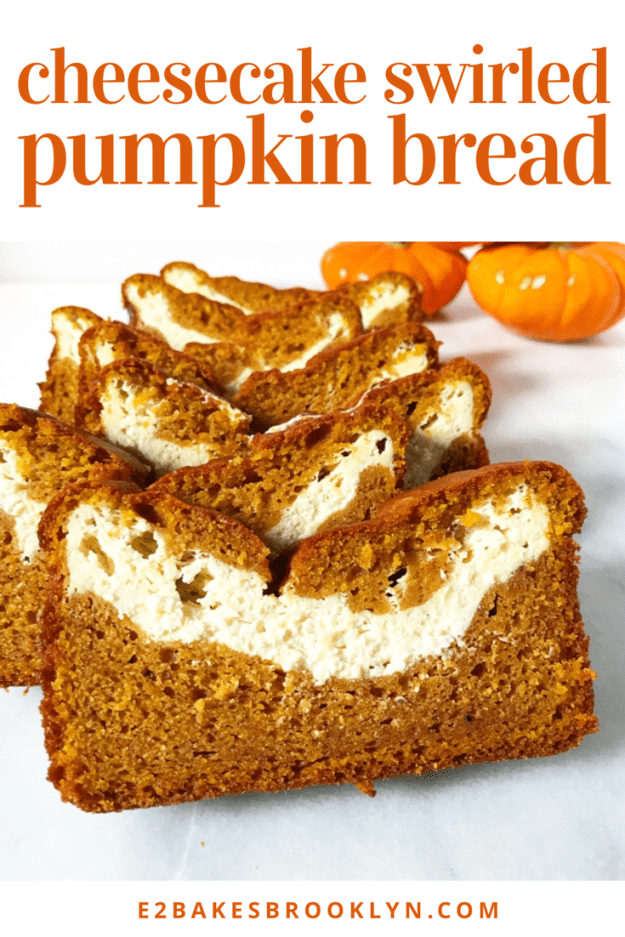
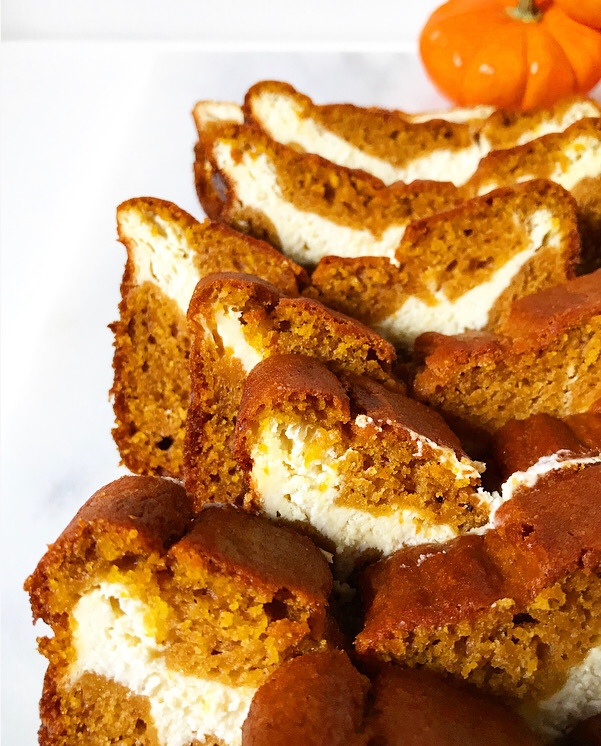 The good news is that NYC weather is finally starting to get with the autumnal program (I am so tired of summer clothes) and that my only plans for this weekend are to take my visiting godparents out for lunch and watch postseason baseball. Then two more work days before going on vacation next Wednesday—it can’t get here soon enough! But more on that later. For now, let’s talk about Cheesecake Swirled Pumpkin Bread.
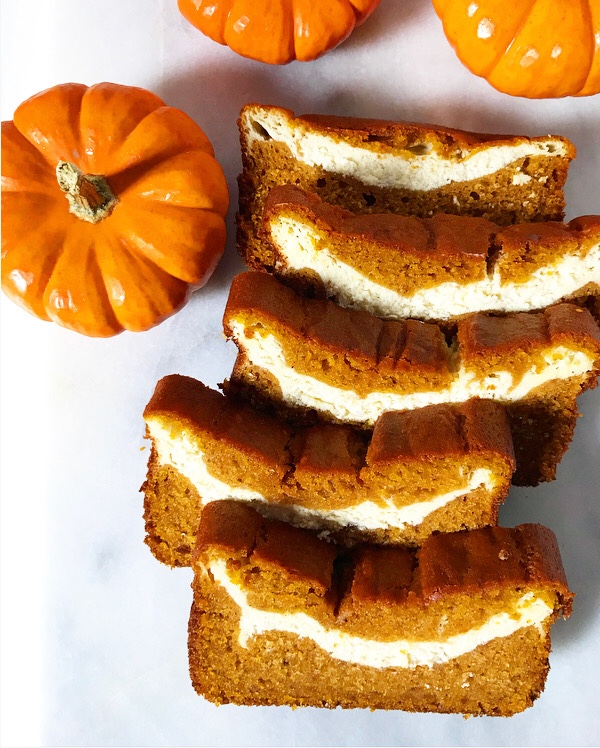 Cheesecake. Swirled. Pumpkin. Bread.
 Cheesecake Swirled Pumpkin Bread begins with a half-recipe of my
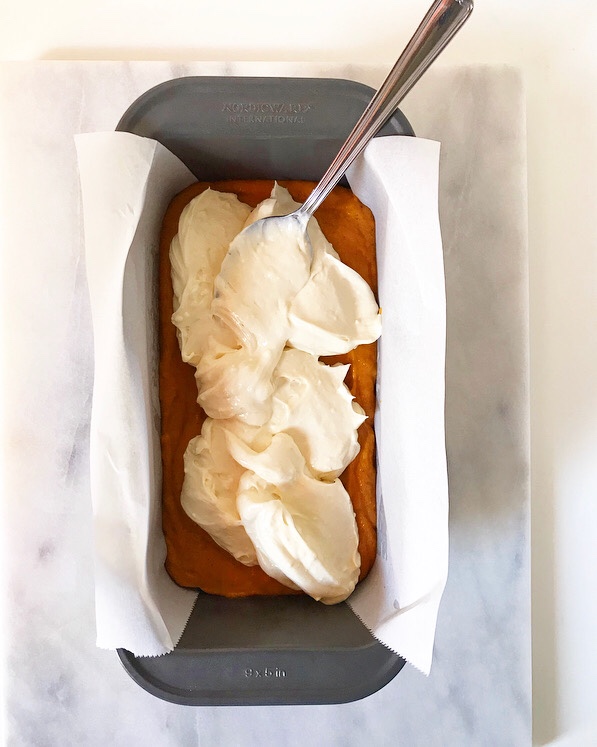

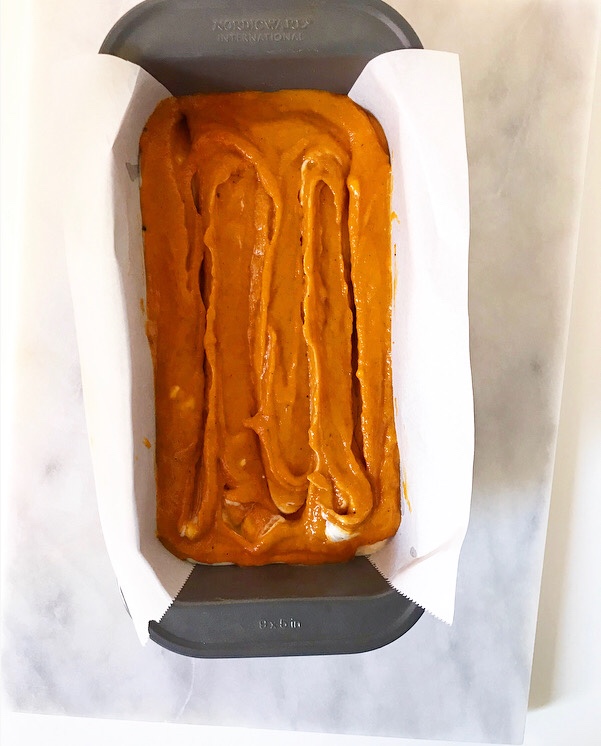
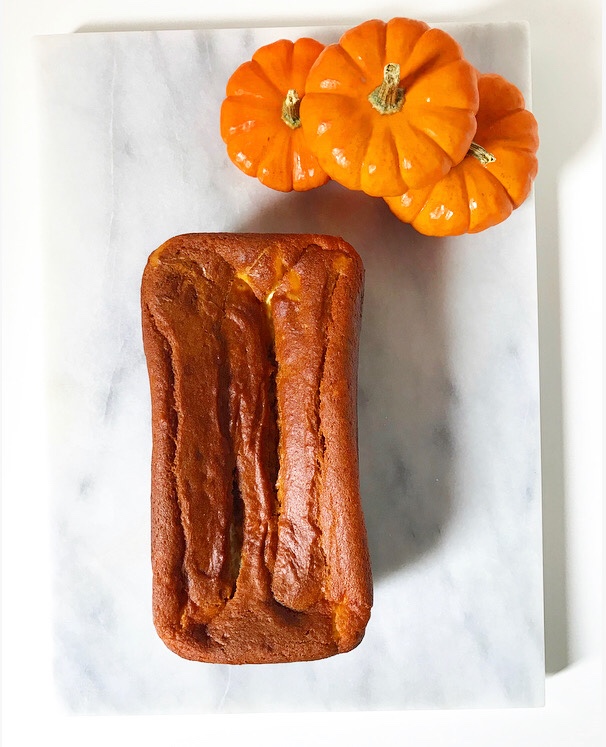 To assemble, you’ll need the pumpkin batter and a small batch of cheesecake—don’t worry, they’re both easy to make. Set aside a cup of the pumpkin batter and put the rest in your loaf pan. Top it with the cheesecake, followed by the remaining batter. Swirl it all with a thin knife or skewer before baking for the better part of an hour. The bread will be puffed when it comes out of the oven, but sink a bit as it cools. This is just the cheesecake buckling a bit—not a bad thing.
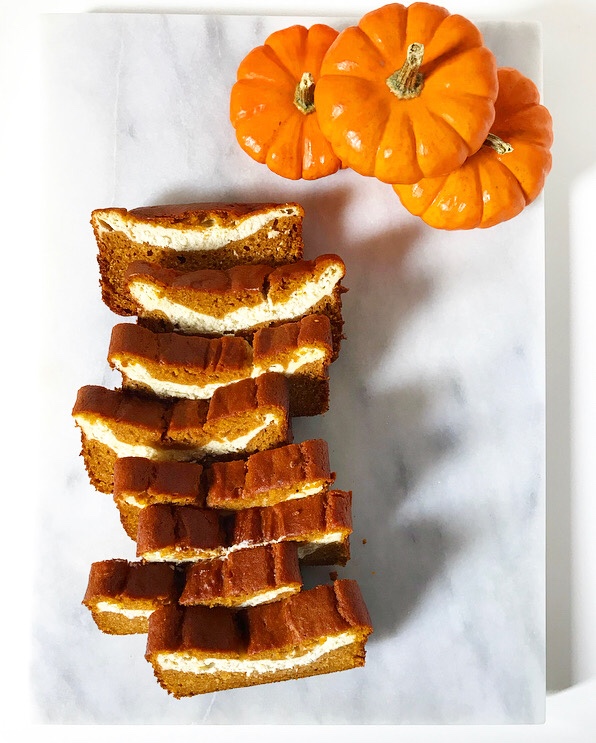 This bread needs to be cooled at room temperature and then chilled in the refrigerator, making it an ideal make-ahead treat. Don’t rush to serve this. Pumpkin is a flavor that blooms over time and nobody loves room temperature (or warm 😬) cheesecake. Good things come to those who wait.
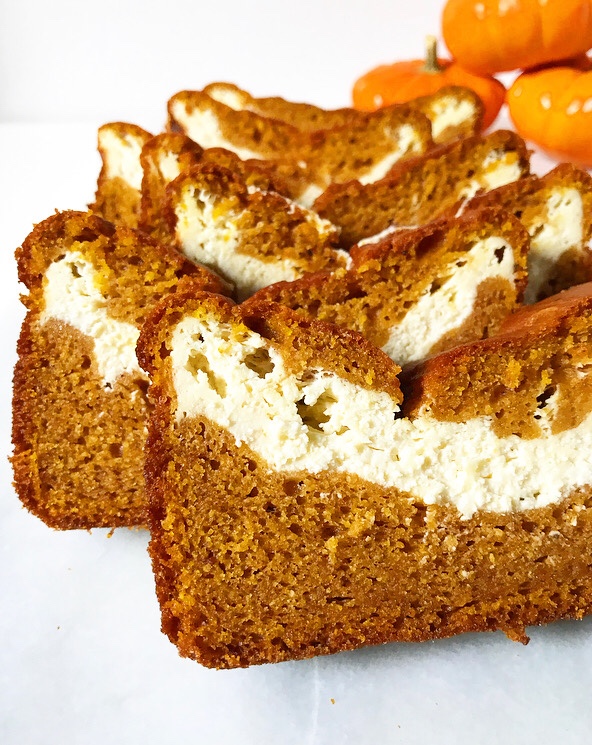
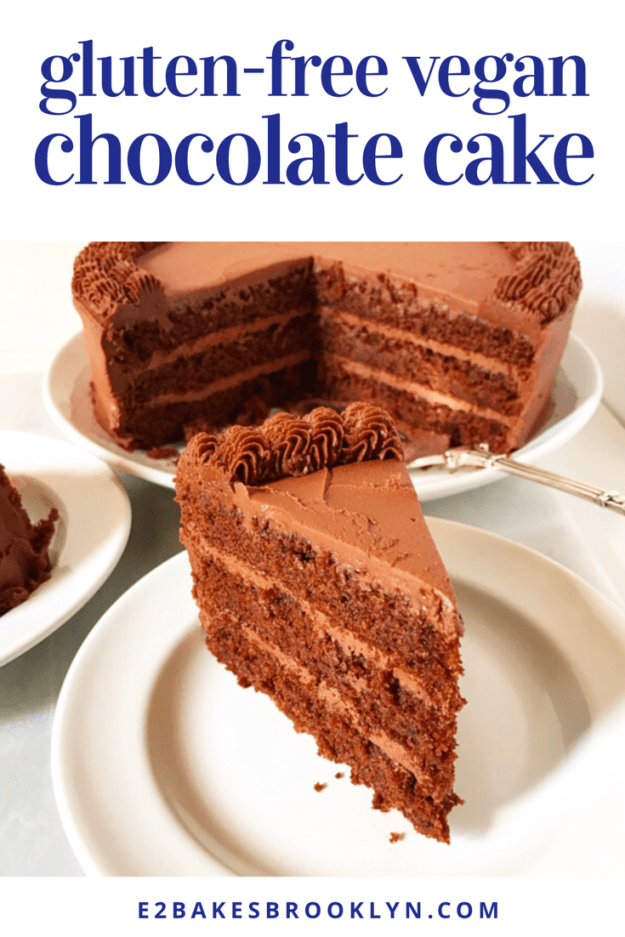
 When you make as many layer cakes as I do, it’s inevitable that someone will ask you to make a gluten-free or vegan one, or one that is both of those things. I used to fear these requests and turn them down across the board, but as time has gone on, I’ve gained confidence, learned new skills, and befriended my NYC ride-or-die,
 It all started with The Minimalist Baker’s genius
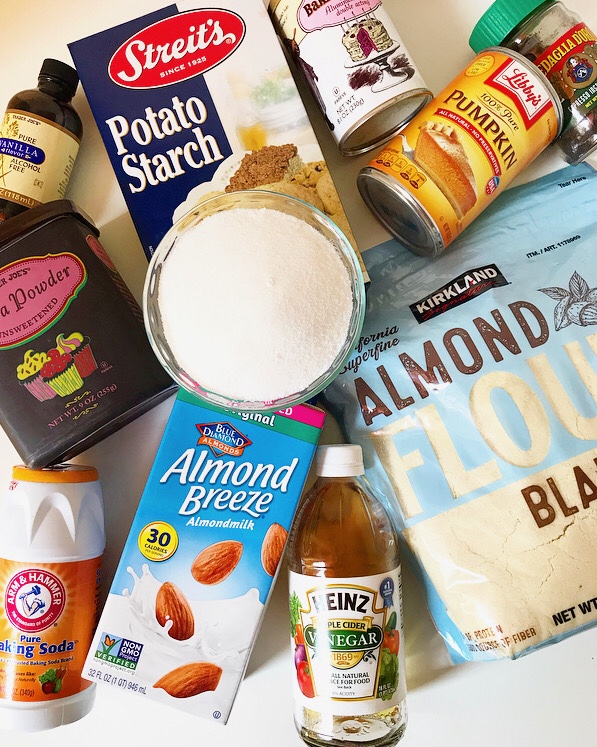
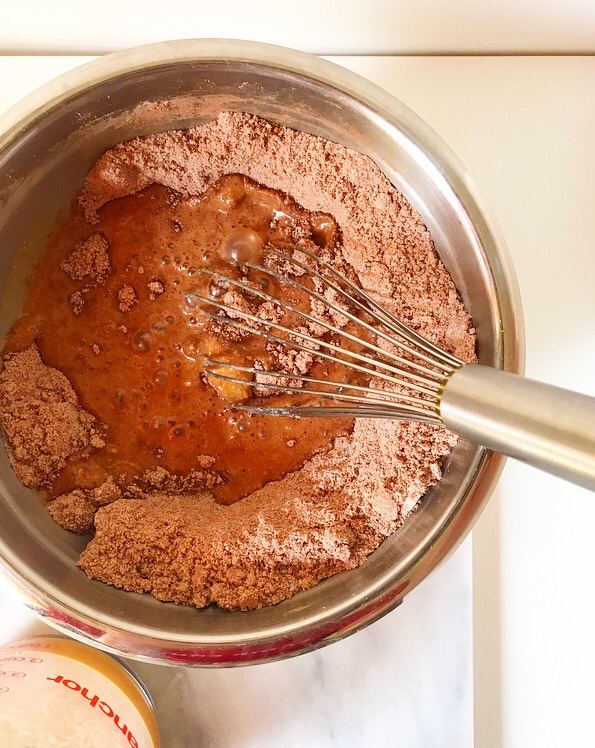
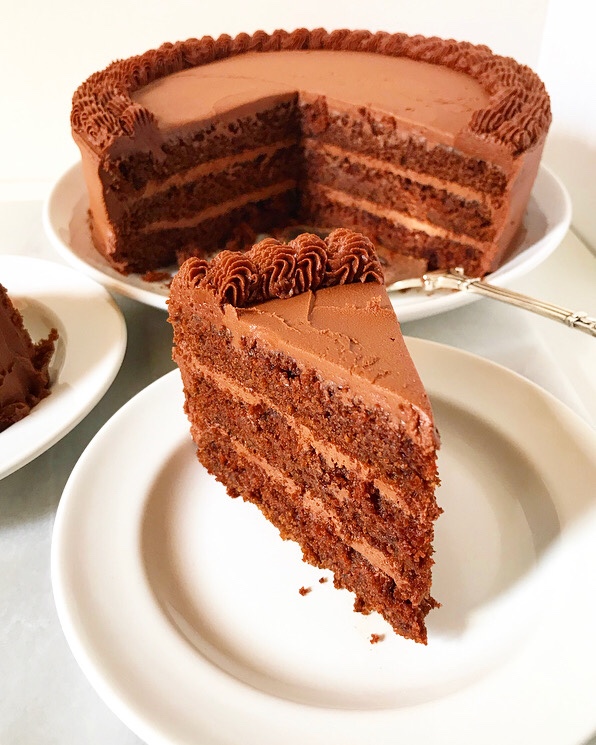
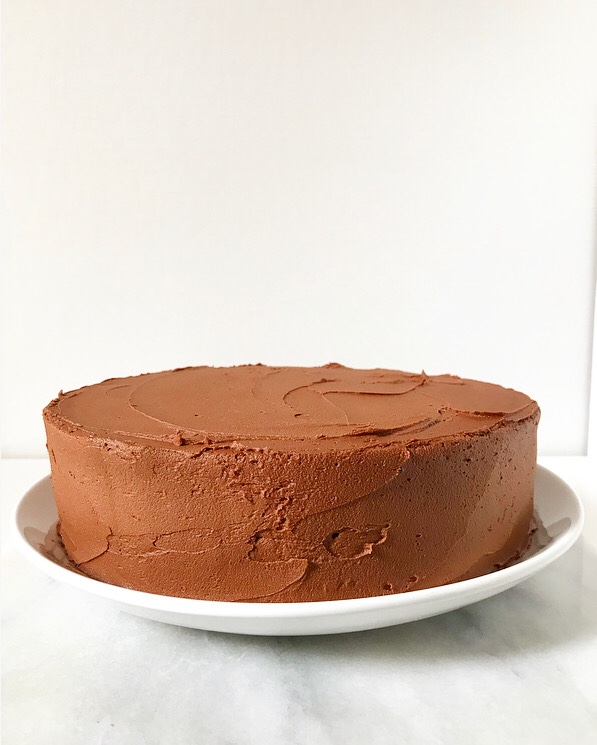
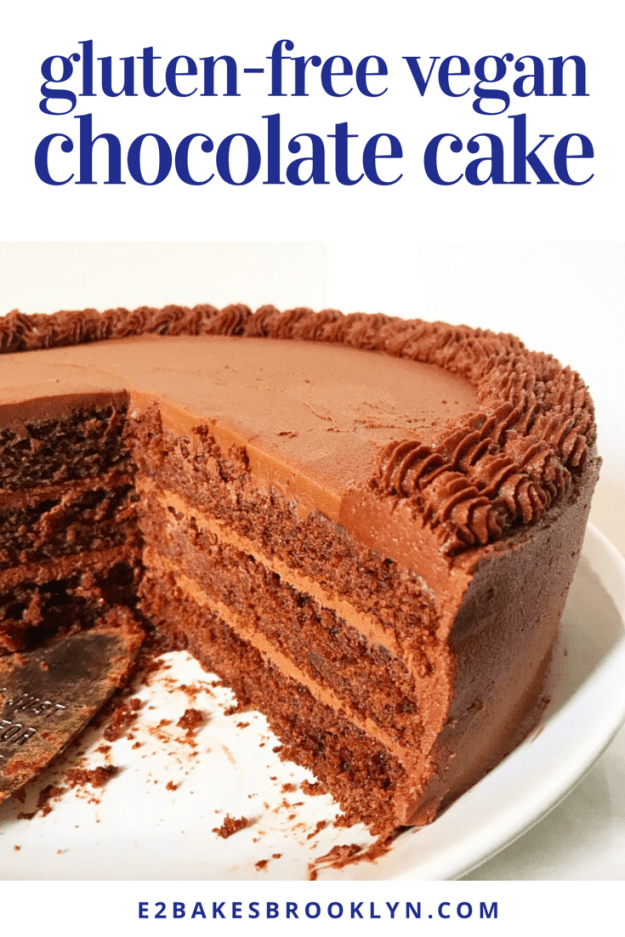
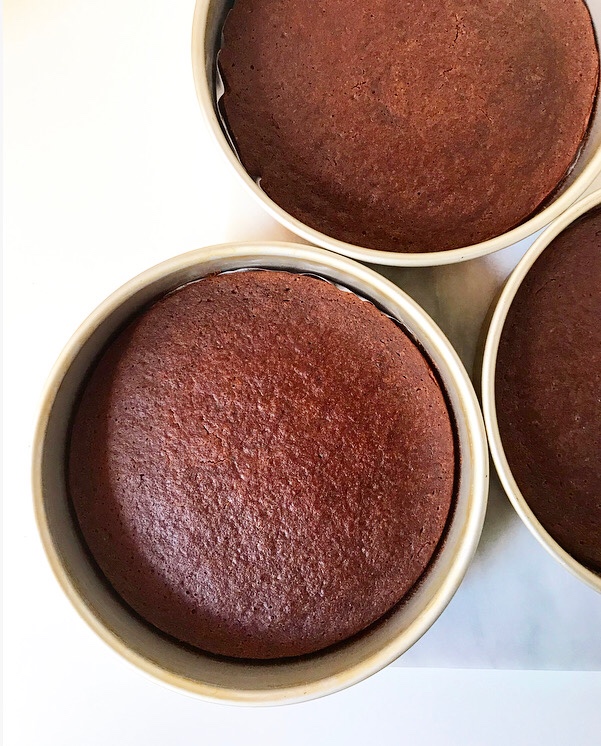 This triple-layered chocolate masterpiece is gluten-free and vegan, yes, but also moist and tender and chocolaty AF—exactly what you want in a layer cake, gluten-free and vegan or not. I used Dana’s (
 If you’re looking at this list of ingredients and wondering where to find them, the answer is almost any well-stocked grocery store. Blanched almond flour is available at Trader Joe’s and Costco, as well as my local supermarket. Potato starch is usually in the specialty flours section or the Kosher foods aisle.
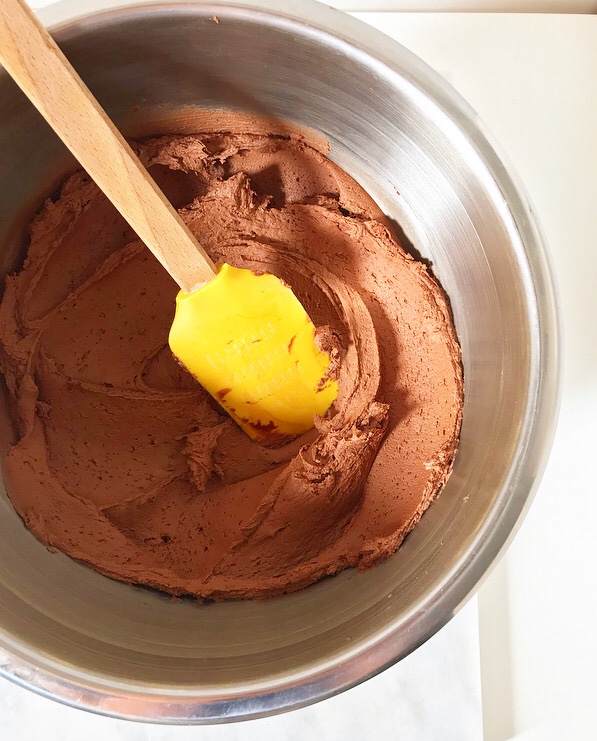 As for the swoopy, pipeable Vegan Chocolate Buttercream…well, first of all, good luck not just eating it straight from the bowl. It’s as flavorful and creamy as traditional chocolate buttercream, thanks to a base of equal parts vegan butter and coconut oil-based shortening, along cocoa powder and confectioner’s sugar.
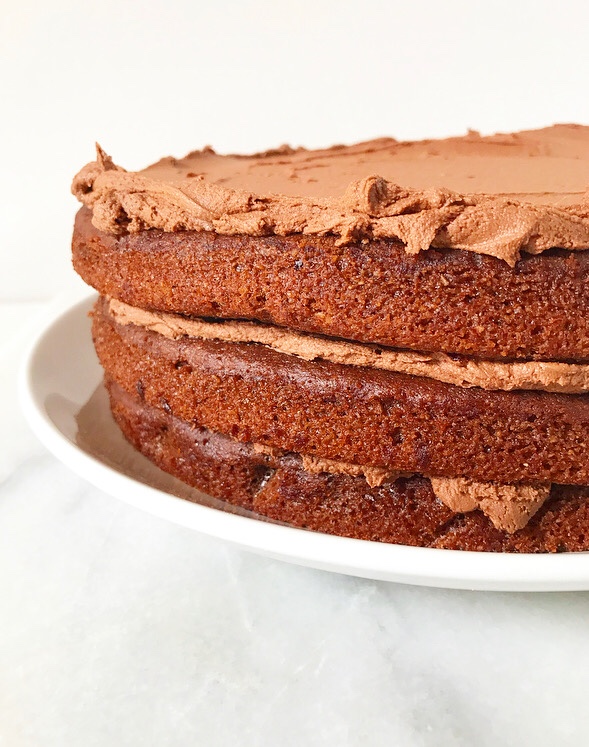
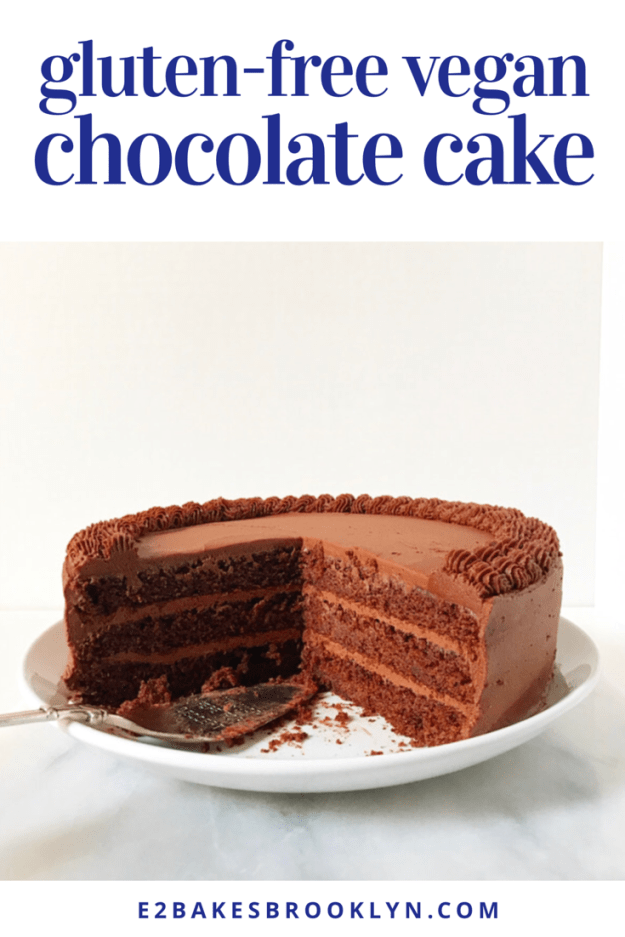
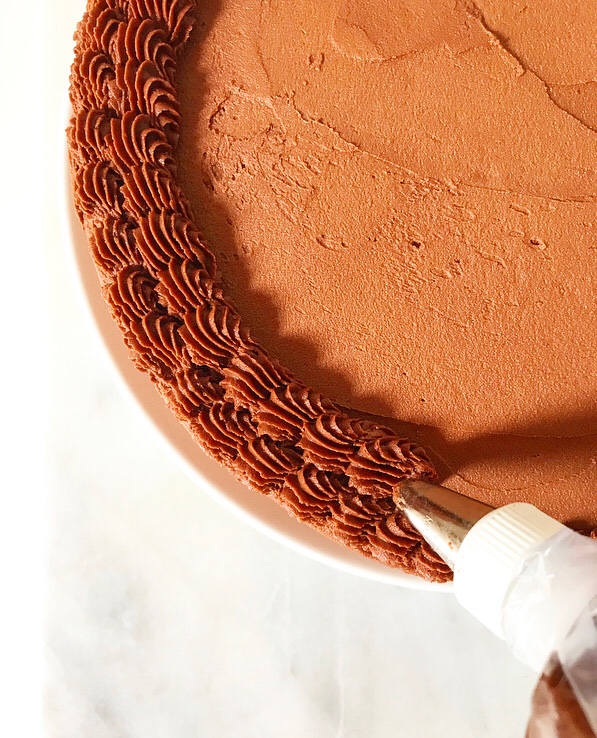 I recommend using shortening in vegan buttercream for the textural magic it works in the absence of dairy butter. Shortening is a polarizing ingredient, to be sure, but it’s what makes this butterless buttercream so incredibly luxurious and pipeable. I am a fan of
 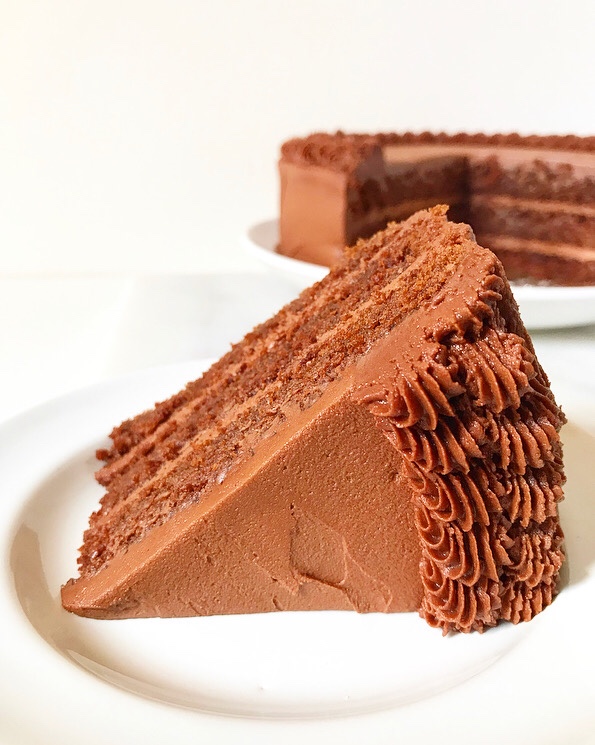 This buttercream recipe makes a lot—enough to fill and frost a cake and then pipe it to the gills! I have had no problem finding things to do with any leftovers (vegan
 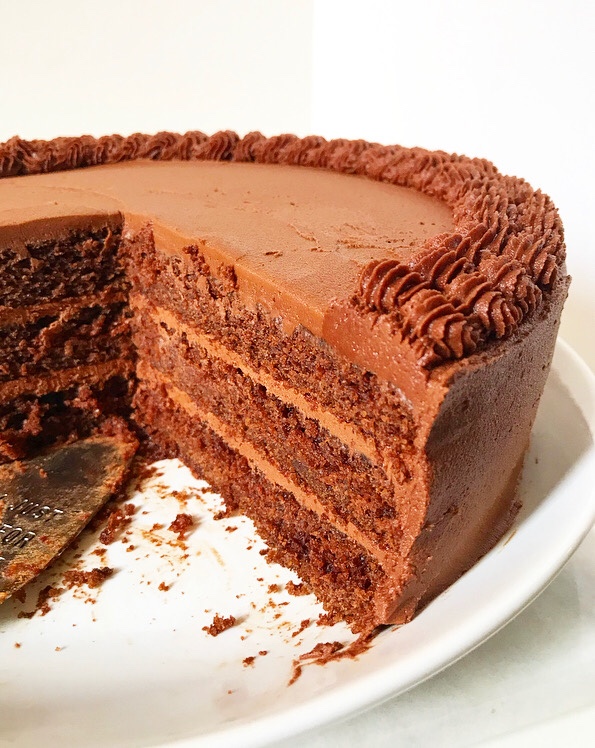 But really, is there such a thing as too much chocolate frosting on a chocolate cake? I don’t think so, especially on one like this that can feed nearly all my friends! This vegan, gluten-free dessert is as delicious and beautiful as it is inclusive. Heck, that in itself is almost enough reason to make one.
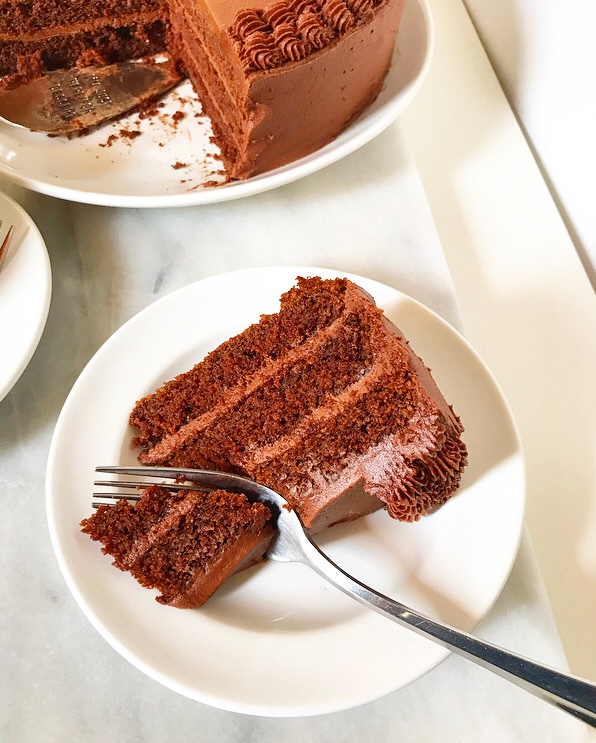
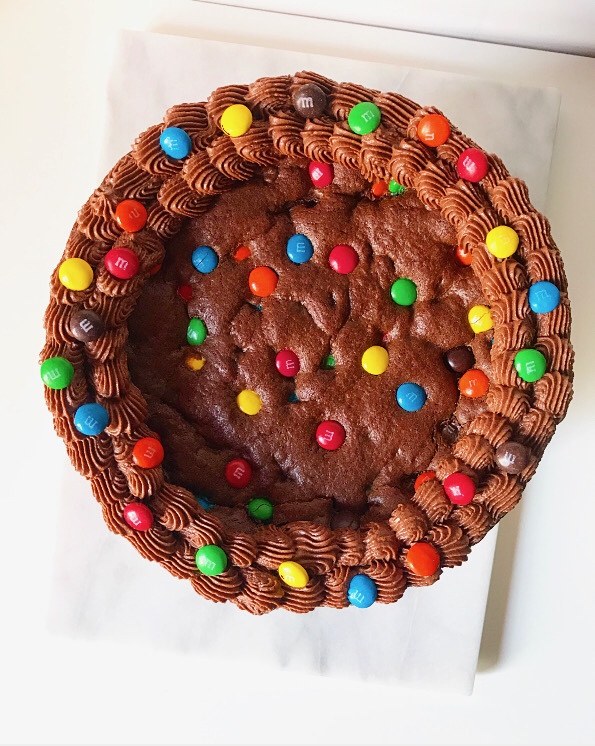
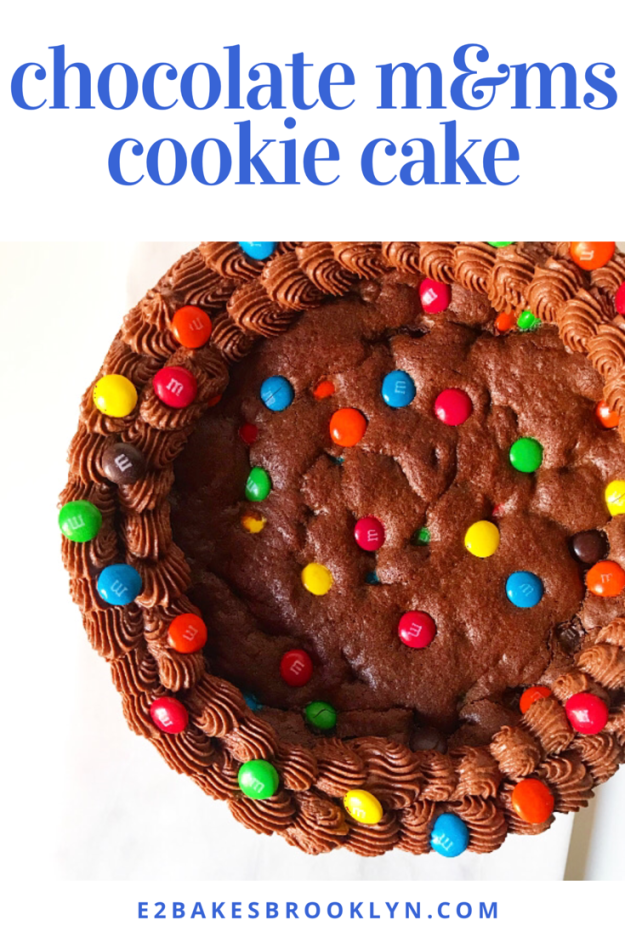
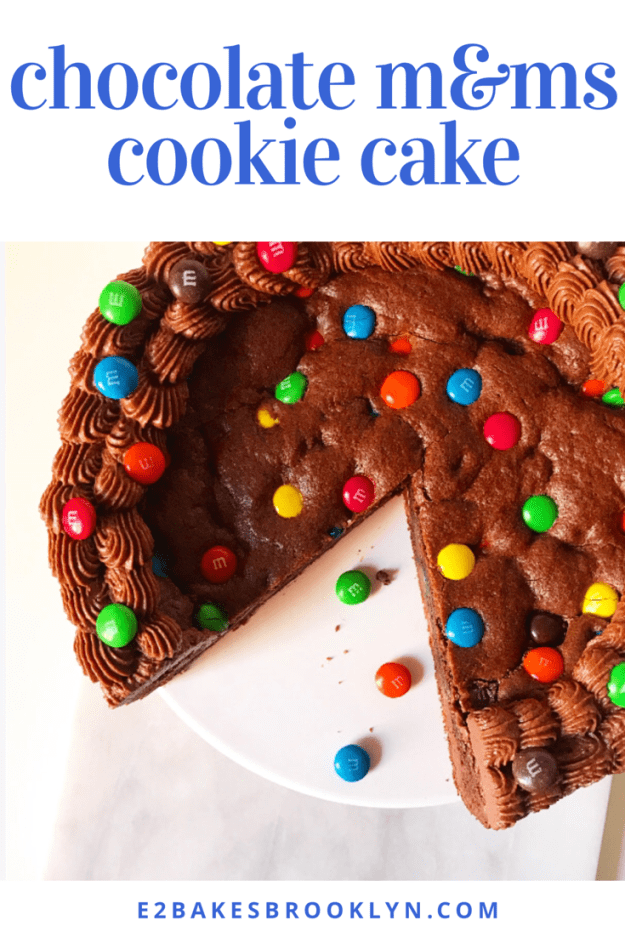
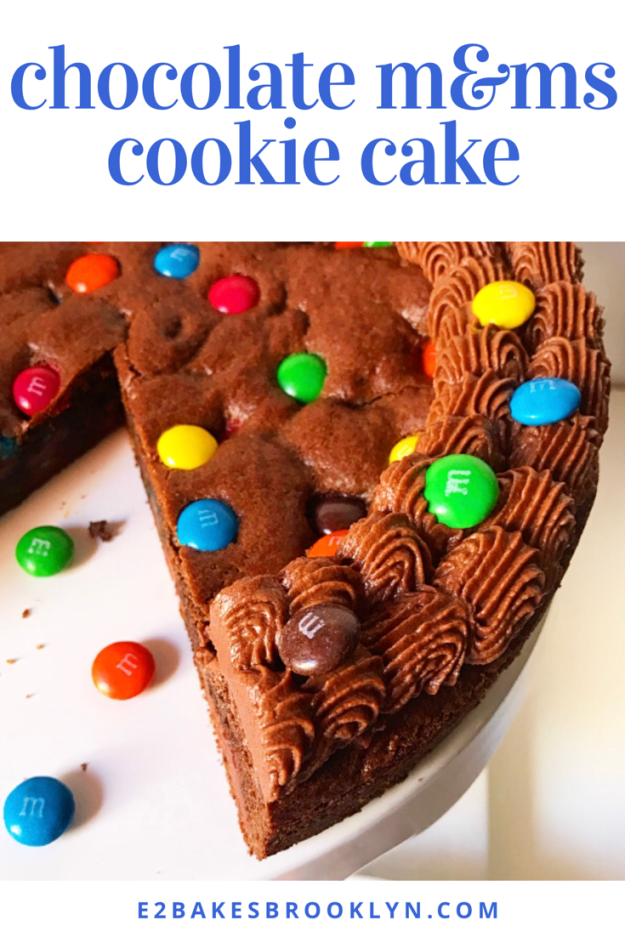
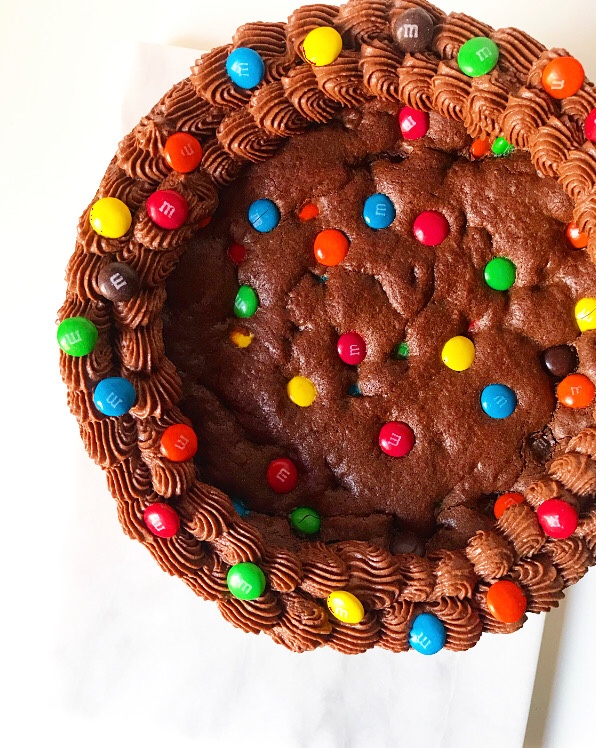 Back in November, I made this Chocolate M&Ms Cookie Cake for a friend’s birthday. I thought it was cute, so I posted a picture of it on my
 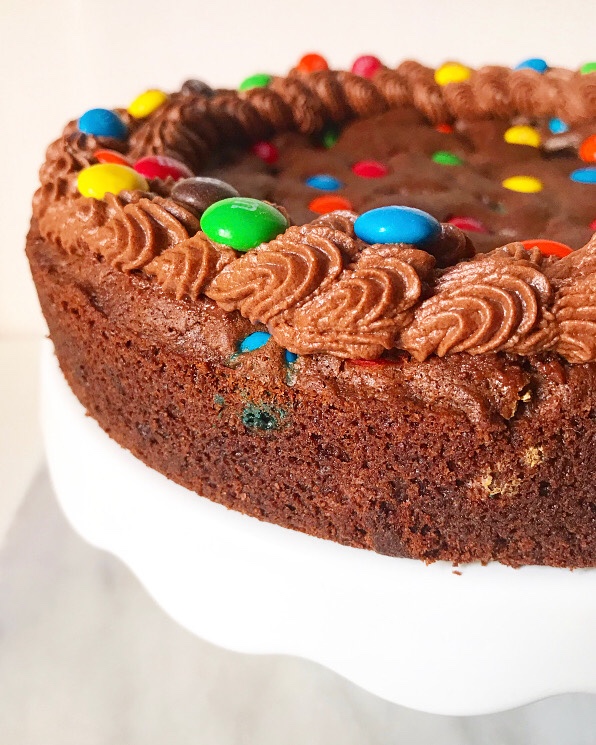 But I remembered now. Seven months later than anticipated, but I remembered. I promise you, Chocolate M&Ms Cookie Cake is worth the wait.
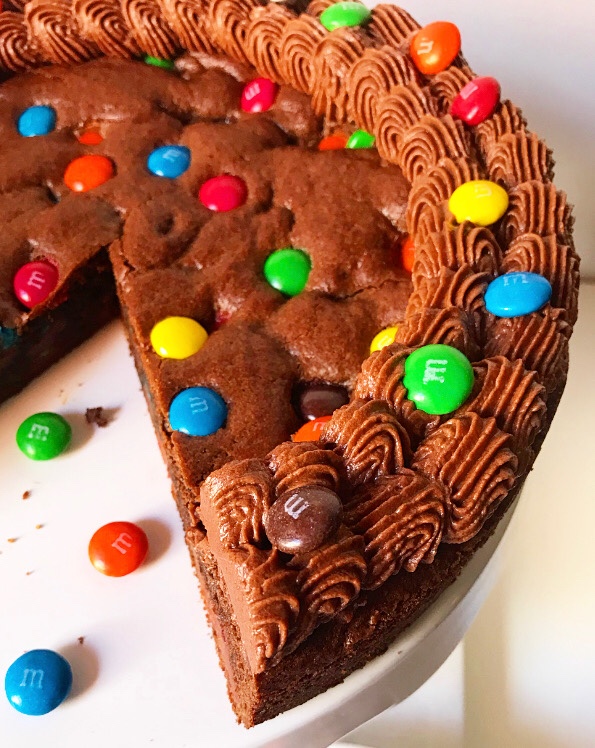 We’re talking about a rich, thick chocolate cookie studded with colorful candy and finished off with a flourish of chocolate buttercream. What’s not to love?!
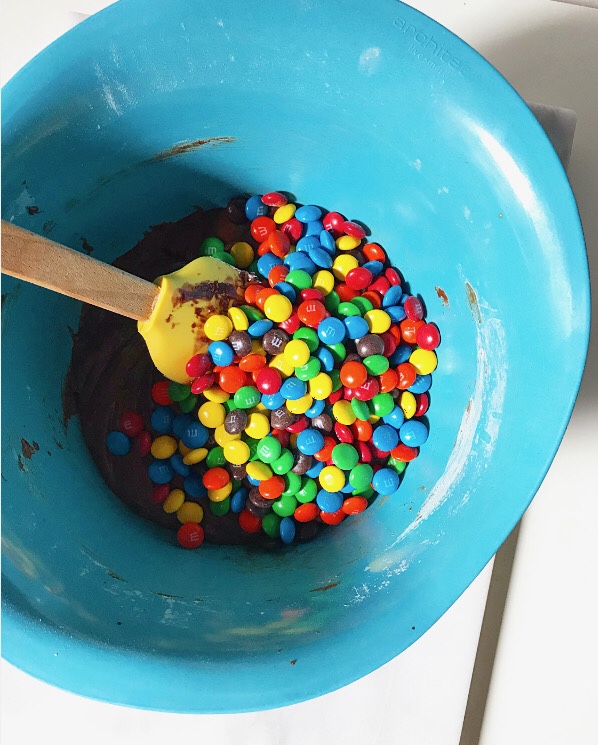
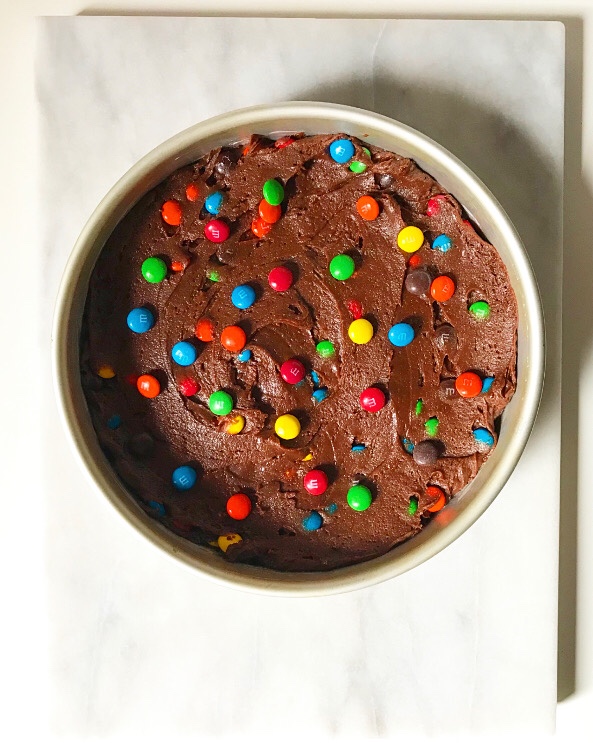 It’s easy too—it’s basically just a slightly smaller batch of my
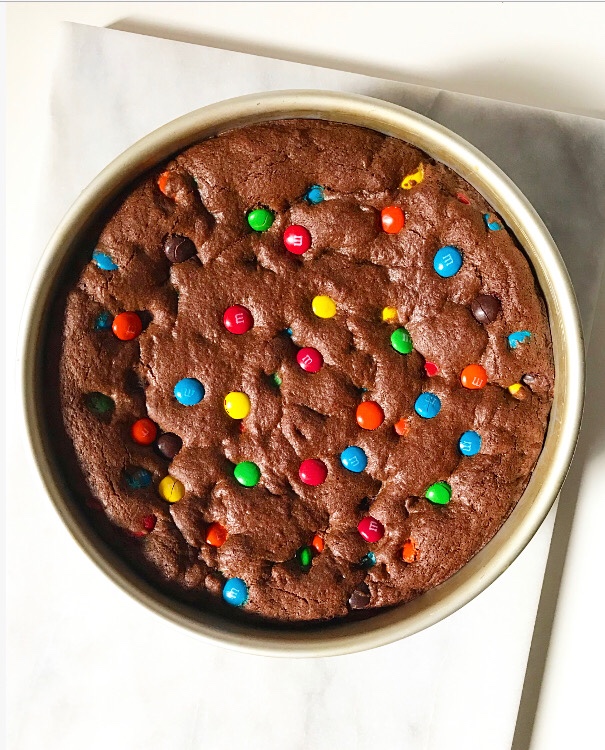
 Bake it up in a cake pan, let it cool, and pipe on a buttercream border. In my opinion, that last step is the thing that takes this recipe from “giant cookie” to “cookie cake.” Not that there’s a thing in the world wrong with a giant cookie, am I right?!
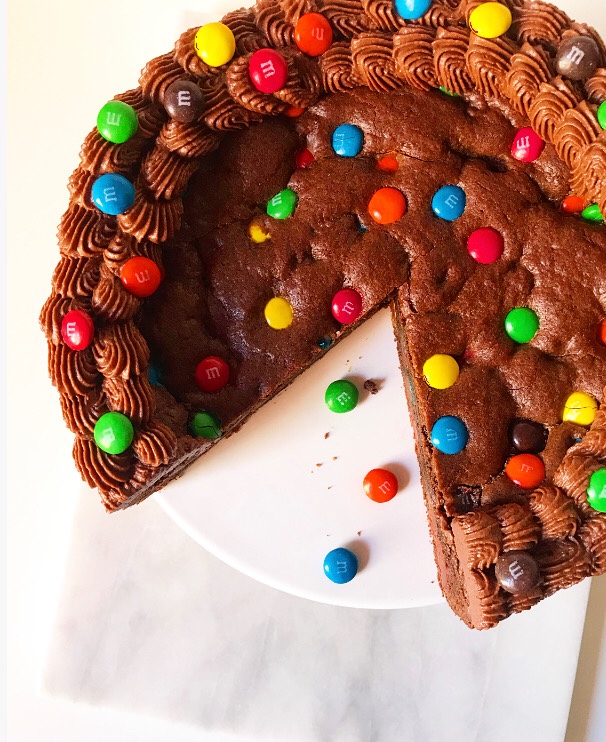 Slice it up and share with people you love this weekend or for the Fourth of July (with
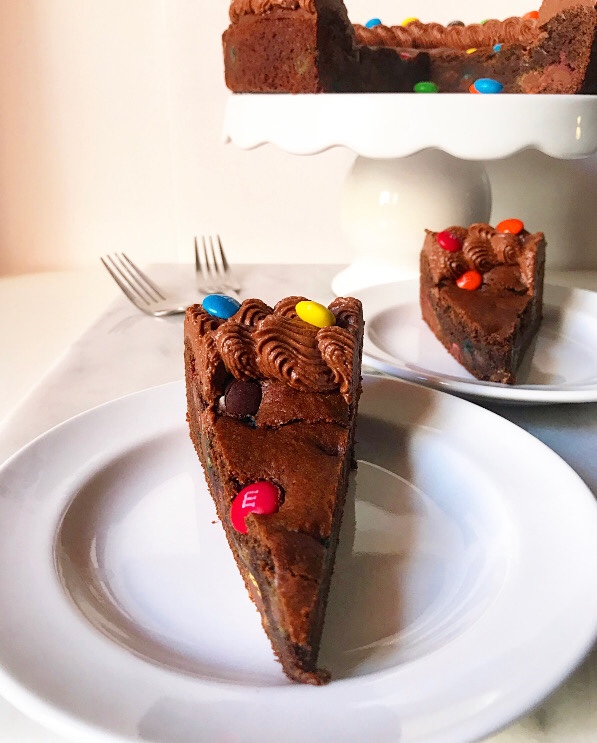
 I owe you an apology. The
  Sure, that cake is delicious—it’s cake!—but it’s not delicious enough to require four bowls, ample sifting, a whisk, a spatula, a mixer and whipped egg whites. Few things are.
 After being asked to make a few
  Simpler and better is exactly what you’ll find with this new, improved White Cake recipe. This rich, tender, fine-crumbed cake is a one-bowl endeavor, and while it does require a mixer, you don’t have to sift anything or whip egg whites. I’m calling it a huge win.
 This cake comes together differently than the others you’ll find on this site. Instead of the usual creaming method (creaming butter and sugar before adding eggs, dry ingredients and milk), this recipe is made using the reverse creaming method, which might be my new favorite way to make cakes. Let me walk you through the process.
 Start by combining flour, cornstarch, baking powder, salt and sugar in a large mixing bowl—the only mixing bowl you’ll need for this recipe. Give those a good stir with a whisk or a low mixer before adding all your softened butter.
 Next up, use your mixer to combine the two. This will take a few minutes and produce a rubbly, sandy-looking mixture. The purpose of doing this is to coat the flour with fat before adding the liquid ingredients. The butter creates a barrier that impedes gluten-development, producing a softer, more tender cake.

 And speaking of gluten-development, the last two steps are adding liquid ingredients (egg whites, extracts, and buttermilk), which are what will activate the gluten in the flour. Mix just until combined before dividing the batter into two pans and baking.
 Once the cake layers are cool, you may fill and frost them however you like. I kept it simple this time around with a white buttercream (just my vanilla buttercream with less vanilla) and went for the naked cake look.
 Ooooh. Ahhhhh.
 You’ll love this White Cake for its buttery vanilla-almond flavor, fine crumb, and did I mention it only requires one bowl?????!!!!!🙌😍💪🍰🎉
  It’s great on its own, but is also a wonderful blank slate for all sorts of applications. Feeling like
  Or maybe get brave and wild and do all three, because this White Cake is just that simple and just that good.


