How cute are these Easter Egg Hunt Cupcakes?! They’re a miniature version of the towering surprise-inside Easter Egg Hunt Cake I made a few years back, and truth be told, I think I love them even more than the original. Layer cakes are great and all, but it’s pretty hard to resist cupcakes topped with Easter candy and filled with sprinkles!
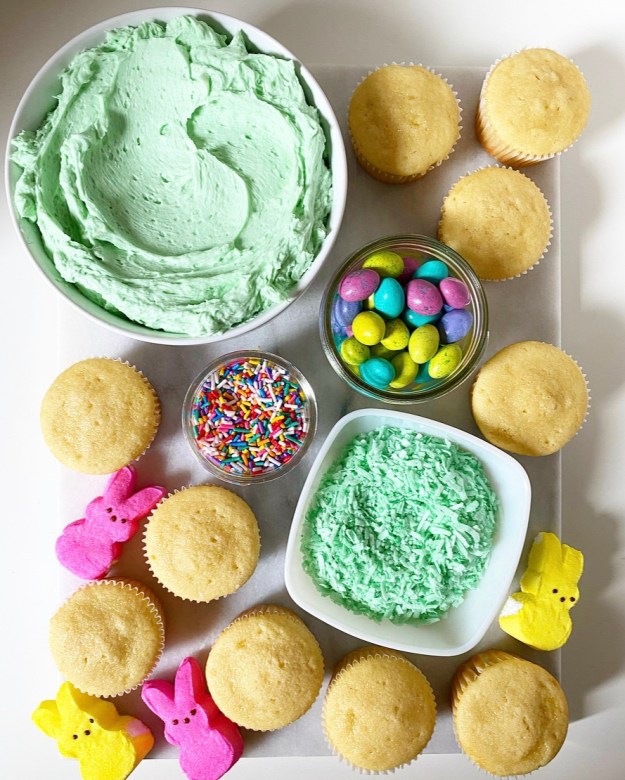 Easter Egg Hunt Cupcakes start with the same vanilla sour cream cupcake base I used for my Red Velvet Marble Cupcakes last month. Here it’s baked up plain, but that’s the only thing that’s plain about these little cakes. It goes without saying that this recipe is pretty extra.
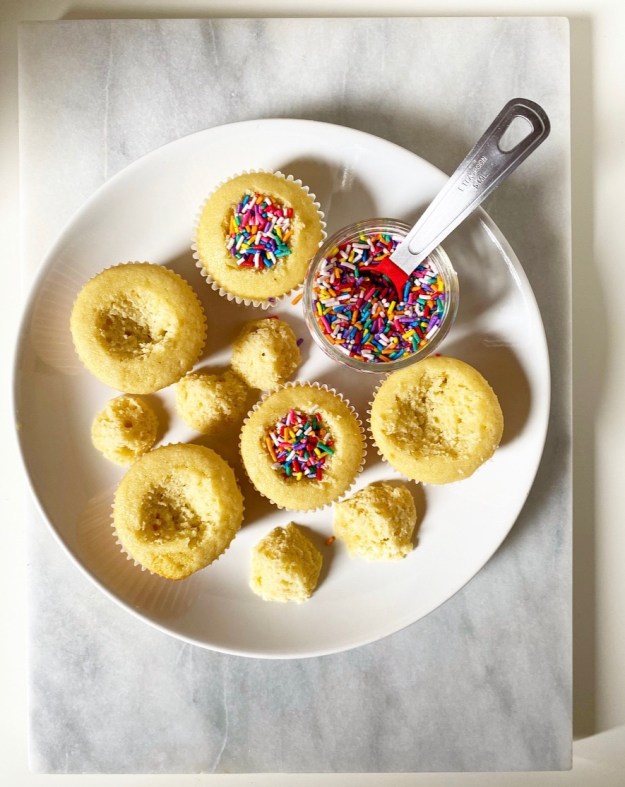
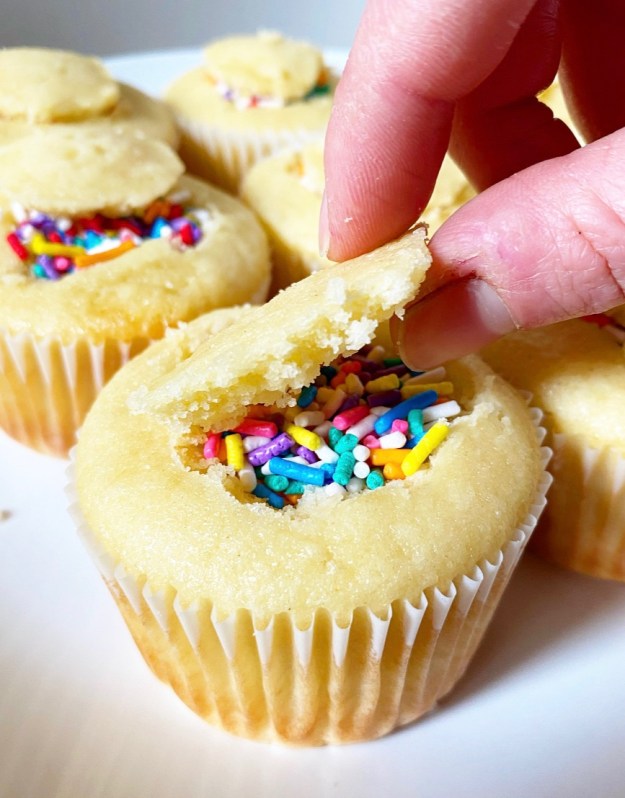 Before frosting, each cupcake is filled with sprinkles for a surprise effect. To achieve this, a cone-shaped piece of cake is cut out of the top of each cupcake, leaving behind just enough room for a teaspoon of sprinkles. Then the little conical toppers are trimmed into disks so that they fit right back on top of the cupcakes, concealing the surprise inside. Once the cupcakes are frosted, the cut-outs won’t be visible, making it all the more fun when your family and friends bite in and sprinkles come running out!
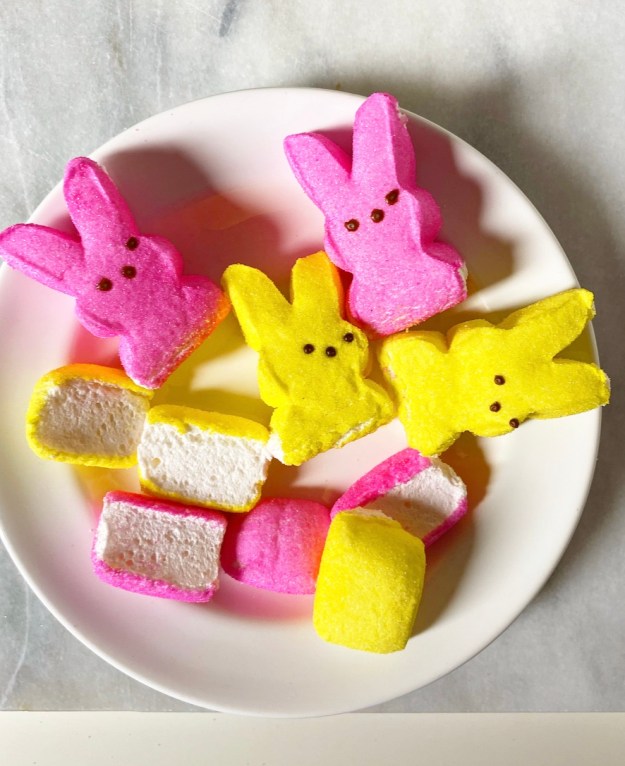
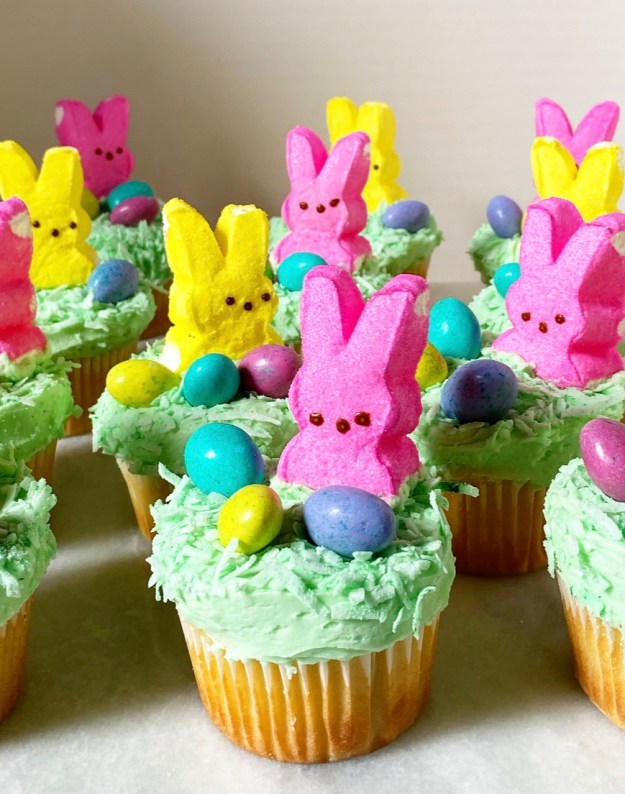 Like the layer cake that inspired them, these cupcakes are frosted with green-tinted vanilla buttercream and decorated with little Easter scenes made of green coconut “grass,” egg-shaped candies and Peeps bunnies.
Pro-tip: slice off the rounded bottom edges of your Peeps bunnies and slick the exposed marshmallow with frosting so that they sit nicely on your cupcakes. You don’t want to spend all of Easter propping up marshmallow bunnies, you know?!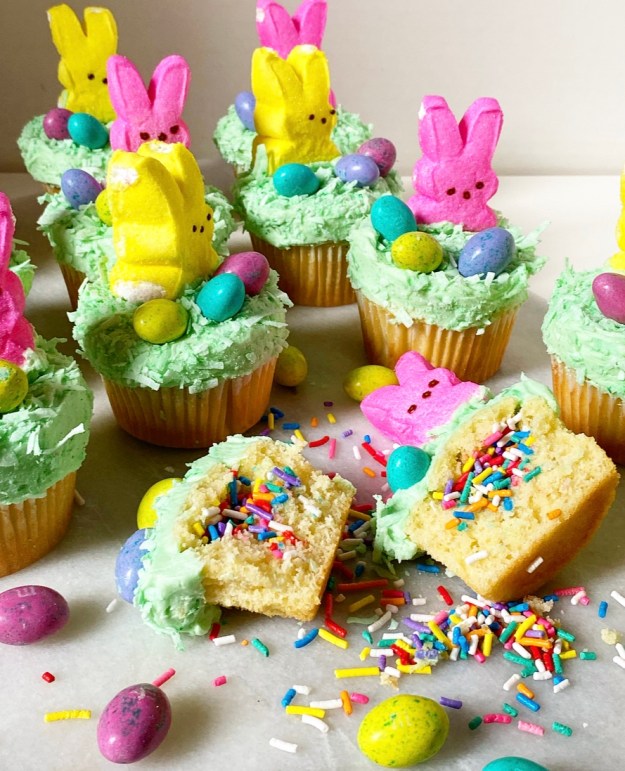 I can’t get over how festive these are! I say this about at least one recipe a year, but these might be the cutest things I’ve ever made. And maybe soon they’ll be the cutest things you’ve ever made.
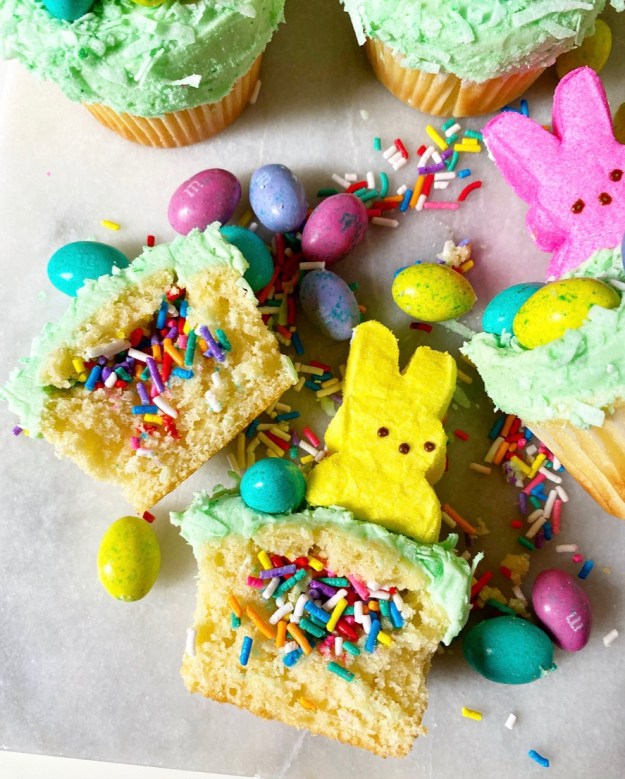
Easter Egg Hunt Cupcakes
makes 12-14 cupcakes
Cupcakes:
1/2 cup milk, room temperature
1/2 cup sour cream, room temperature
1 1/2 cups all-purpose flour
2 tablespoons cornstarch
1/2 teaspoon baking powder
1/4 teaspoon baking soda
1/2 teaspoon Kosher or sea salt
1/2 cup (1 stick) unsalted butter, softened to room temperature
1 cup granulated sugar
2 large eggs, room temperature
2 teaspoons pure vanilla extract
Frosting:
3/4 cup (1 1/2 sticks) unsalted butter, softened to room temperature
2 1/2 cups confectioner’s sugar
pinch of Kosher or sea salt
1 1/2 teaspoons pure vanilla extract
a few drops of green food coloring
3 tablespoons heavy cream
For assembly:
1 1/2 cups sweetened flaked coconut
a few drops of green food coloring
Peeps bunnies (optional)
rainbow sprinkles (jimmies) or seasonal sprinkles
Easter egg candies (I used M&Ms)
Make the cupcakes. Preheat oven to 350F. Line a 12-cup standard muffin tin with cupcake liners. Set aside.
Combine milk and sour cream a liquid measuring cup, then use a fork to whisk them together. Set aside.
In a small-medium mixing bowl, whisk together flour, cornstarch, baking powder, baking soda, and salt. Set aside.
In a large mixing bowl, use an electric mixer to beat butter until light and fluffy. Beat in sugar. Add eggs one at a time, combining completely after each addition. Beat in vanilla. Mix in half the dry ingredients, followed by half the milk/sour cream. Add the remaining dry ingredients followed by the remaining milk/sour cream.
Fill liners 2/3-3/4 full. Tap full pan on the counter five times before baking for 18-19 minutes, until a toothpick inserted in the centers comes out clean. Let cupcakes cool in the pan for 5-10 minutes before removing to a rack to cool completely.
Make the frosting. In a large mixing bowl, use an electric mixer to beat butter until light and fluffy. Add confectioner’s sugar and salt in two installments, combining completely after each addition. Beat in vanilla, food coloring & heavy cream until combined. Set aside.
In a small bowl, mix together coconut and food coloring until combined. If using Peeps bunnies, trim off 1/2-inch of their curved bases so that they are flat.
Fill cupcakes. Working with one cupcake at a time, use a small paring knife to carve out a 1-inch deep hole in the top. The removed piece should be conical; slice off the narrow/pointed end so that you have a little disk of cake. Fill the hole in the cupcake with ~1 teaspoon of sprinkles, then place the disk of cake on top to cover them. Repeat process until all cupcakes have been filled.
Frost and decorate cupcakes. Use an offset icing spatula to frost filled cupcakes, leaving the tops relatively flat. Sprinkle on green coconut (or gently dip cupcakes into a bowl of coconut), then decorate with egg candies and Peeps bunnies. I find it easiest to get the Peeps bunnies to stick by dipping their trimmed flat bottom edges in frosting before adhering to the frosted cupcakes.
Serve. Cupcakes will keep covered at room temperature for up to three days, or in the refrigerator for up to five. Peeps bunnies will get stale over time.


 I’ve made
  Let me lay it out for you. On Monday, I made the cake—a sprinkle-free, rectangular version of this
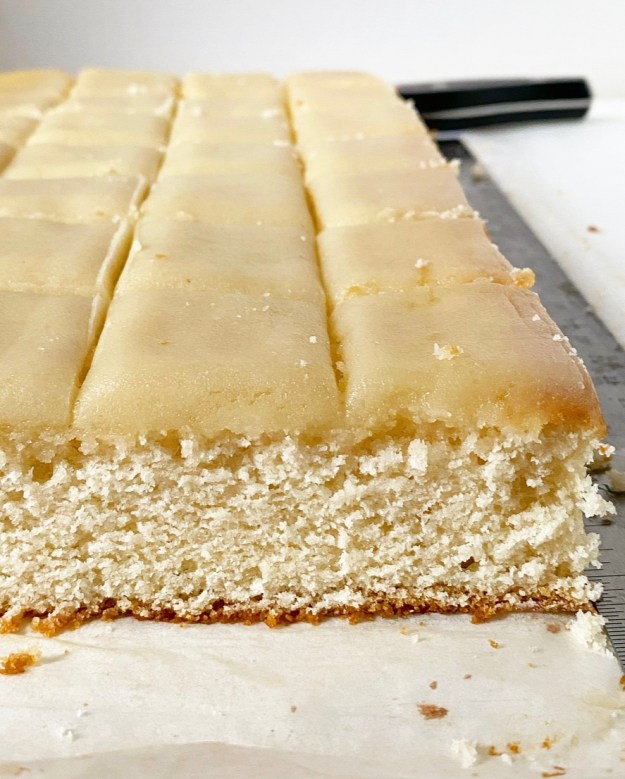 The next day (Thursday), I trimmed the edges and cut the cake into 1 1/2-inch squares. Since marzipan is moldable, I scored my squares before slicing—it made the whole process super simple.
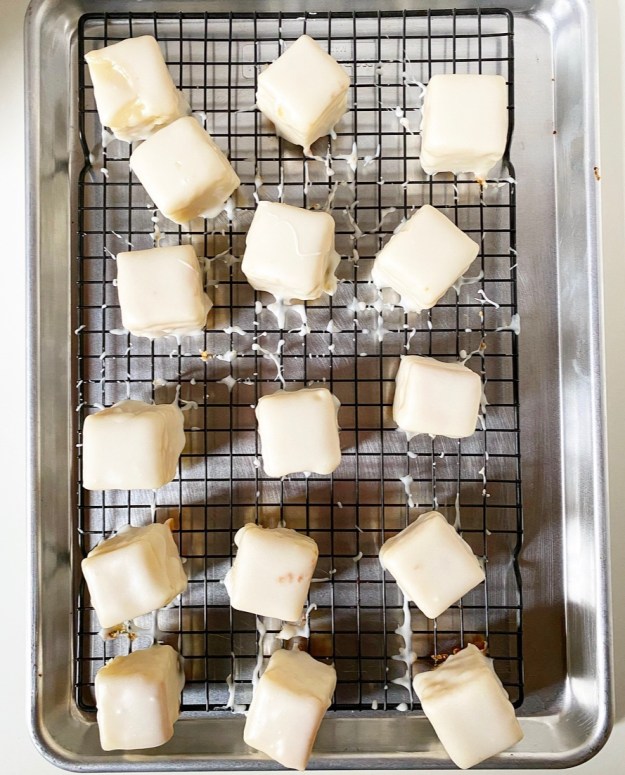
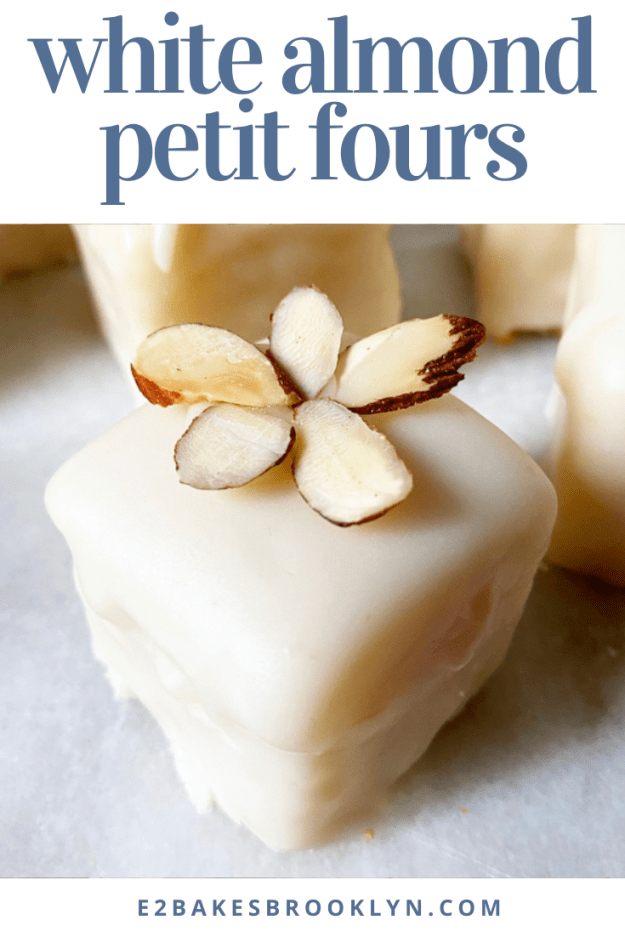
 My process went something like this. I stuck a fork in the bottom of a petit four and dipped it in the warm fondant, quickly moving the bowl around to cover the sides. Then I used another fork to help ease the petit four onto a rack to set before moving onto the next.* I had a few casualties, but the solution was to slightly reheat the fondant and keep going. Make no mistake, this was still a tedious process, but it’s nothing compared to the squeeze bottle nightmares of petit fours past! Are there a few crumbs on these little cakes? Sure! But perfection is the enemy of joy here. Also, toasted almond flowers are quite handy for hiding flaws. Aren’t they pretty? I’m obsessed.
 As far as flavor goes, White Almond Petit Fours are sweet almond through and through! If you love
 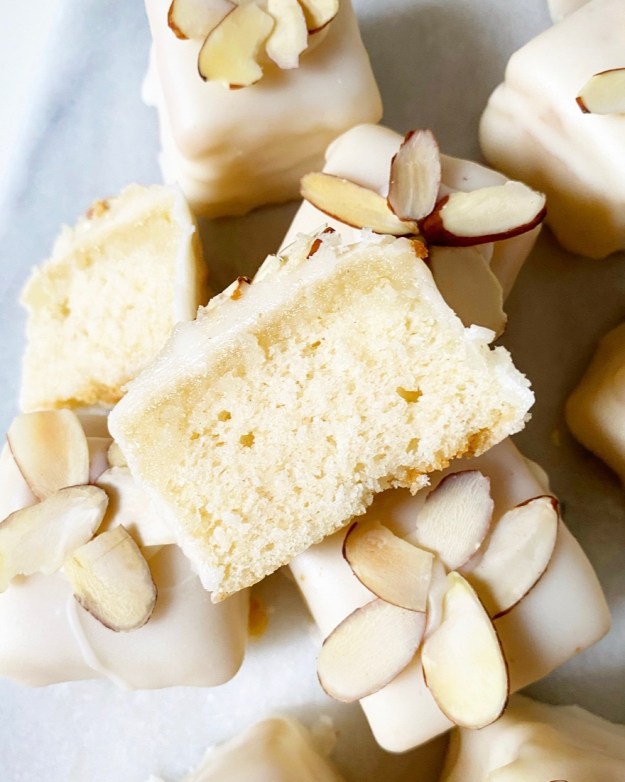 The petit fours of my childhood were super-sweet so I love the intensity here, but if you need some sharpness to cut through all the almond, you could soak the cake in a
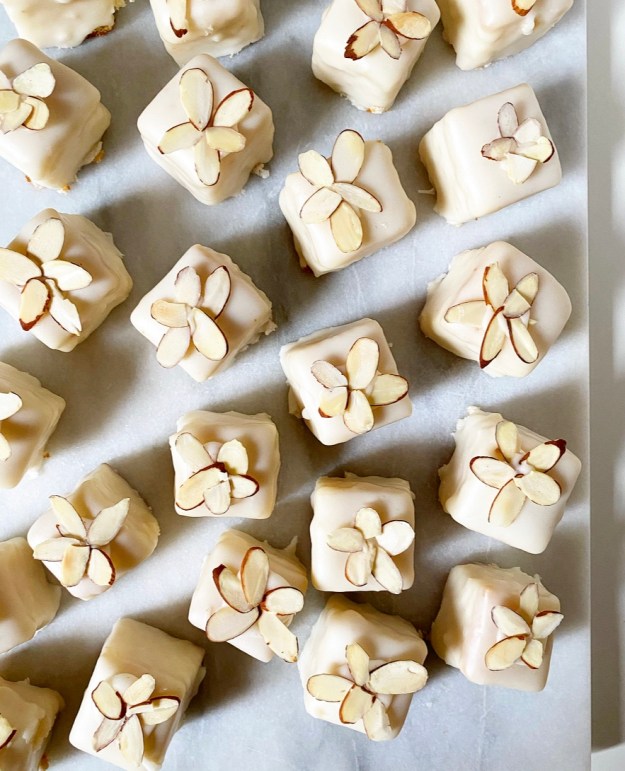

 I put a
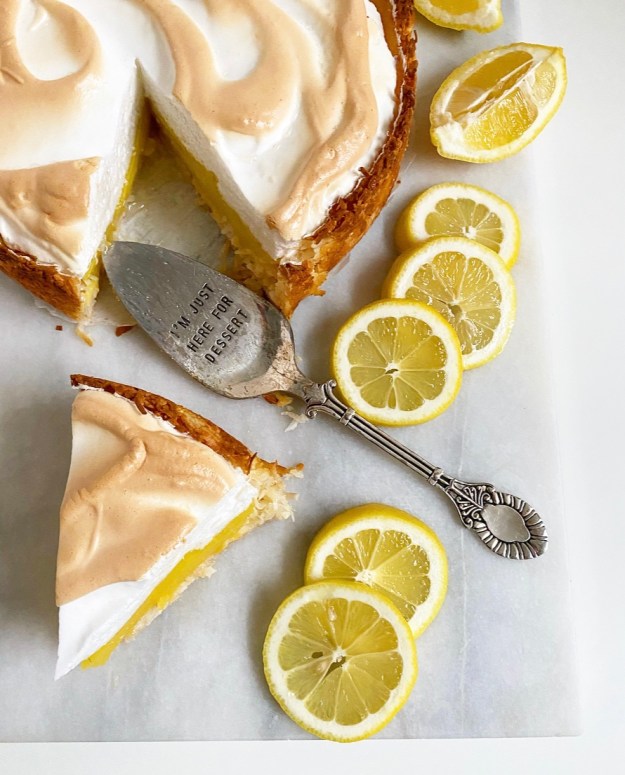
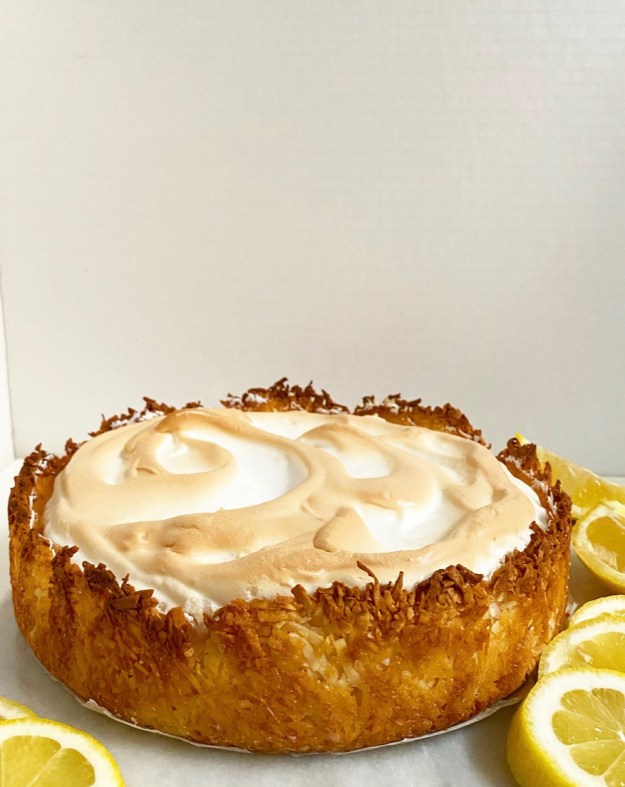
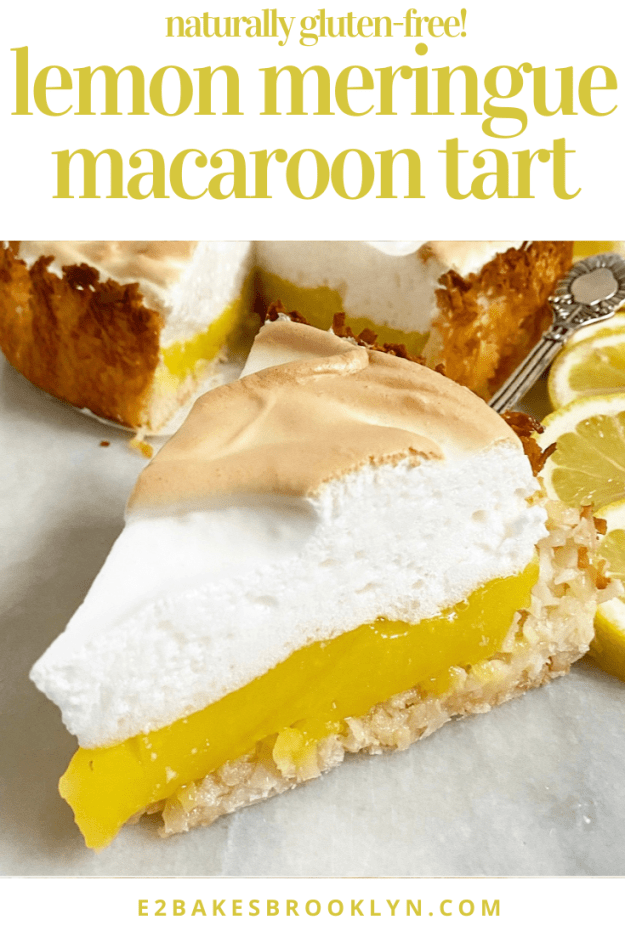
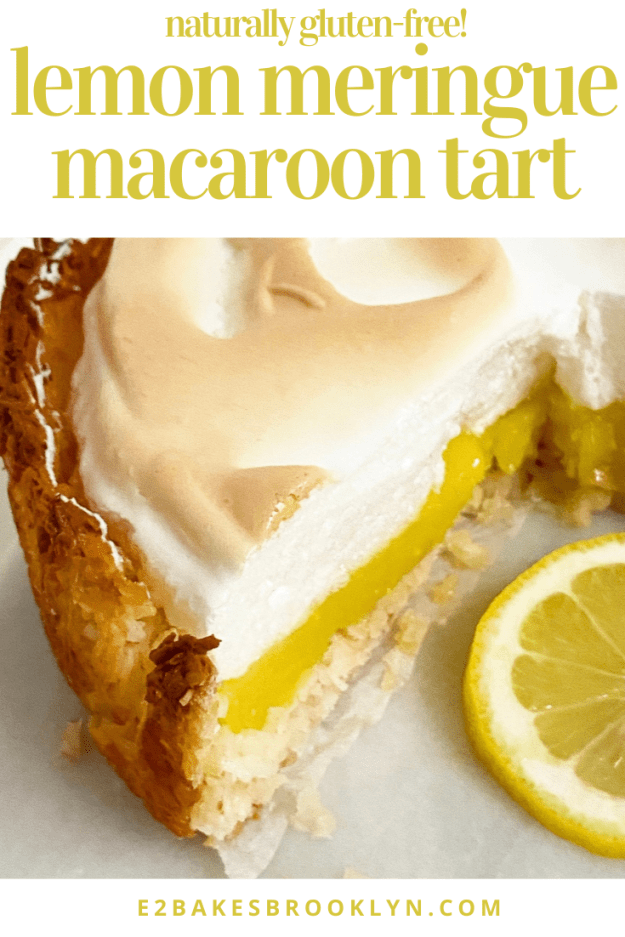
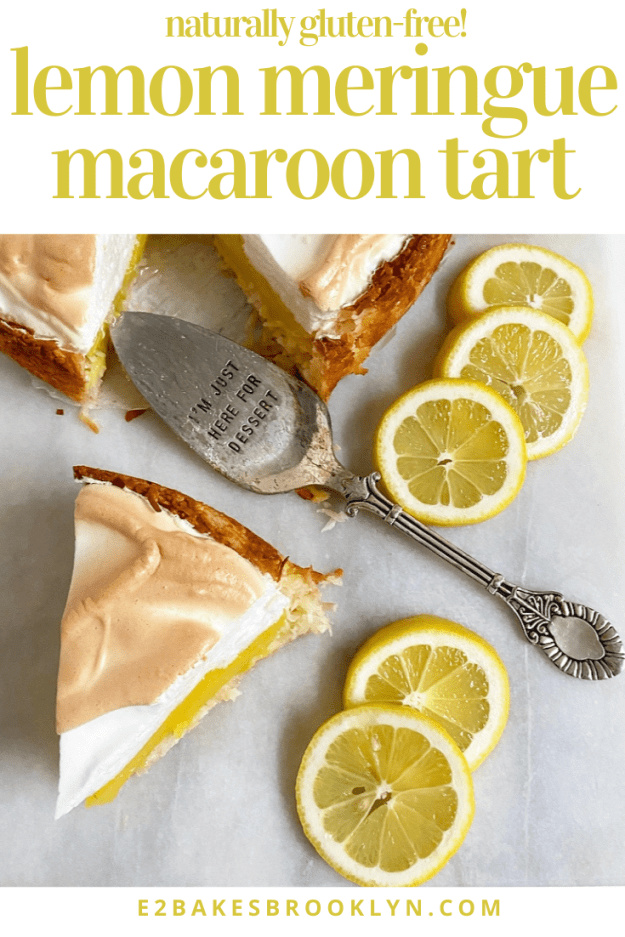
 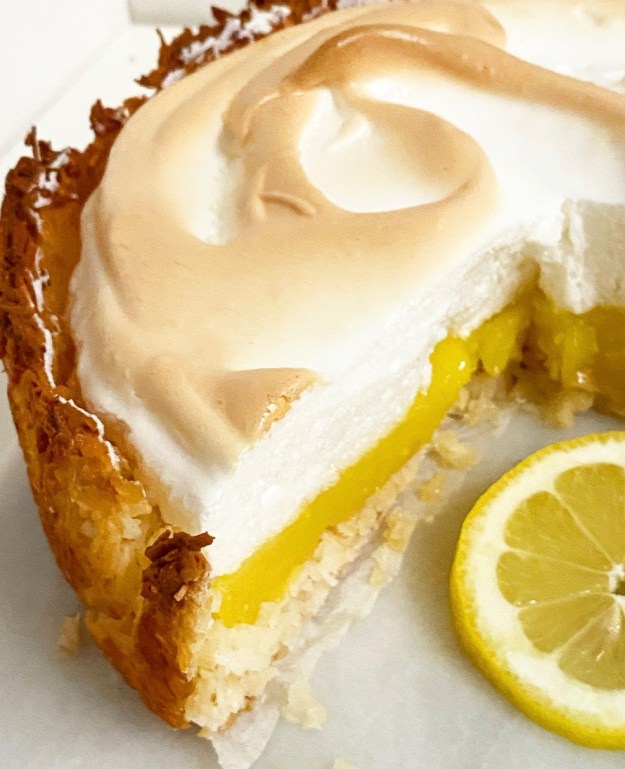 You read that right: Lemon Meringue Macaroon Tart. Like tangy lemon filling and airy meringue layered into a giant coconut macaroon crust. Oh y’all, this is something special.
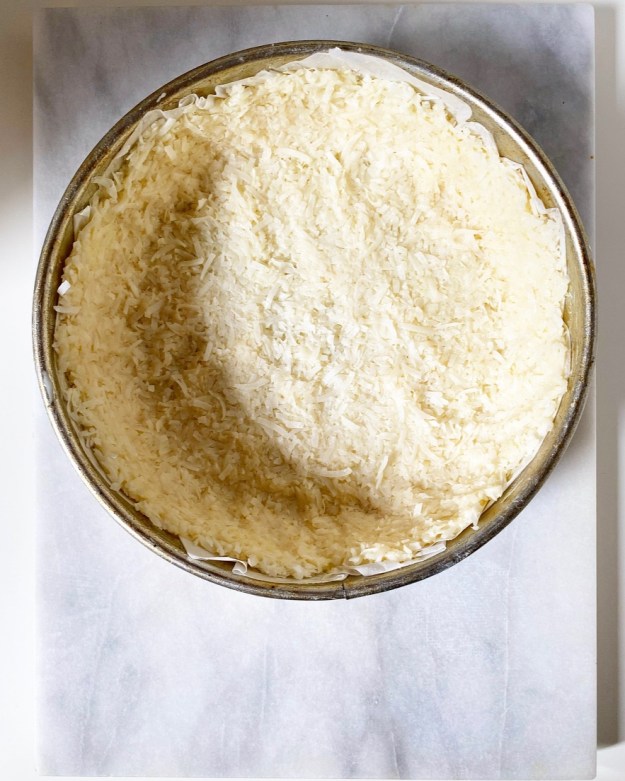
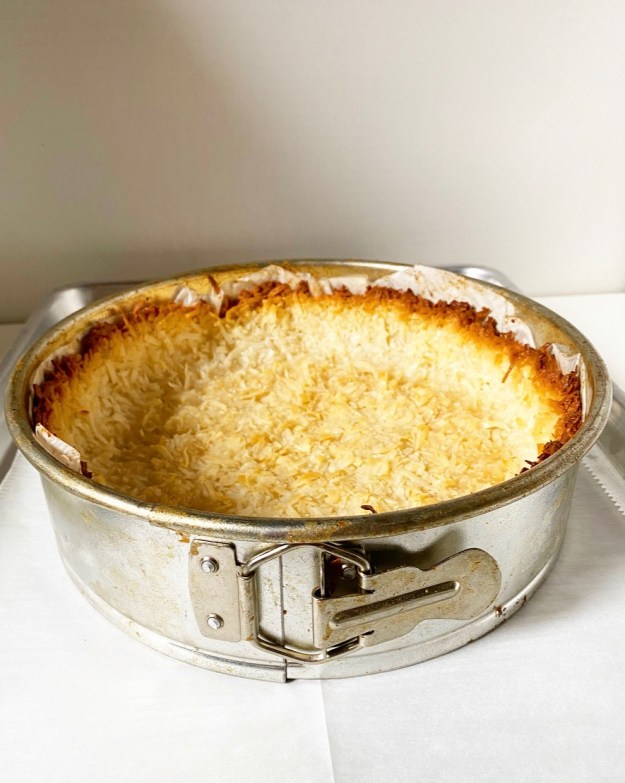
 Let me get this out of the way: we are talking about
 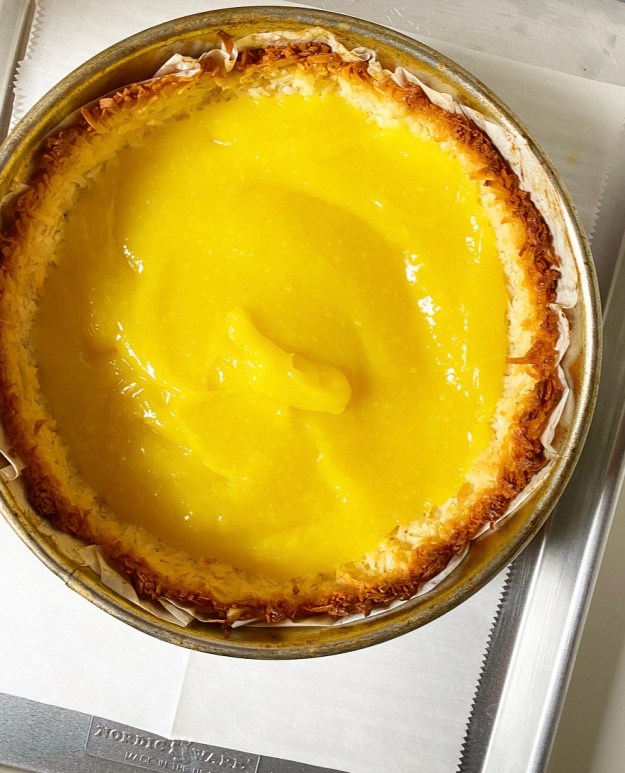 I know lemon meringue filling can be intimidating if you haven’t made it before, but I promise it’s not scary. I think it’s the color blocking that sends people running for the nearest bakery, but lemon meringue is just a marriage of two really simple recipes. The lemon portion is very similar to the
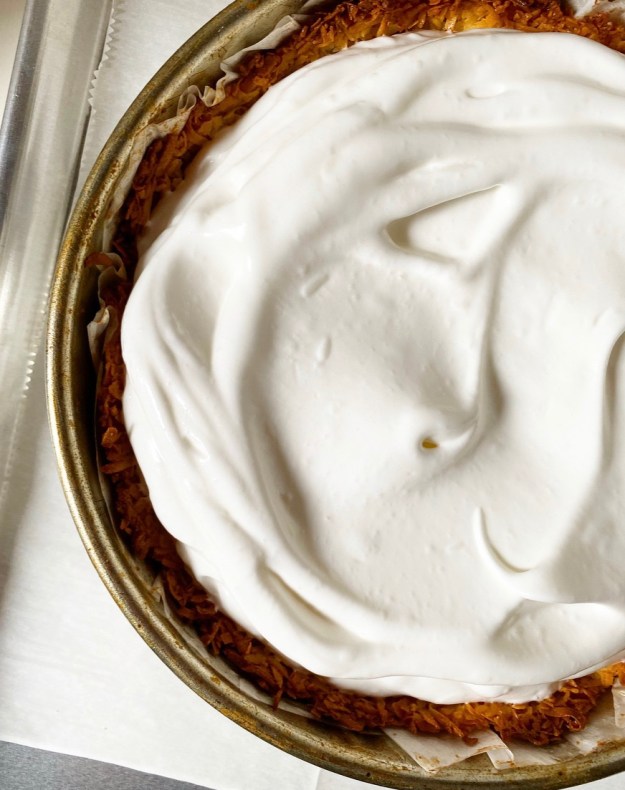 Regarding assembly, you’ll need to have your crust baked and cooled and the meringue whipped before you make the lemon filling. The reason for this is that the filling needs to be piping hot when it meets the meringue. By doing this, we are allowing the egg whites in the meringue to bake directly onto the entire surface of the filling, helping them to fuse together so they don’t slide apart during slicing. Once filled, the tart will need to bake for about 25 minutes, just until the meringue is beginning to turn golden.
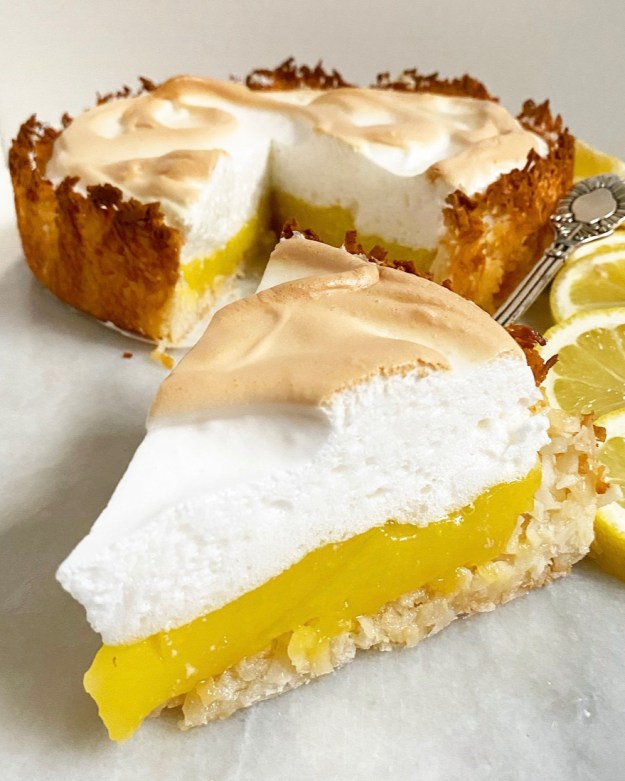 Some people like their lemon meringue desserts at room temperature, but I prefer mine cold. Also, I think it makes for more aesthetically pleasing slices. That color blocking though 😍
 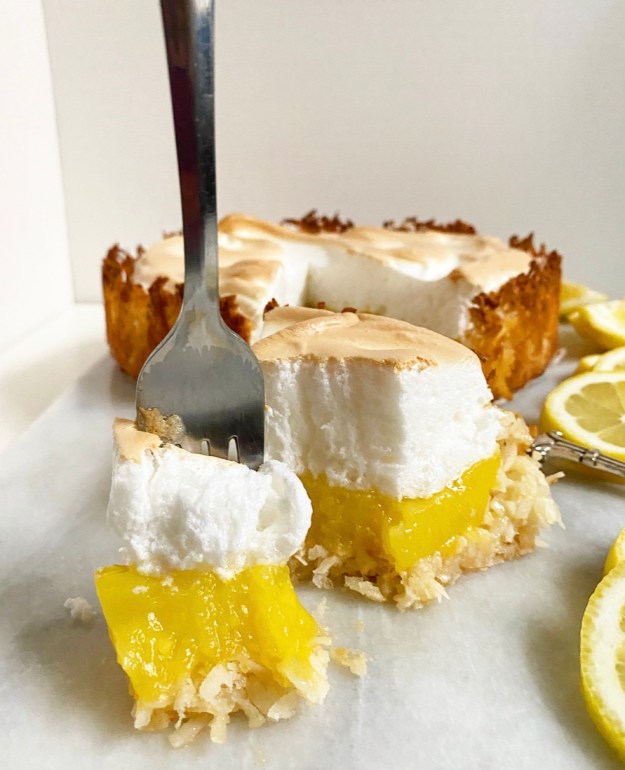 One persnickety thing about lemon meringue desserts? They need to be served the day they’re made. Meringue is a beautiful thing, but it is fleeting. If not served within hours of baking, it will begin to weep. Ew. Rest assured that even if you don’t have the time to bake and serve on the same day you can still get your lemon macaroon tart fix. The solution? Skip the meringue layer. You can cool the tart just after adding the lemon filling, then refrigerate until ready to serve.
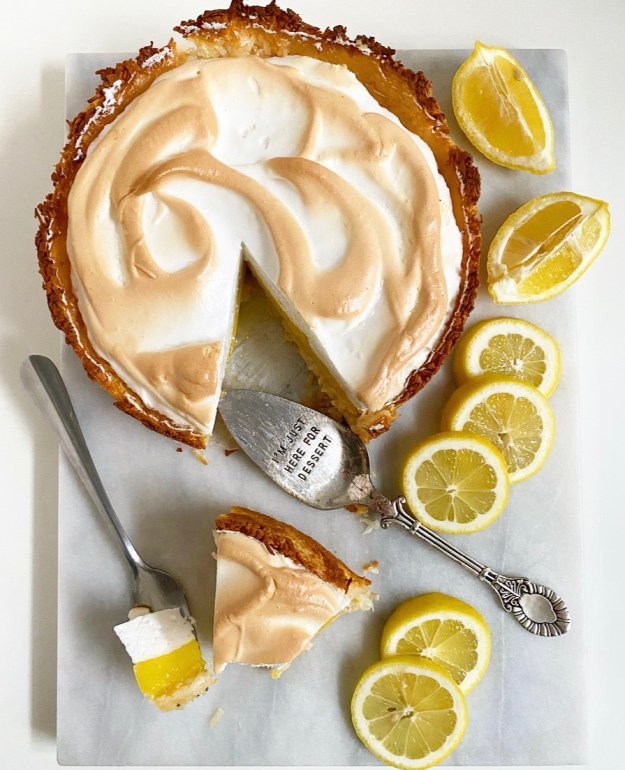
 Funfetti, confetti, whatever you want to call it, white cake dotted with rainbow sprinkles is one of my
  I haven’t made many layer cakes in the last year—it’s hard to believe I used to make 10-20 a month!—but that doesn’t mean I haven’t fed my craving for
  Like the traditional
 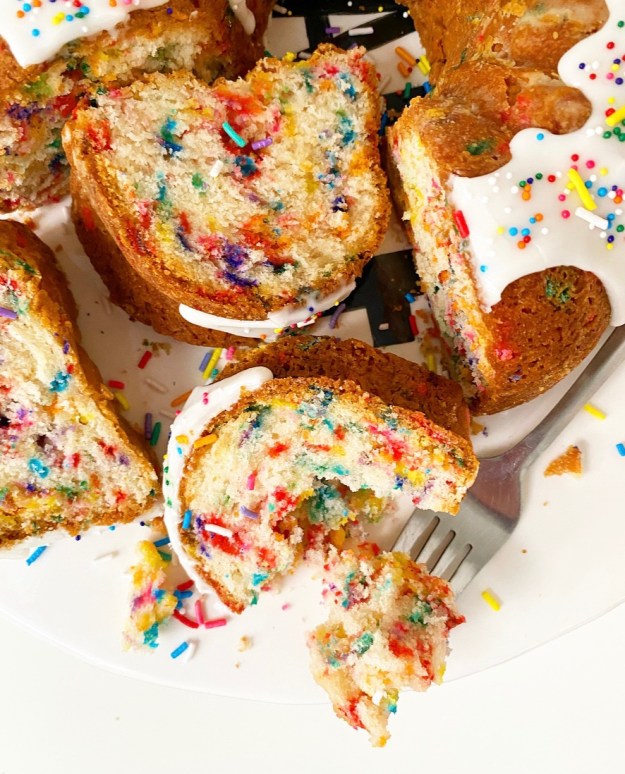 I know that restrictions are starting to loosen as vaccines becomes more available, but if you’re not attending gatherings that require a cake of this size, don’t worry, I’m not either. What that means is that I happen to know that this recipe halves well and can be baked in a loaf pan for your immediate pod or just yourself. I don’t know about you, but dipping into my own personal Funfetti cake over the course of a week sounds a lot like happiness to me.

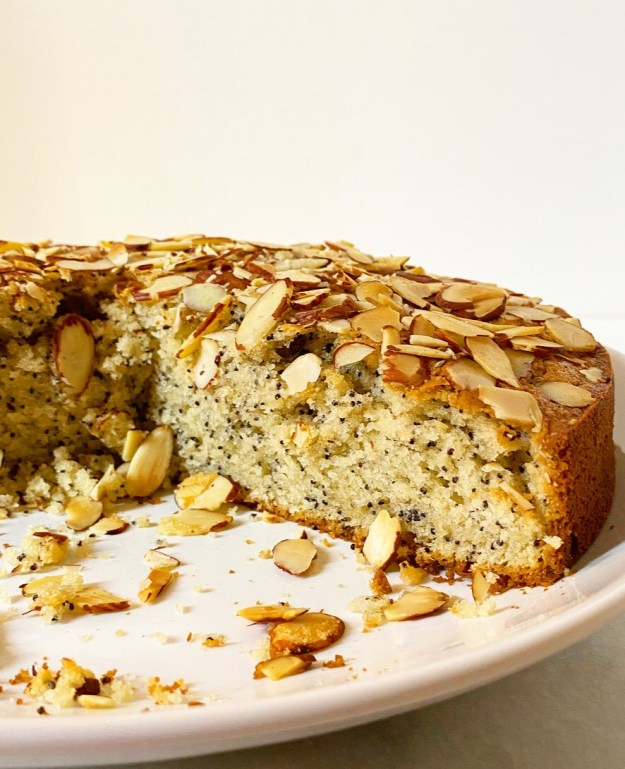
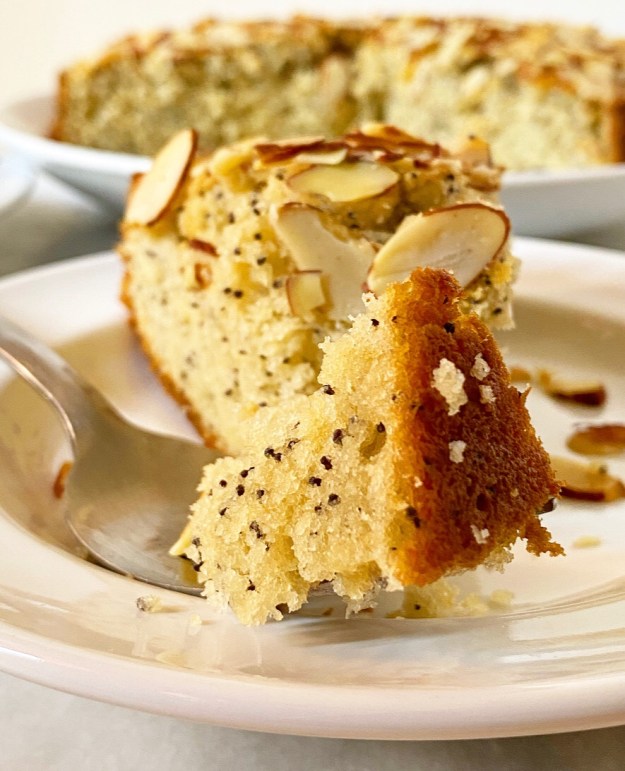
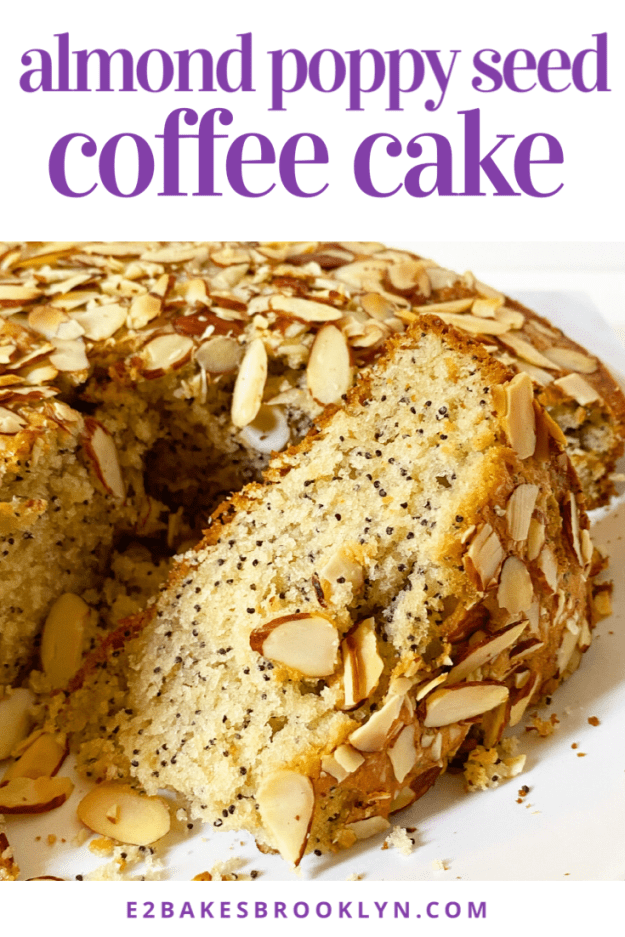
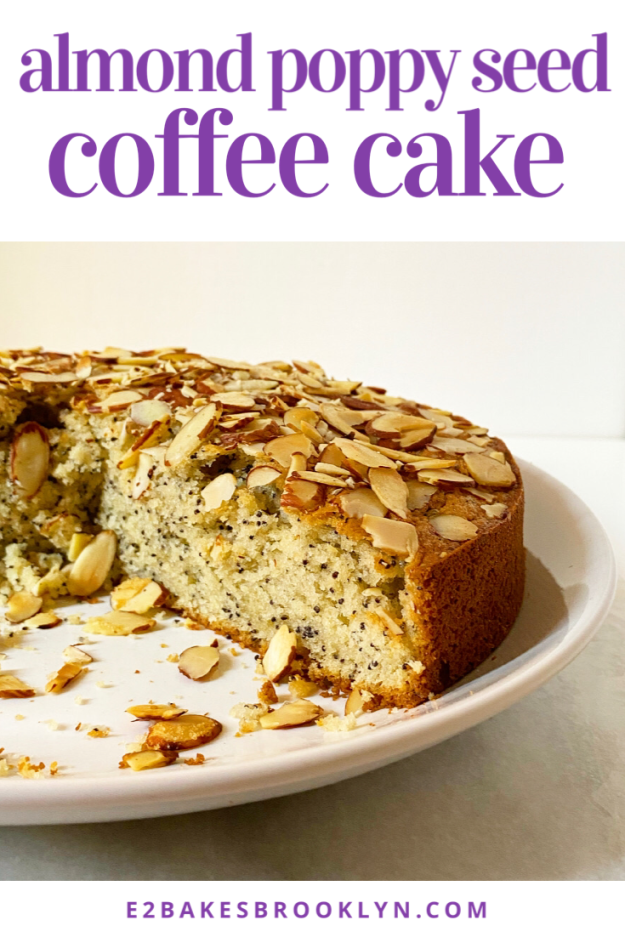
 In keeping with social distancing, baking with what I have, considering what you might have, thinking up swaps, and trying to make something Easter-appropriate, I present to you this Almond Poppy Seed Coffee Cake. It’s made with the last of a container of sour cream I found in my fridge, poppy seeds leftover from
 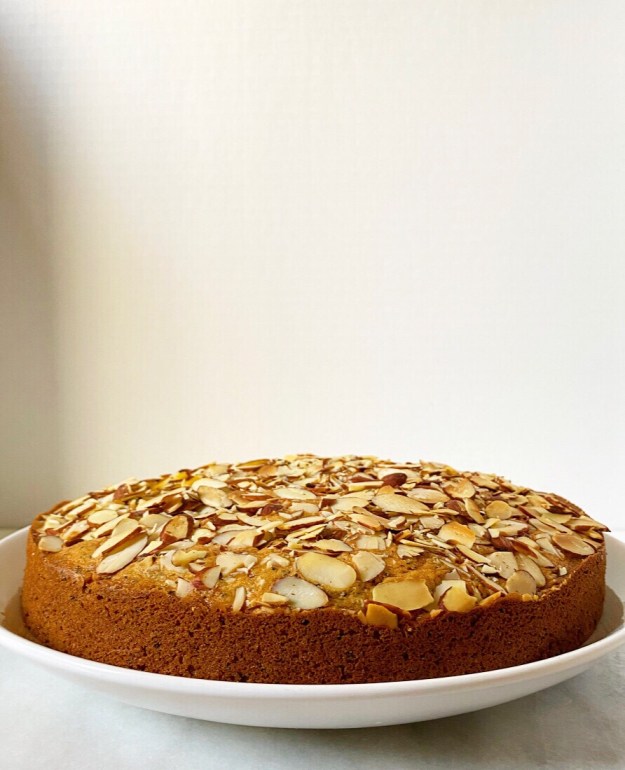 As far as Easter goes, this is not my norm. This cake is not
  The cake is just my usual
 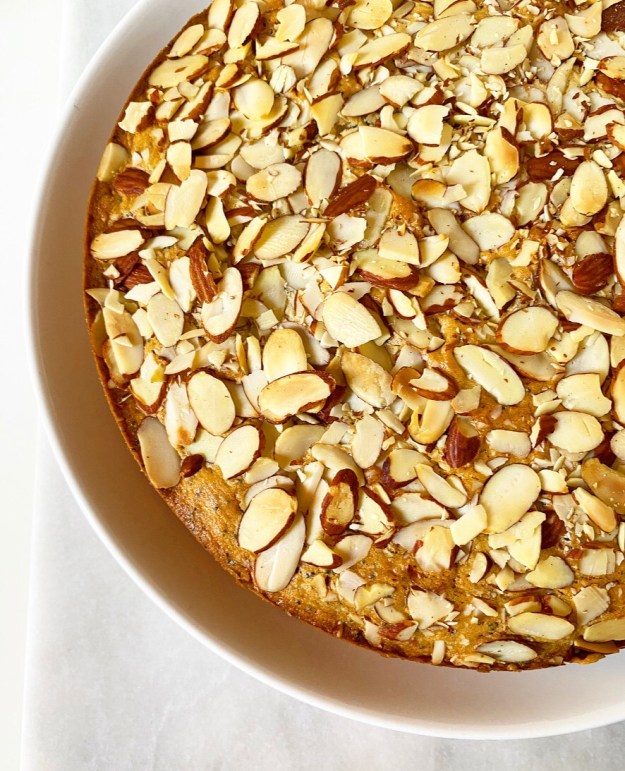 I skipped the traditional coffee cake crumble here because I felt like it was competing with the poppy seeds—too much crunch, ya know? Instead, I’ve taken the easy way out and topped this sucker with sliced almonds, put it in the oven and called it a day.
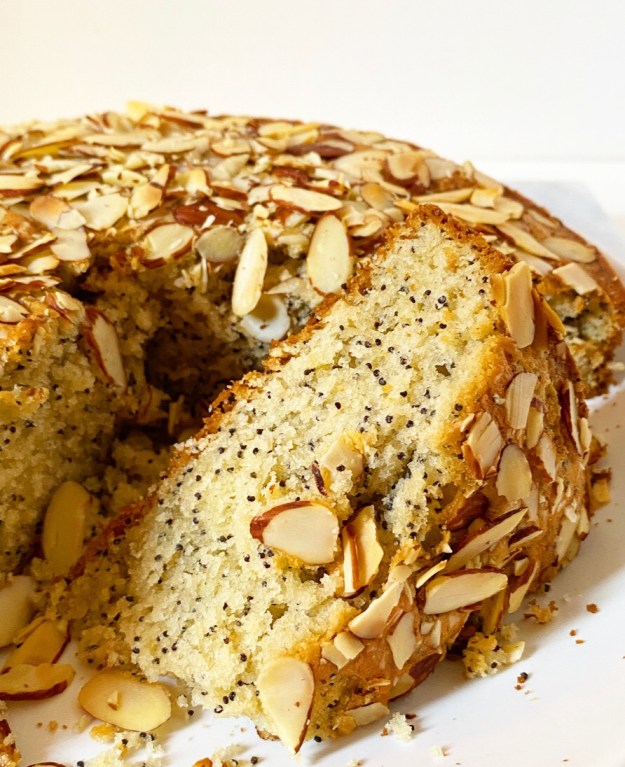 As with every recipe I’m posting right now, Almond Poppy Seed Coffee Cake has plenty of room for substitutions and swaps.