 A week on Swan’s Island is never enough time. It simply isn’t. Yes, there’s relaxing and hiking and quiet, but just when you start to fully decompress, you have to get back on the ferry, drive ten hours, and return to your real life. It’s the worst.
 We keep saying “two weeks next year” but only getting half of that. I’m putting it out to the universe now: one month next year. That way, when we only get half, it’ll be two weeks. Am I trying to con the universe in to more vacation? Sure, why not. You can’t blame me for wanting to spend time with the friends we’ve made up there (even socially distanced) instead of carrying on entire relationships via Facebook.
 I mean, would you believe that I’ve pretty much never baked for anyone on Swan’s Island? It’s true. I’ve been going there regularly for the last six years, made some friends, and know the people who own the general store well enough that they recognized me immediately with my mask on, but I’ve never really baked for any of them. They know, of course, that I bake and blog, and I always say I’m going to make something for them, but then time gets away and suddenly I’m on the ferry back to the mainland.
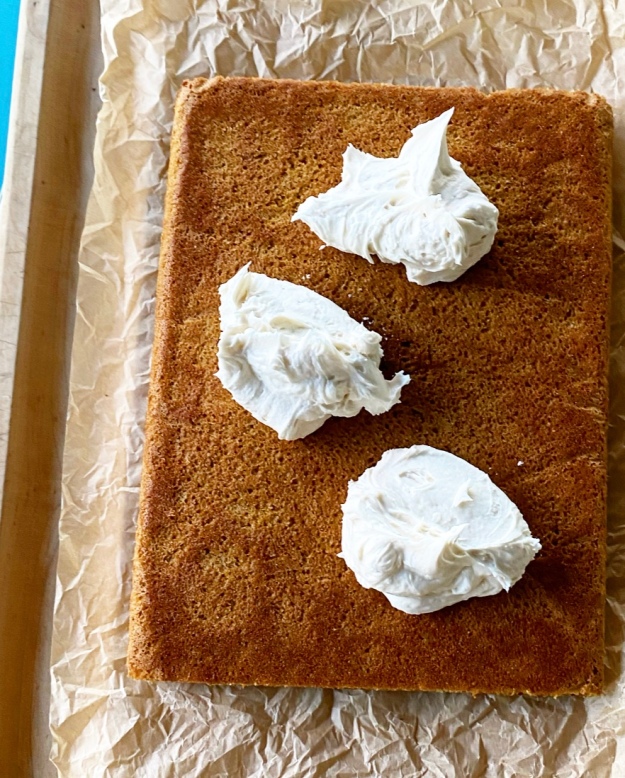
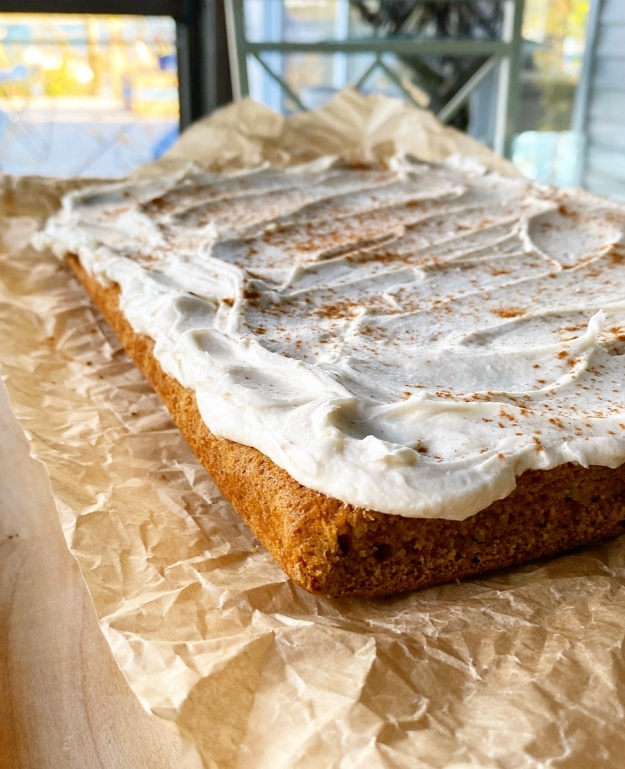
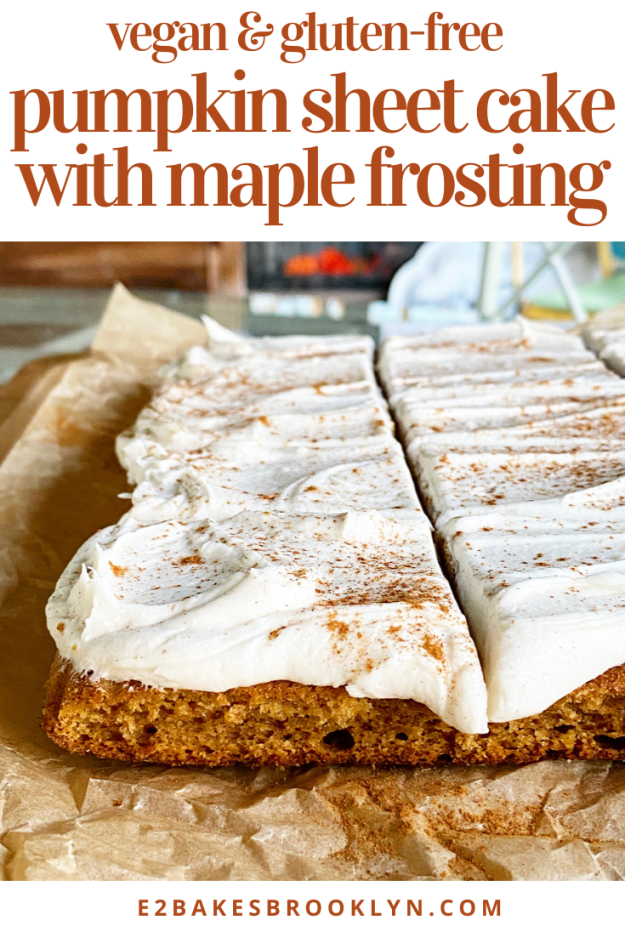
 All that said, when we booked our trip in July, I decided this year was *the* year. I tested a recipe before I left Brooklyn, brought a box of potato starch and the vegan butter I like, and it took until the second-to-last day, but I baked this Pumpkin Sheet Cake with Maple Frosting for my Maine people. Finally.
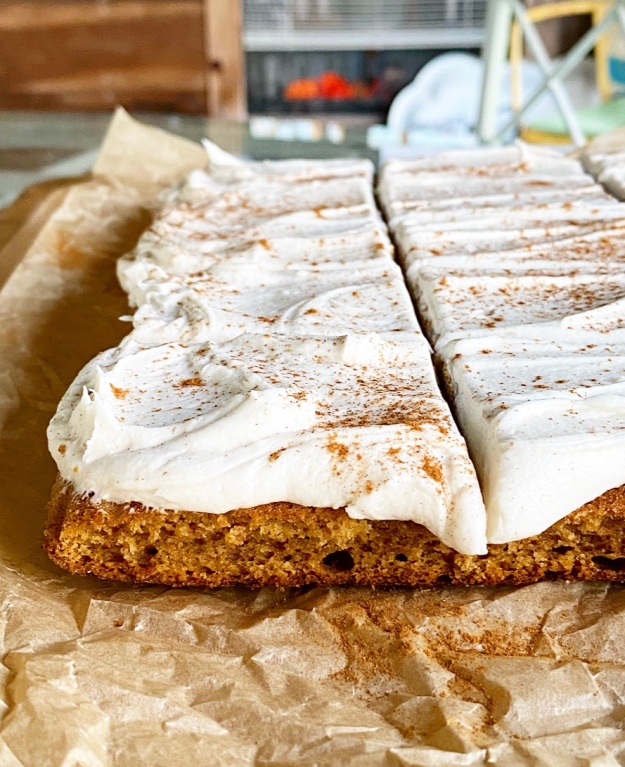 I’ve never put a sheet cake on here. It’s not because I think they’re “less than” or something—I just have occasions for other configurations of cake and frosting far more frequently than I do for this super simple slice-and-share situation. But our annual Swan’s Island trip? That’s a slice-and-share situation if I’ve ever seen one. Especially in COVID, when get-togethers with people outside my immediate germ pod aren’t a thing, it was so nice to be able to wrap up and dole out slices of this Pumpkin Sheet Cake with Maple Frosting without having to worry about keeping layers intact.
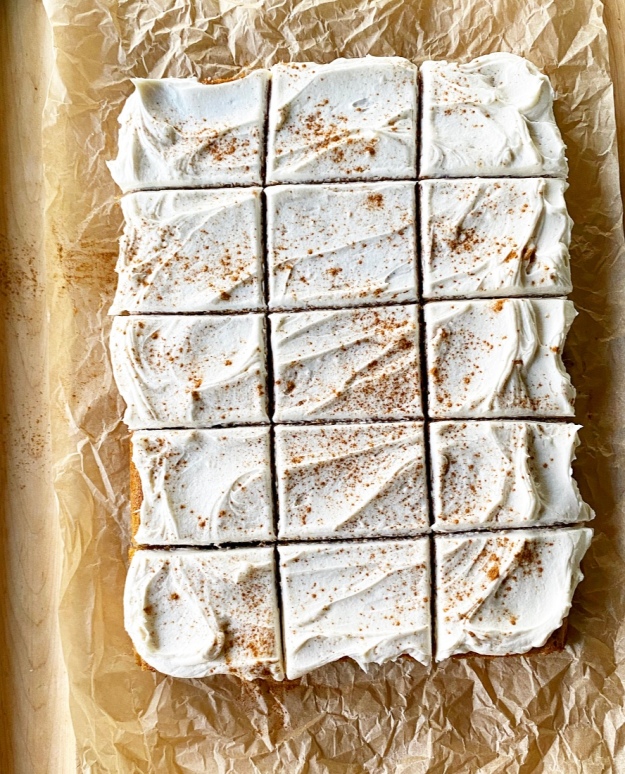 As with most of what we eat on Swan’s Island, this cake was made with my trusty co-traveler/fellow Maine enthusiast, VJ, in mind. I’ve mentioned many times that she is a gluten-free vegan, and though I am not either of those things, I greatly enjoy the challenges and rewards of baking (and cooking) that way when we are together. It’s far more fun to bake when people can eat what you make…not that I’d be particularly mad about being saddled with all 15 slices of this cake. I mean, do you see that vegan Maple Frosting???
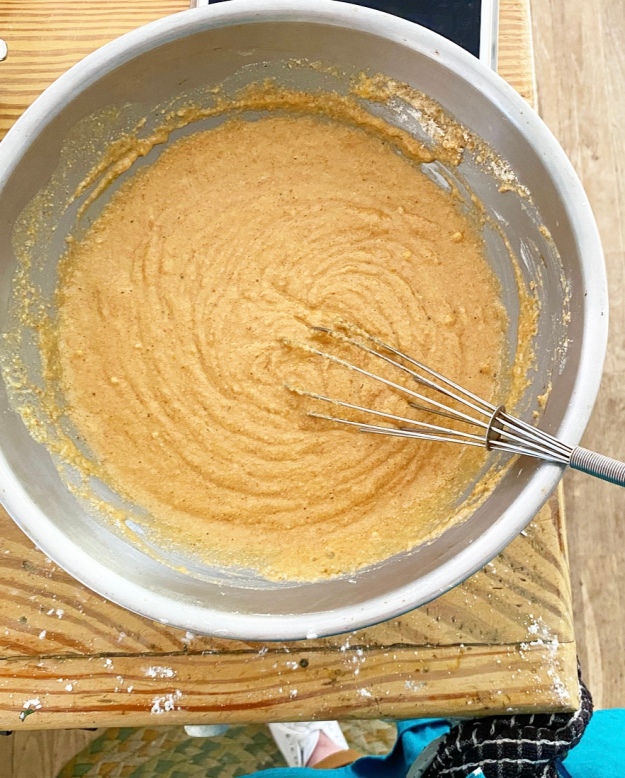
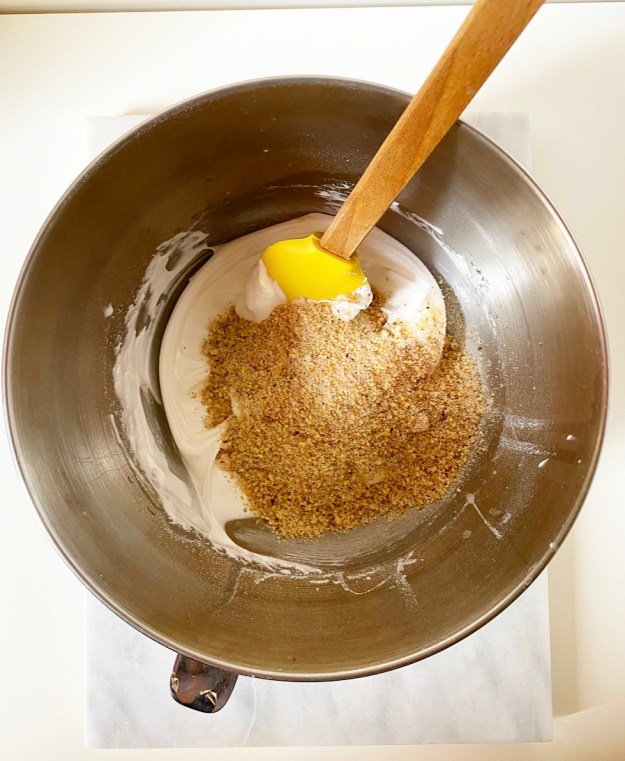
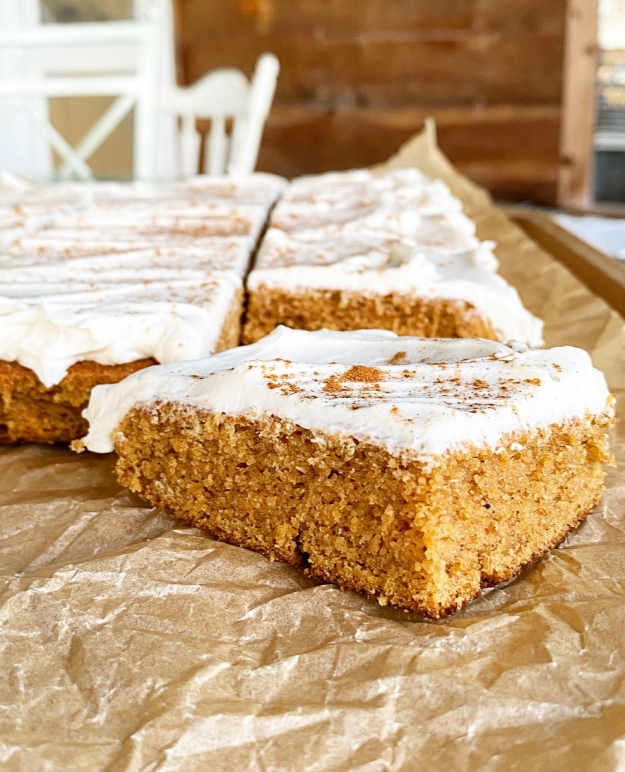 The pumpkin cake is a variation on the vegan, gluten-free chocolate cake I posted last year. It relies primarily on almond flour, potato starch and cornstarch for structure, and pumpkin purée and pumpkin pie spice for flavor. There are other things in the batter too, of course (granulated and brown sugars, vanilla, leaveners, almond milk), and they all bake up into a moist, tender, nicely-spiced sheet of cake. Vegan and gluten-free or not, this pumpkin cake is legit.
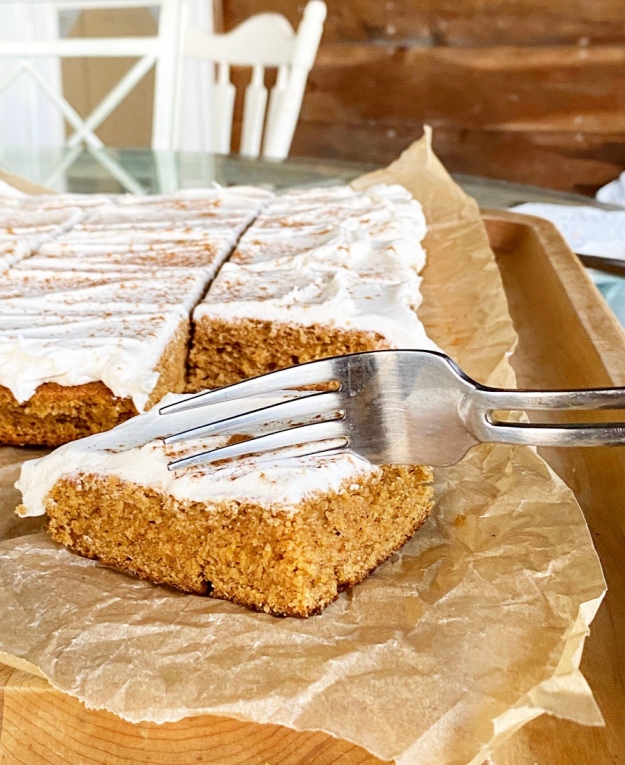 Believe me when I tell you that I understand wanting to eat this cake by its lonesome straight out of the oven, or with a simple dusting of confectioner’s sugar…but also? Believe me when I tell you that a swoopy layer of Maple Frosting takes this seasonal dessert from very good to fabulous. For real.
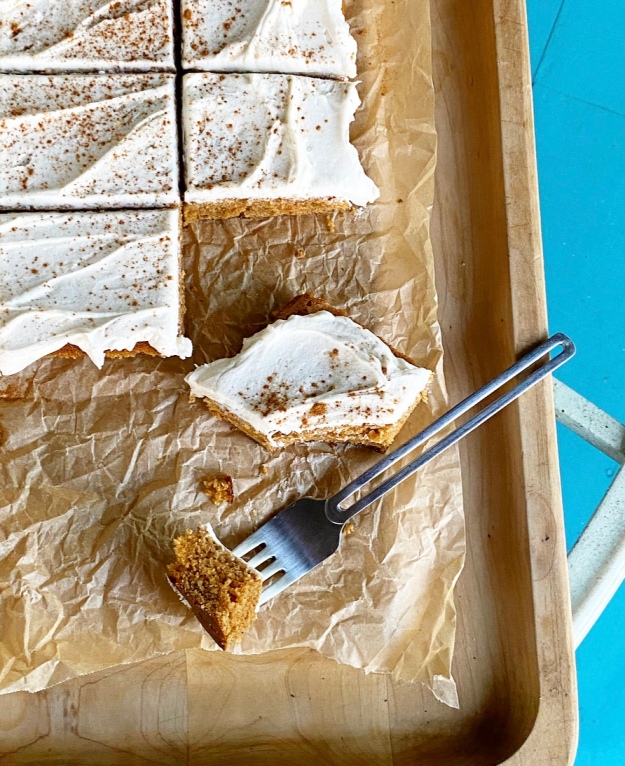 Pumpkin Sheet Cake with Maple Frosting is very good the day it’s made, but as with many pumpkin spice things, it’s actually more delicious the next day, after the flavors have melded. But with a cake this good around, I can’t blame anyone for not waiting to dig in. I mean, I certainly didn’t.
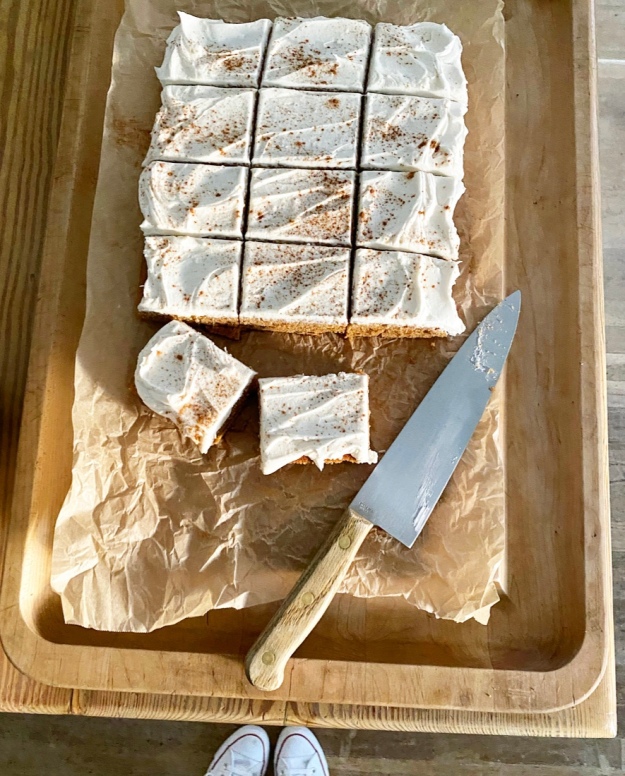
Pumpkin Sheet Cake with Maple Frosting {Vegan & Gluten-Free}
makes a single layer 9×13-inch sheet cake
2 teaspoons apple cider vinegar
~1 1/4 cups unsweetened almond milk
1/3 cup pure pumpkin purée
2 teaspoons pure vanilla extract
2 1/2 cups blanched almond flour (not almond meal)
3/4 cup potato starch
1/4 cup cornstarch
1/2 cup granulated sugar
1/2 cup light brown sugar, packed
2 1/4 teaspoons pumpkin pie spice
1 1/8 teaspoons baking powder
1 1/8 teaspoons baking soda
1/4 teaspoon Kosher or sea salt
For finishing:
Vegan Maple Frosting (recipe below)
sprinkle of ground cinnamon (optional)
Preheat oven to 350F. Grease a 9×13-inch cake pan. Line with parchment and grease again. Set aside.
Pour apple cider vinegar into a liquid measuring cup. Add almond milk until liquid reaches the 1 1/4 cup mark. Stir and let sit for 5-10 minutes, until curdled. Stir in pumpkin purée and vanilla. Set aside.
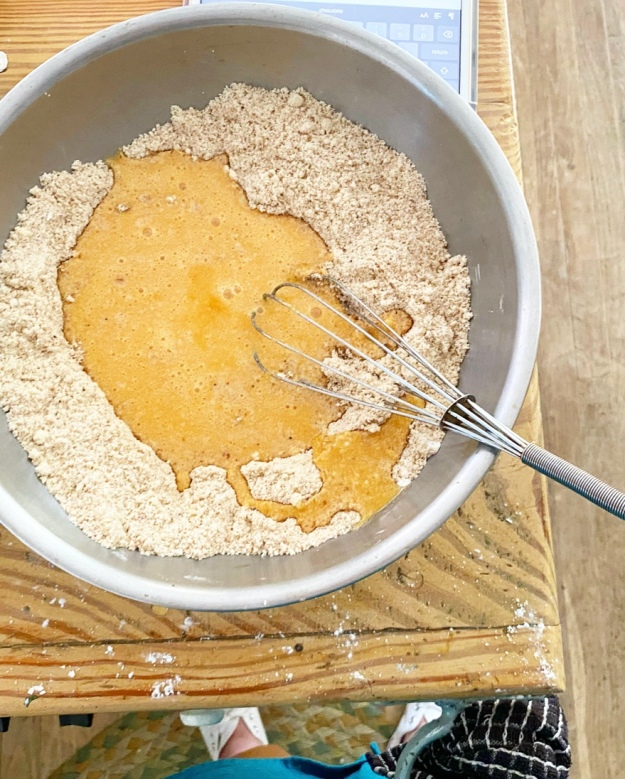
In a large mixing bowl, whisk together blanched almond flour, potato starch, cornstarch, granulated sugar, light brown sugar, pumpkin pie spice, baking powder, baking soda, and salt. Add liquid ingredients in two installments, whisking until combined.
Transfer batter to prepared pan and smooth to the edges with a silicone spatula or wooden spoon. Tap pan on the counter 5 times to release any large air bubbles. Transfer to the oven and bake 32-35 minutes, or until a toothpick inserted in the center of each layer comes out with only a few crumbs.
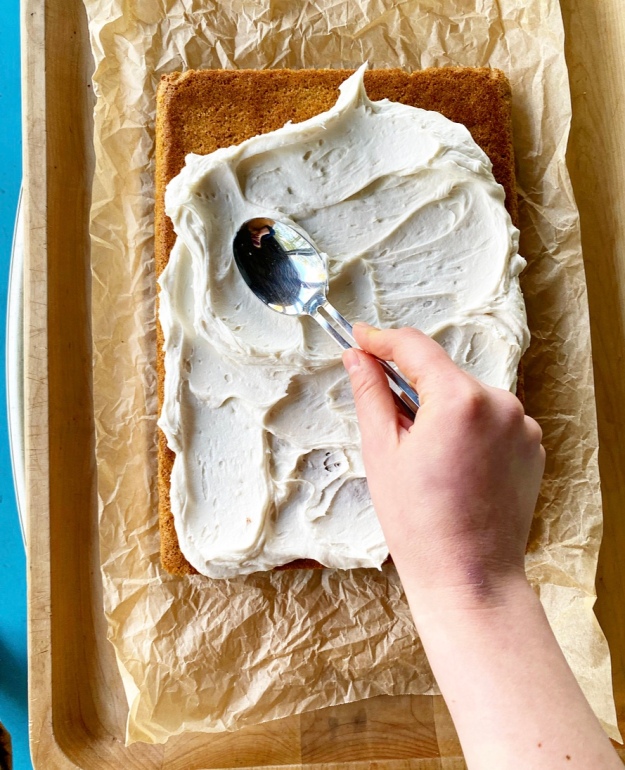
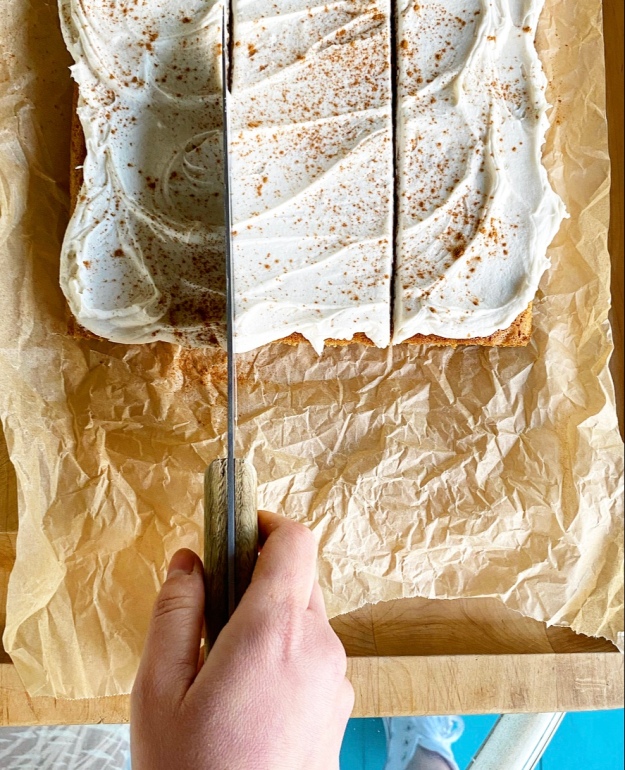
Let cake cool completely in its pan on a cooling rack. Run a thin knife along the edges of the pan before inverting to release onto a platter (alternatively, you may keep it in the pan and serve from there). Frost as desired with Vegan Maple Frosting (recipe below). Sprinkle with cinnamon, if desired.
Frosted cake will keep at room temperature for up to 3 days and refrigerated for up to 4. Unfrosted cake may be triple-wrapped in plastic wrap and frozen for up to 1 month. Thaw overnight in the refrigerator before frosting.
Vegan Maple Frosting
makes enough for the top of one sheet cake
4 ounces (1/2 cup) vegan butter, room temperature (I like Miyoko’s)
2 ounces (1/4 cup) shortening, room temperature (I like Nutiva)
1 1/2 cups confectioners sugar
pinch of Kosher or sea salt
2 teaspoons pure vanilla extract
2 tablespoons pure maple syrup
In a large mixing bowl, use an electric mixer to beat vegan butter and shortening until light and fluffy. Mix in confectioners sugar in two installments, mixing until combined and fluffy. Mix in salt, followed by vanilla and maple syrup.
Use to frost the top of the sheet cake.

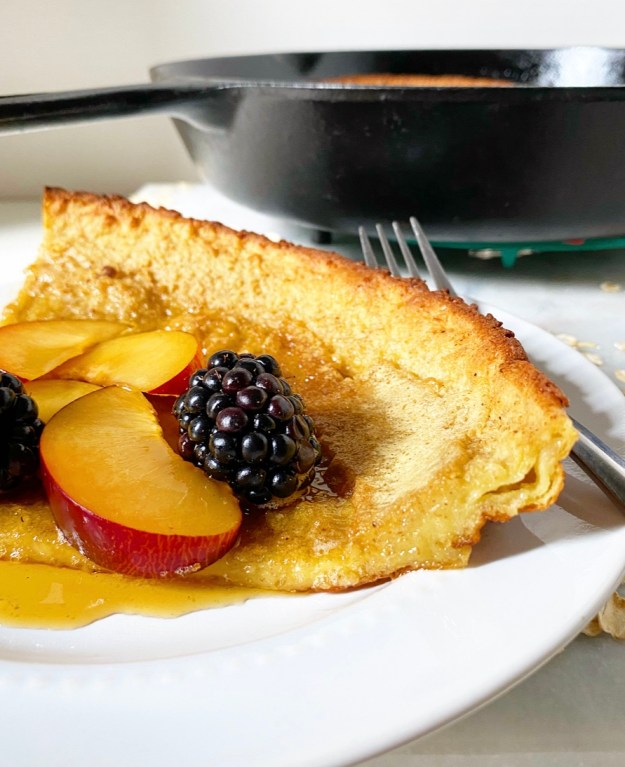
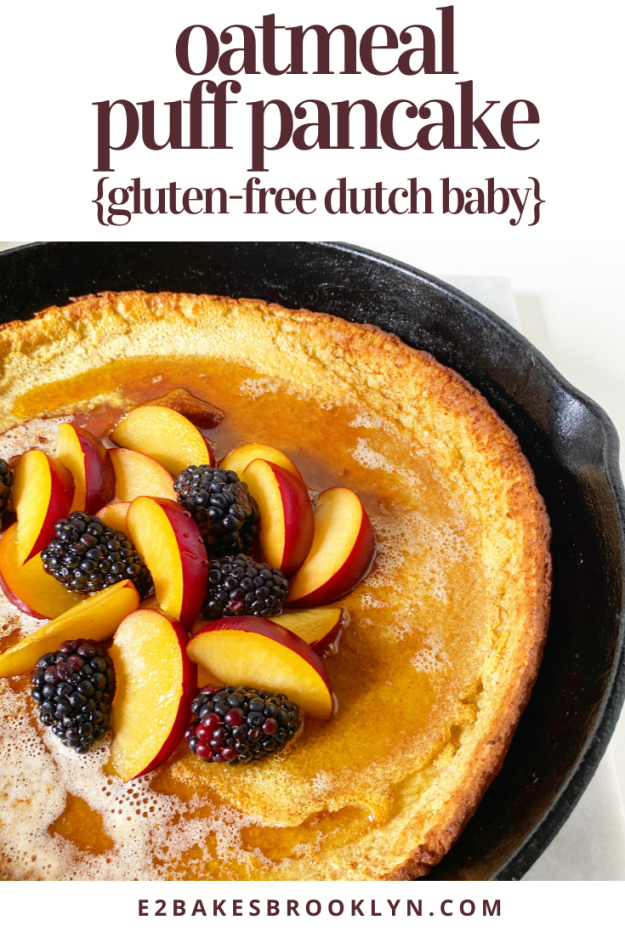
 Did you know you can make a
 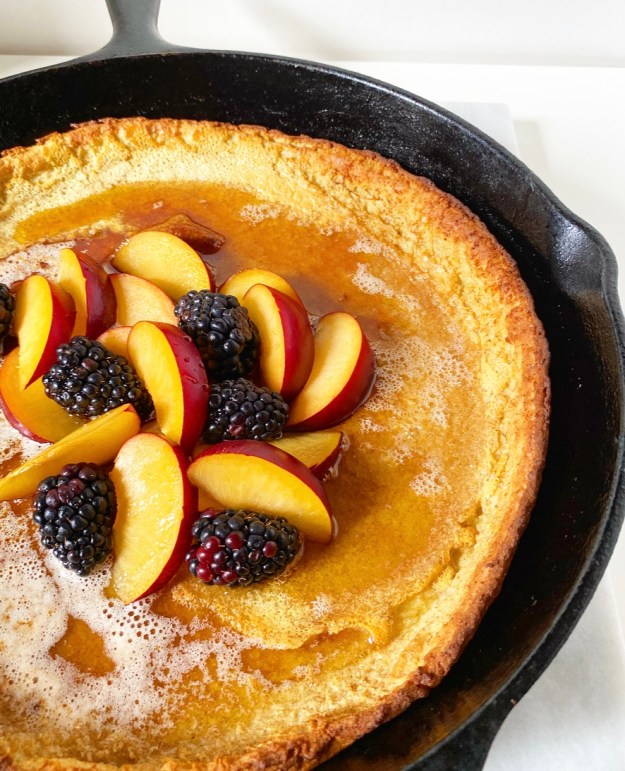 Well, I didn’t. It hadn’t even occurred to me until I made
 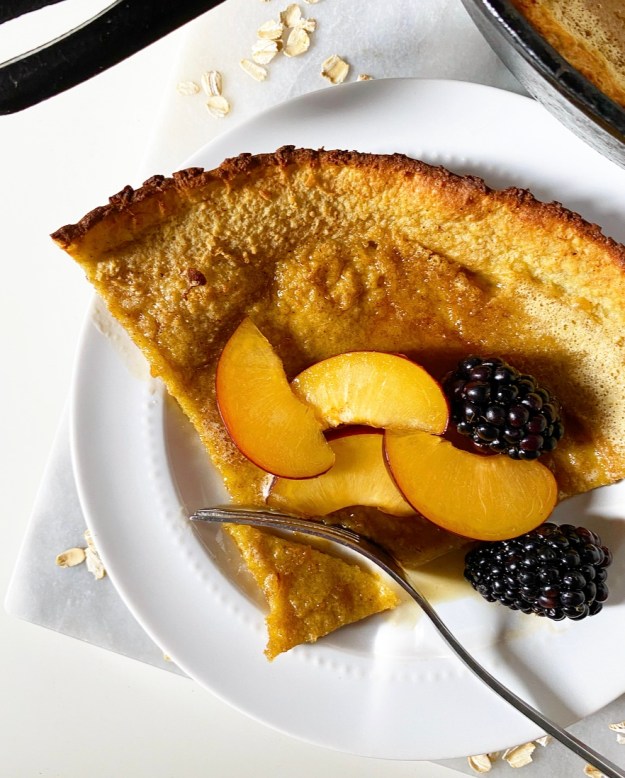 Not only is this oven pancake completely whole grain, it’s also naturally gluten-free! If you or a fellow breakfast guest needs to be gluten-free, make sure your oats are certified gluten-free.
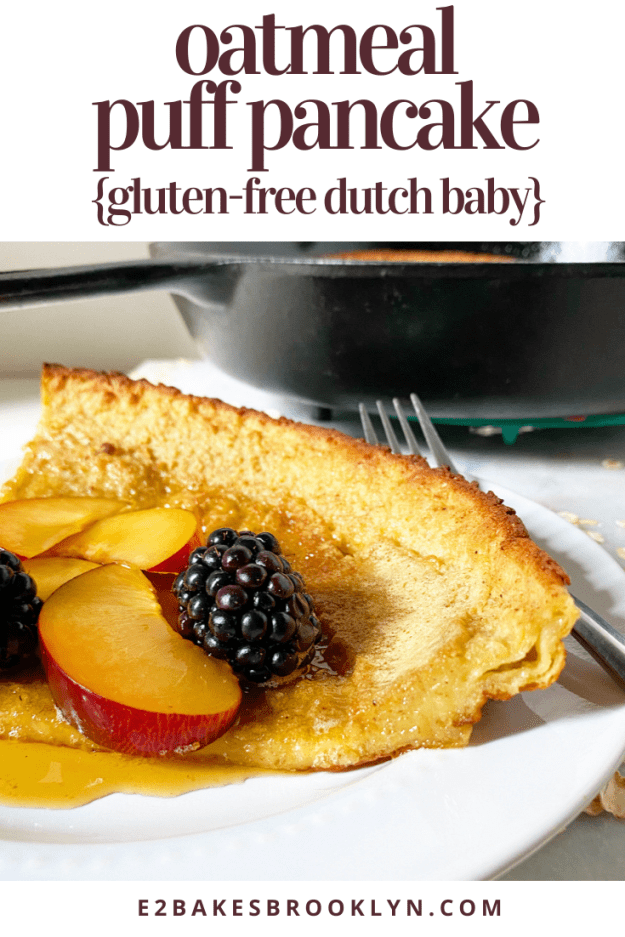
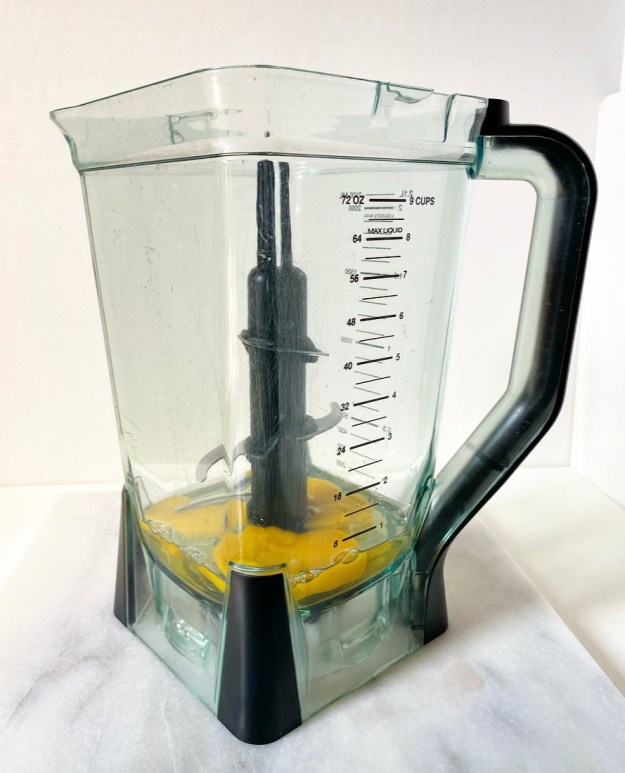
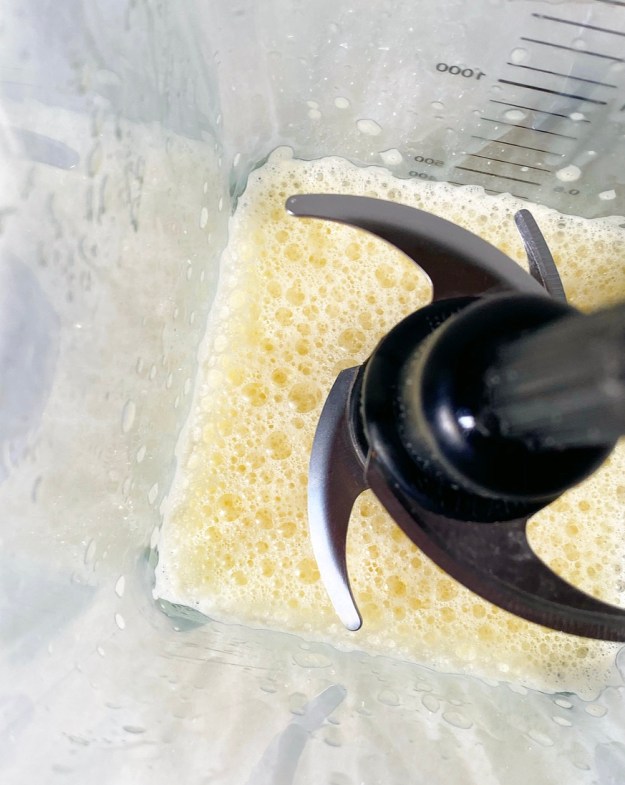
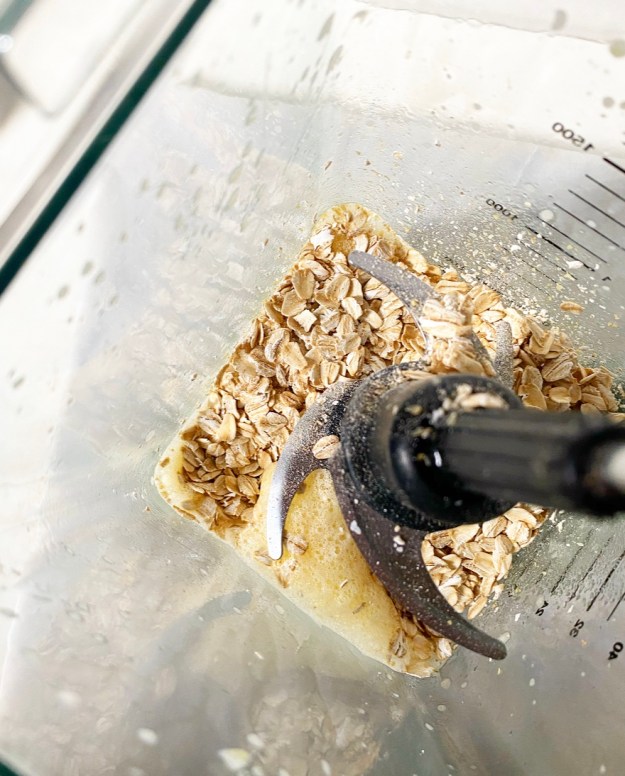
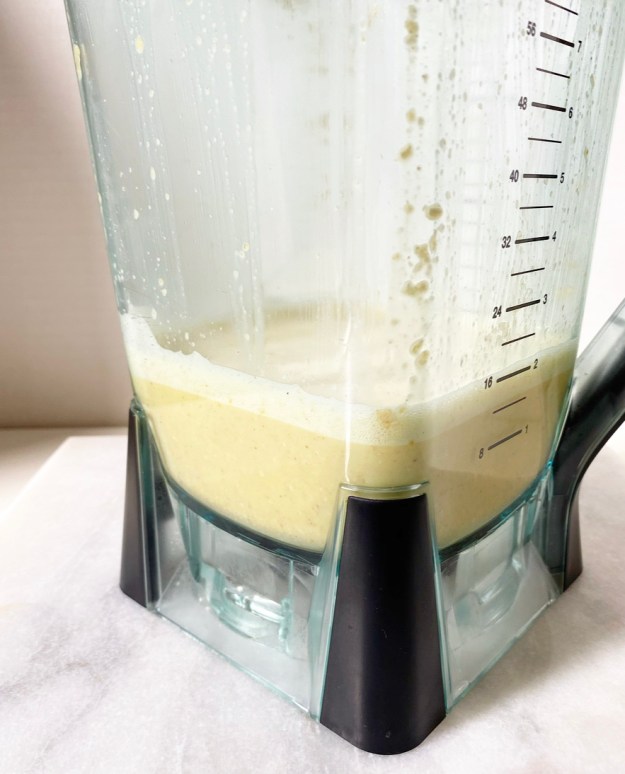 If you’re wondering if this Oatmeal Puff Pancake is more work than the traditional version, the answer is “no.” Just like its gluten-full counterpart, the batter comes together in under 90 seconds in a blender, then goes directly into a super hot, buttery pan, then into the oven for 18 minutes.
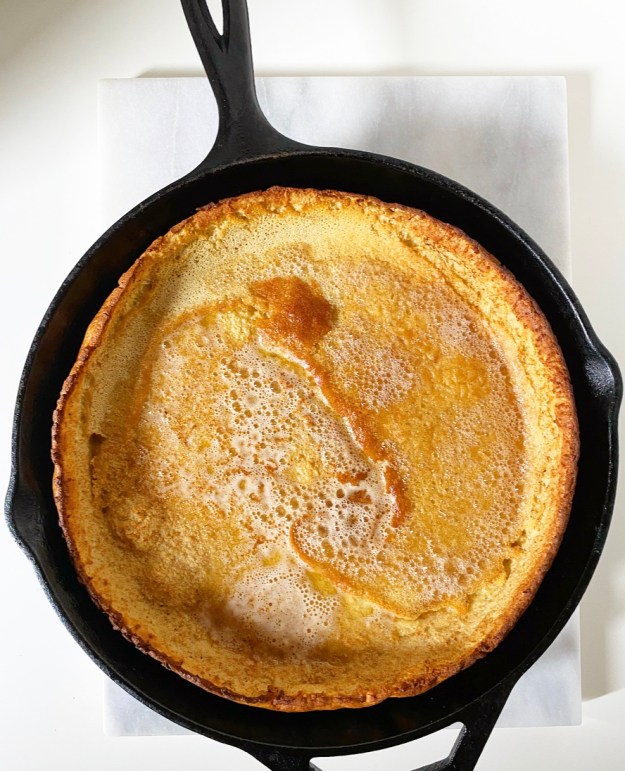 The pancake is ready when the edges are golden brown and the center is beginning to take on color. It will also likely (but not always) have a few large bubbles, which will quickly disappear as the puff relaxes into a smoother bowl shape at room temperature.
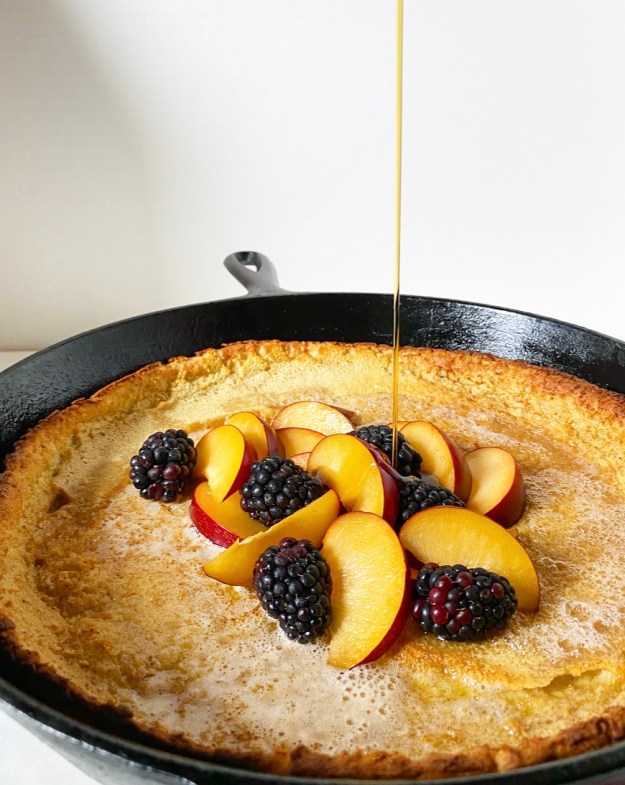 Once it’s deflated, fill your Oatmeal Puff Pancake with your favorite seasonal fruit (I went with the last of the plums and blackberries) and drizzle with maple syrup, or go more traditional with lemon and confectioner’s sugar. Then slice into this custard-centered beauty and behold its crisp-chewy edges.
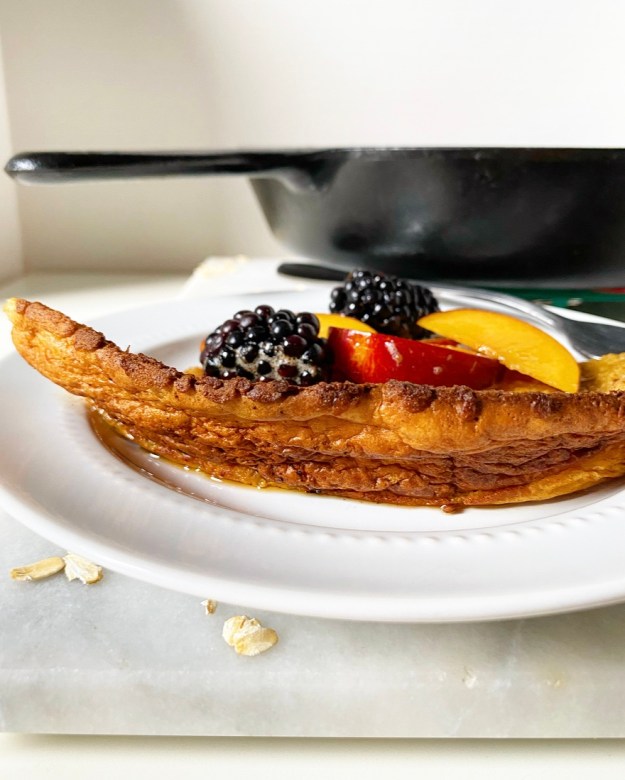
 Like other Dutch Baby recipes, this Oatmeal Puff Pancake can be scaled up or down depending on the size of your pan and how many servings you need. I’ve included times and proportions for four different yields in the recipe notes to make sure that there’s plenty to go around.
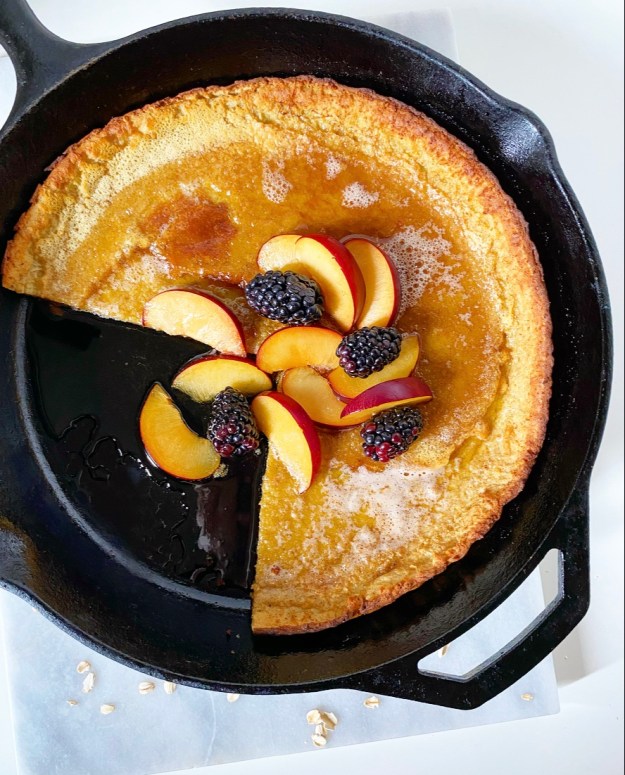
 It seems like every July my mind goes to Maine while my body stays in New York and bakes in preparation to join it…in
 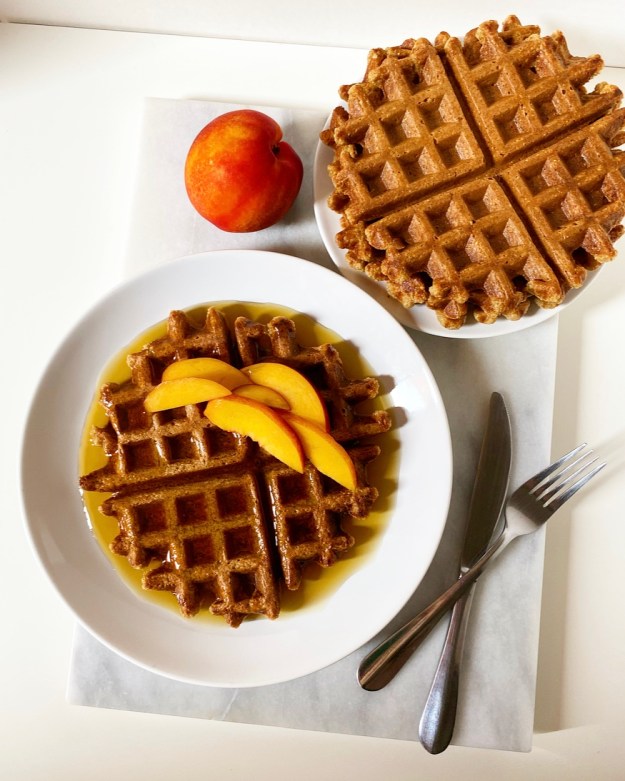 I’m not saying I manifested a Maine trip, but I’m not saying I didn’t (with a lot of VJ’s help and a big check). What I am saying is that when I started testing these gluten-free, vegan Oatmeal Waffles a few weeks ago, I could only daydream about making them on a sunny
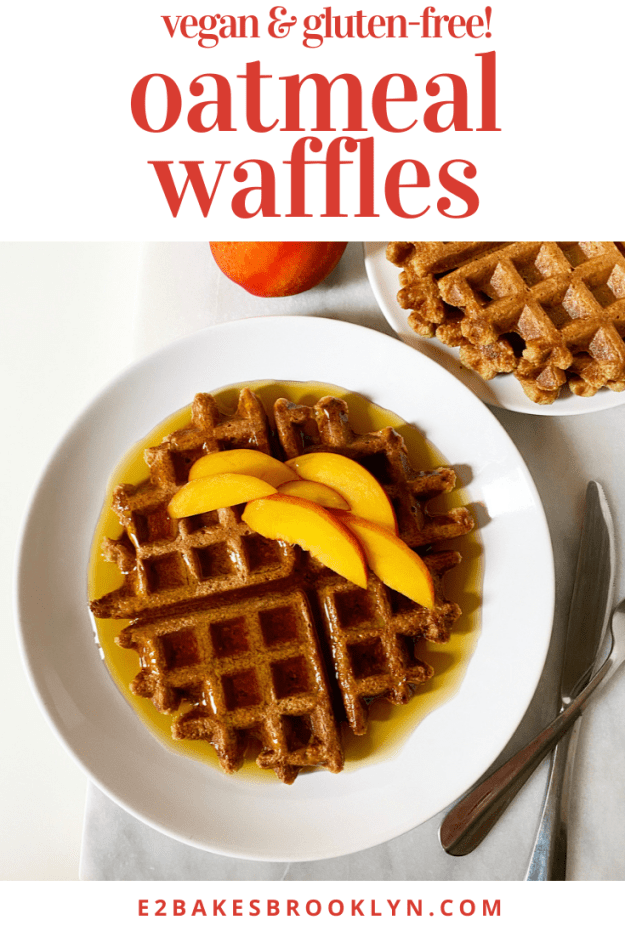
 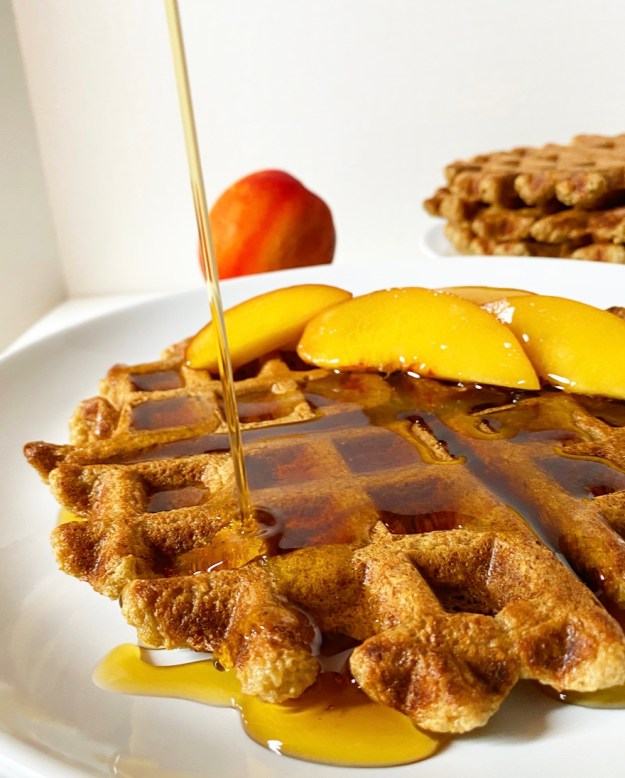 Until then, these Oatmeal Waffles are my current weekend breakfast obsession. They’re fairly quick and easy to make, and have a slightly sweet whole grain flavor—no cardboard here, I promise. These are real, delicious, syrup-in-every-divot, Saturday morning-worthy
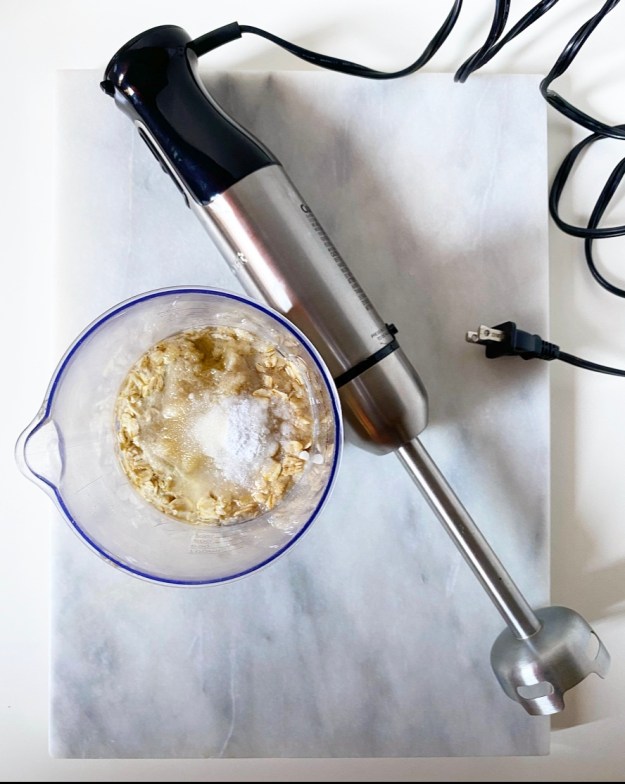

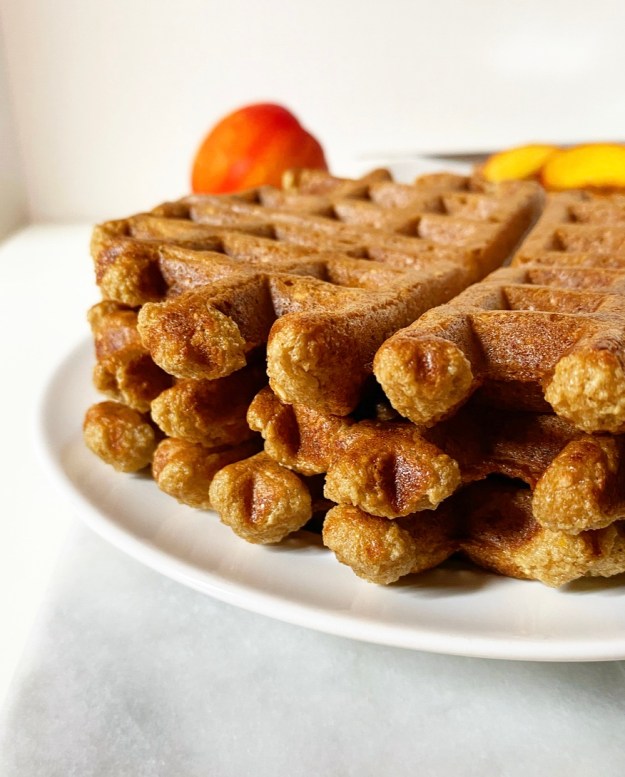
 The batter is made with eight ingredients: gluten-free old-fashioned oats, non-dairy milk, applesauce, touches of oil and sugar, baking powder, baking soda and salt. It comes together in the blender and, after resting for ten minutes, makes four burnished, crispy-edged, fluffy-centered waffles—enough for two or four people, or eating one now and freezing three for when a craving hits. And oh, it will hit.
 For those who don’t need or want their waffles to be
 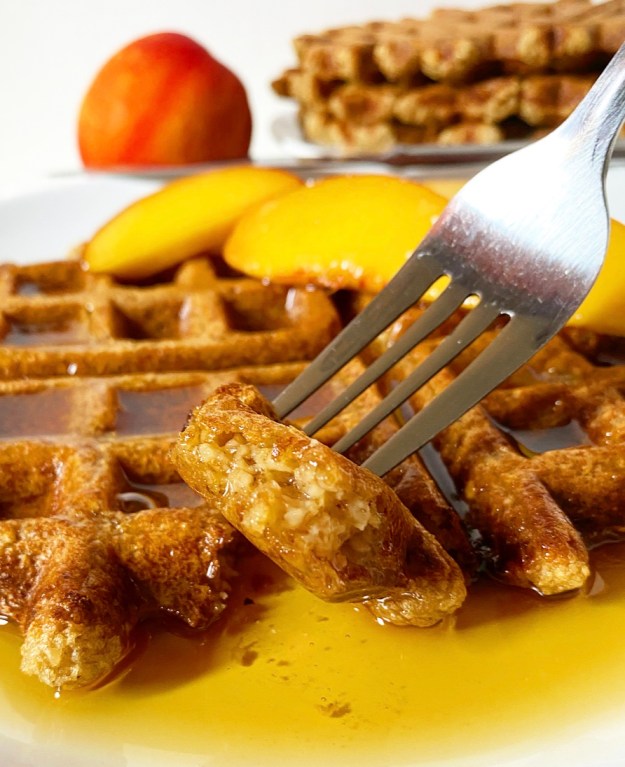 Again, I’m not saying I manifested a trip to Maine, but if you put intention—in this case, waffles and a dream—out into the world (and write a check and ask VJ to send a series of emails to the powers that be), sometimes good things happen. Like vacation and a freezer-full of Oatmeal Waffles.


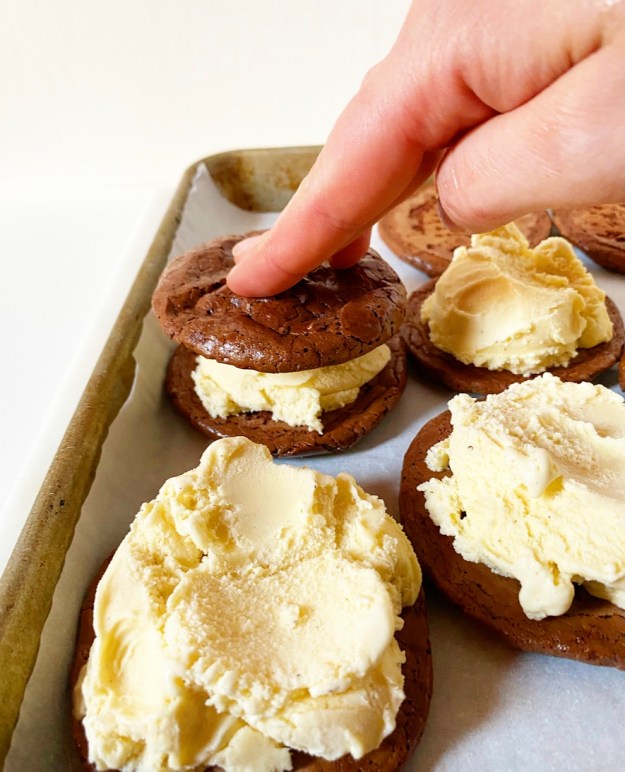
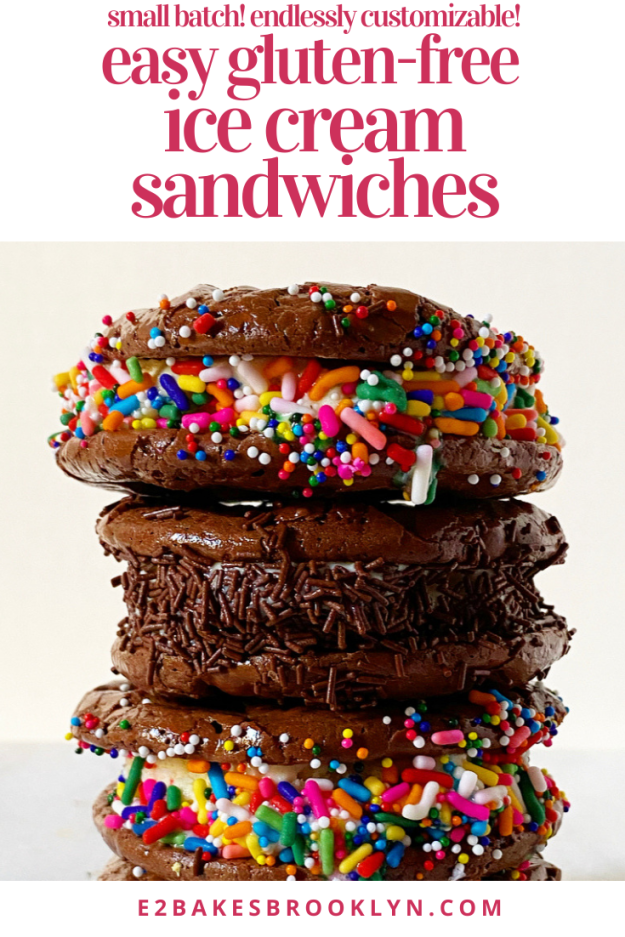
 When I posted
  These cookies are on the sweeter side (confectioner’s sugar provides a lot of the structure), so I added a teaspoon of granulated espresso to the recipe to keep them from being cloying with ice cream. I also cut the size of the cookies in half for a dozen medium cookies instead of six large ones.
 Next up, you’ll need to freeze the cookies for about 30 minutes. This helps the ice cream to stay on the solid side and the cookies from getting too soft during assembly. This step is not strictly necessary, but it is good insurance against ice cream sandwich frustration.
 Regarding ice cream, use whatever flavor you want. I went with a mid-level nationwide brand’s vanilla here and it was fine—good, even—but I will go higher quality next time. Oh, and I’ll probably go with mint chocolate chip because it’s my favorite. The point is to use what you love and not settle for less. Cookies are an important part of ice cream sandwiches, but ice cream is the *most* important part.
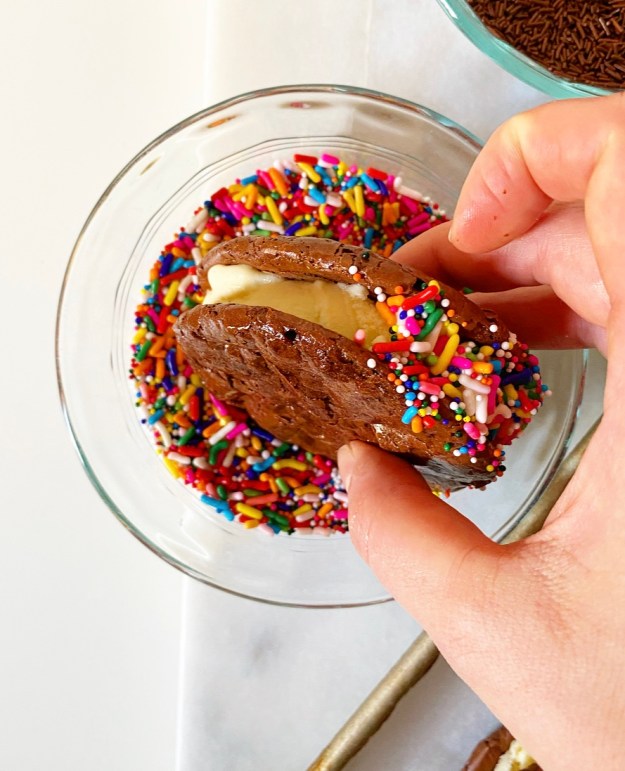
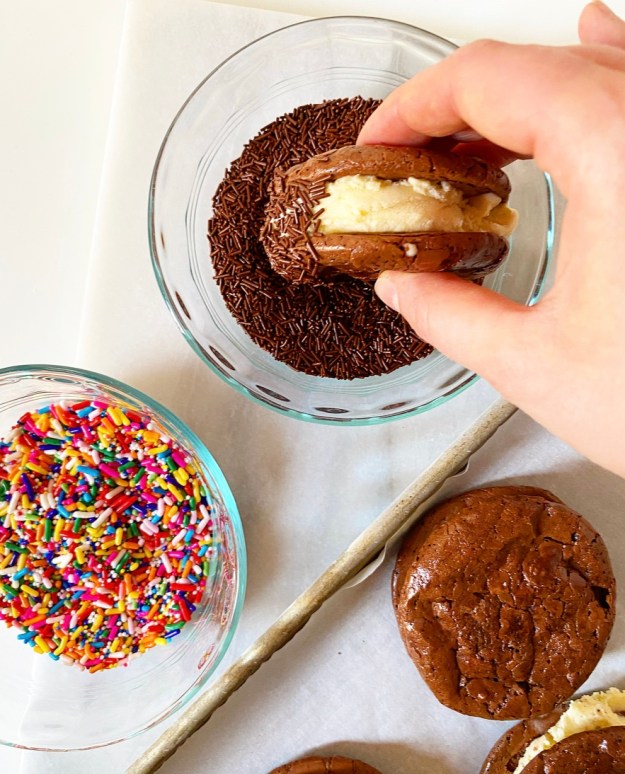 Freeze the sandwiches before rolling them in your sprinkles of choice or chopped nuts or mini chocolate chips or candy bar pieces or crushed Oreos. Again, use what you love and don’t settle for less. <—good life advice?
 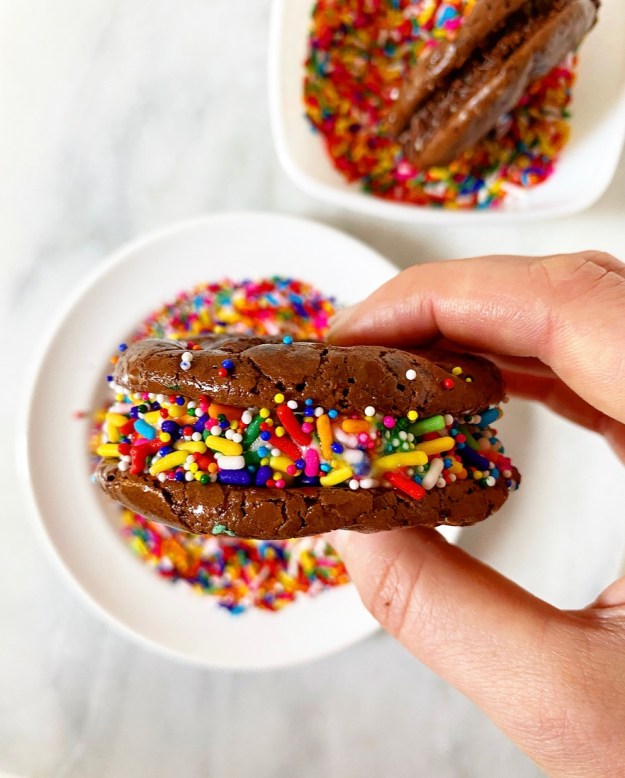 The last step is to freeze your ice cream sandwiches again for several hours or up to a day before digging in. Yes, you can eat them right after assembly, but the ice cream squidges out the sides and then you’re just eating two cookies with a translucent smear of ice cream and a weird smattering of sprinkles and then licking ice cream off a salad plate like a wild animal.
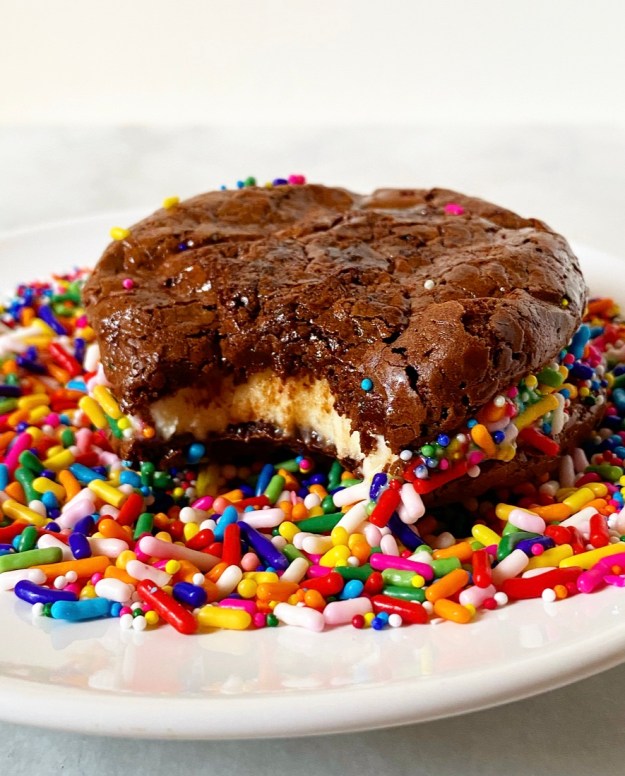 Anyway, freezing the completed ice cream sandwiches for a few hours allows the ice cream to adhere to the cookies so that the sandwiches become single entities. That’s something I really care about with my ice cream sandwiches. Considering how much I loathe the patriarchy, I sure do love to be able to eat things in a ladylike manner.
 I assure you, they’re worth the lengthy freezer time. The cookies never fully freeze, instead softening a tiny bit and getting extra chewy. And then there’s the ice cream and crunchy sprinkles. Like I said, perfect.


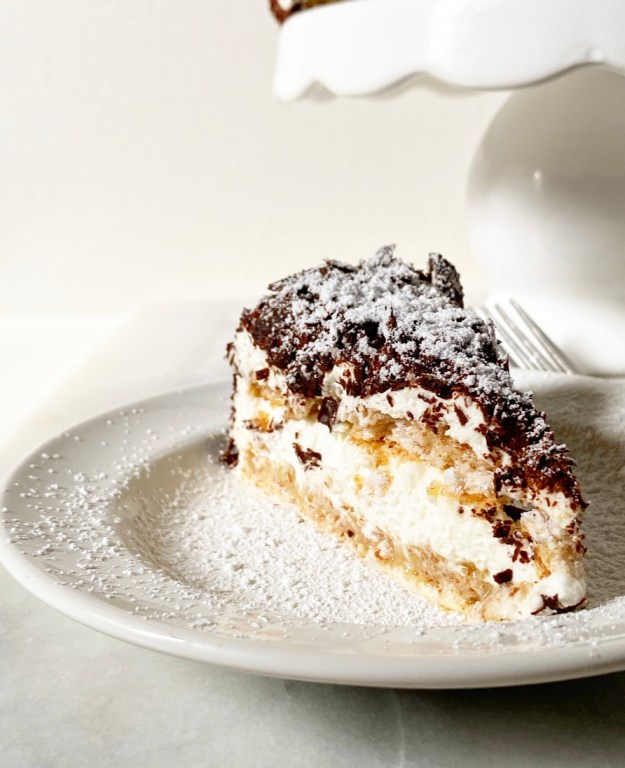
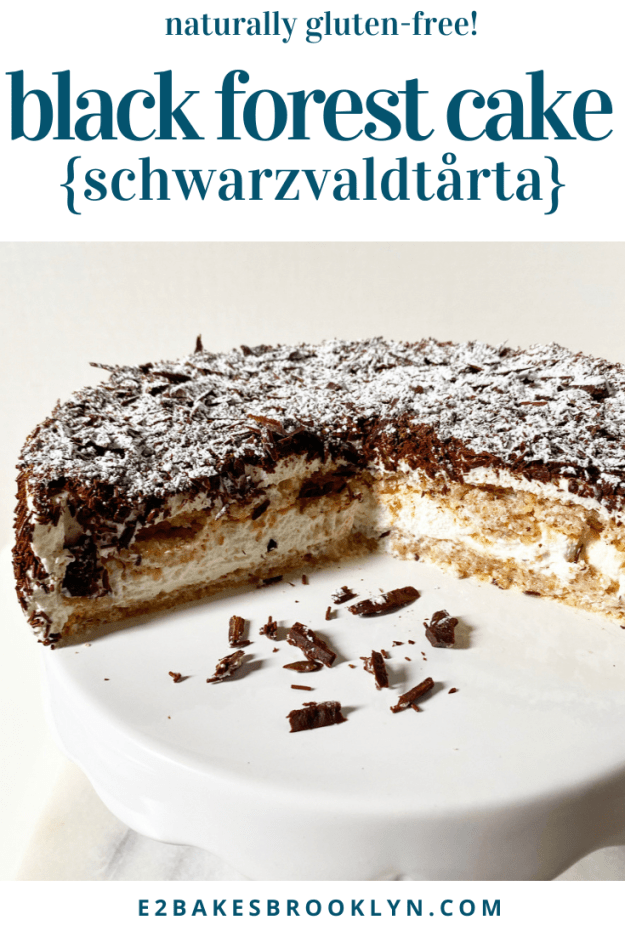
 If you’re wondering where the cherries and chocolate cake are in this Black Forest Cake, well, this isn’t your average Black Forest Cake.
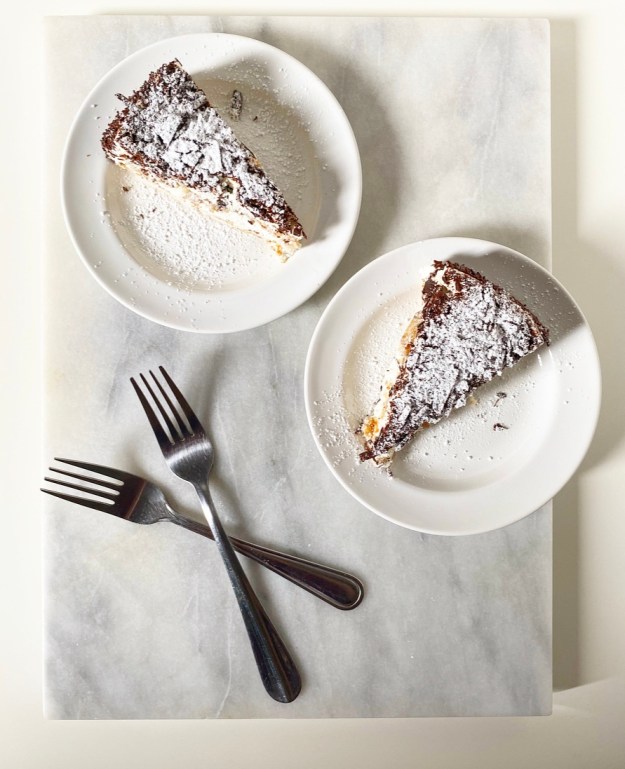 Ohhh no. This is my take on a hometown favorite: Black Forest Cake from
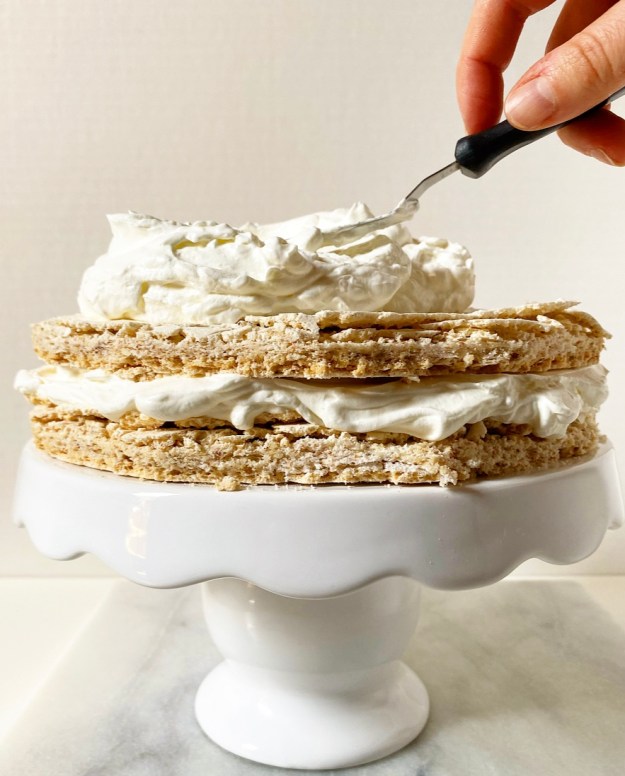
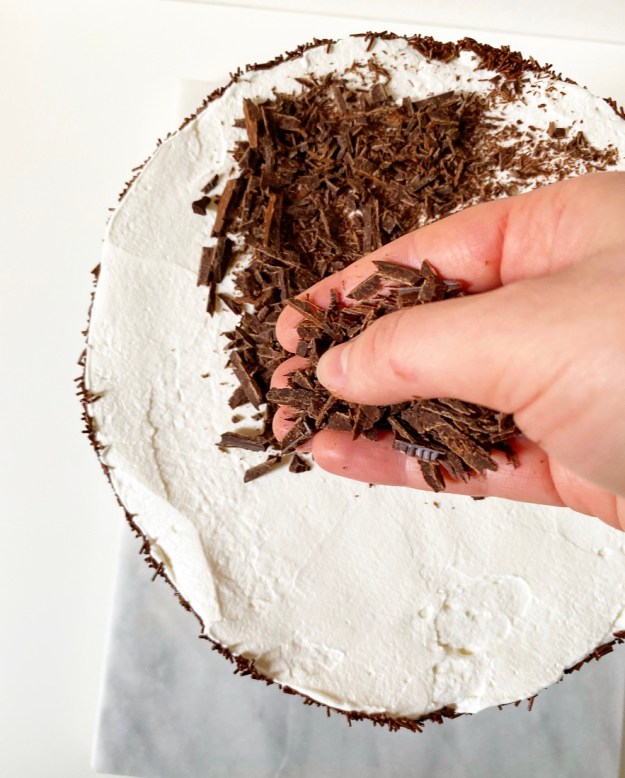
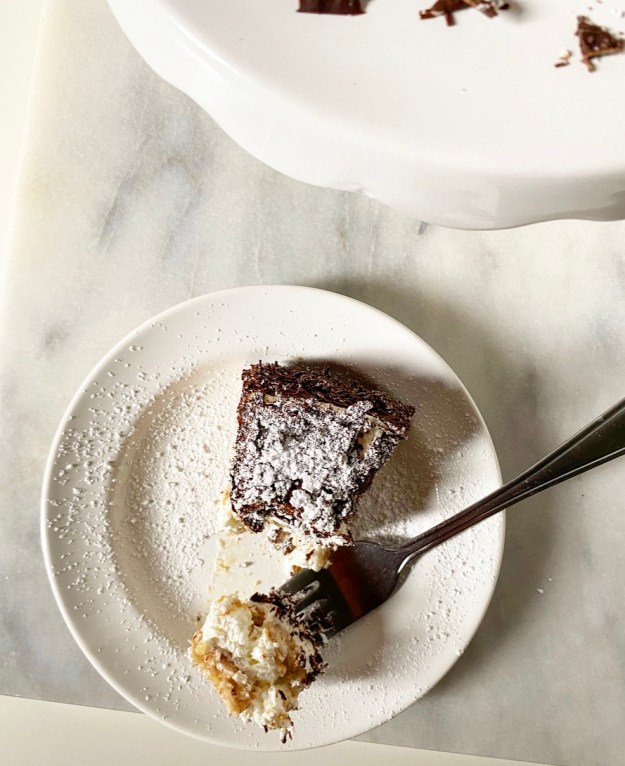
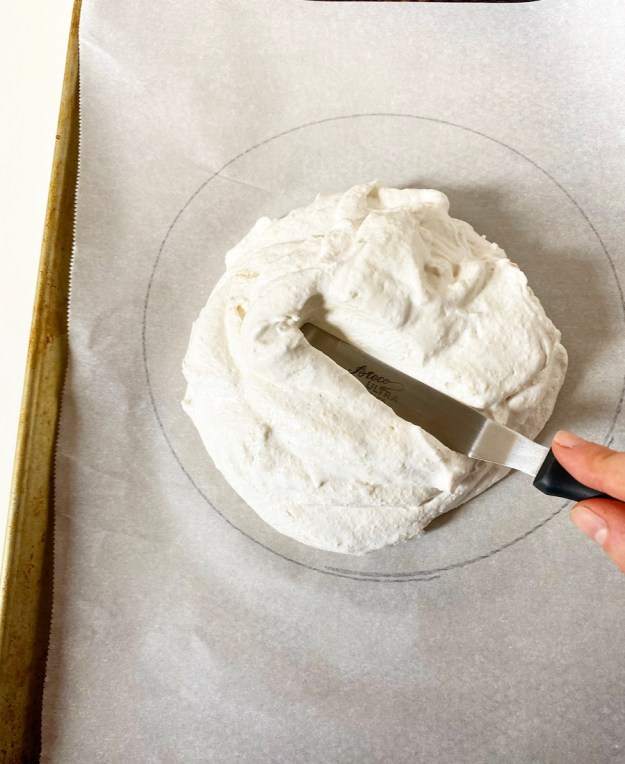
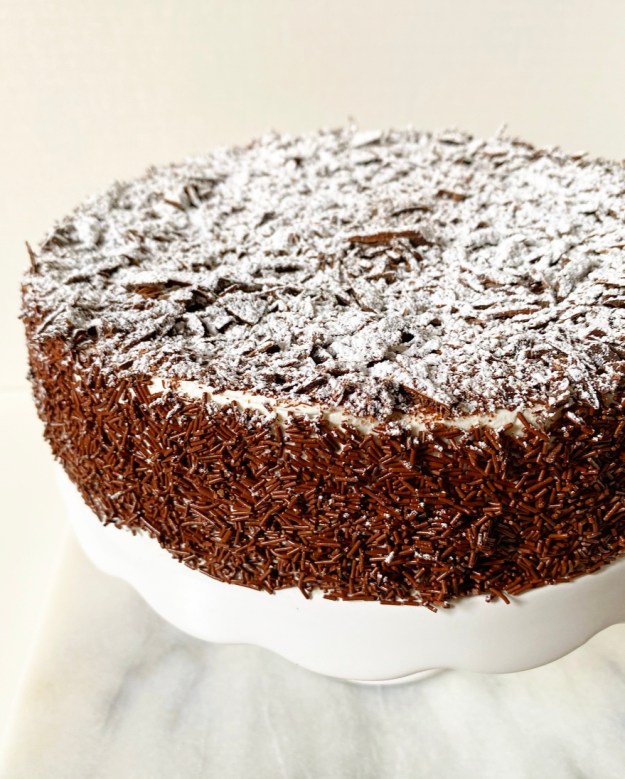 There’s a reason the citizens of Fort Worth are so in love with this cake—it’s absurdly good, and unique for that part of the world. Made by layering crisp almond dacquoise (meringue with nuts) and whipped cream, and coated with thin chocolate sprinkles and shaved dark chocolate, this cake is hardly a cake at all. It’s pure bliss! Cold, crisp, super-light, creamy, nutty, chocolaty, naturally gluten-free bliss.
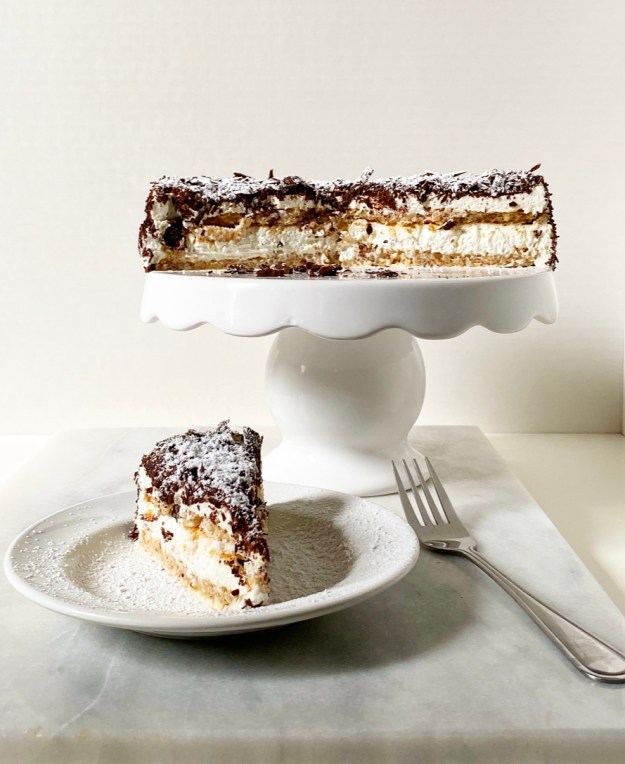 I’ve thought for years that Swiss Pastry Shop’s Black Forest Cake was unique to them—I mean, I’ve never seen or heard of it anywhere else. Turns out, it’s actually a Swedish cake and unrelated to the cherry-chocolate version, only sharing a name (Schwarzvaldtårta). Who knew?!
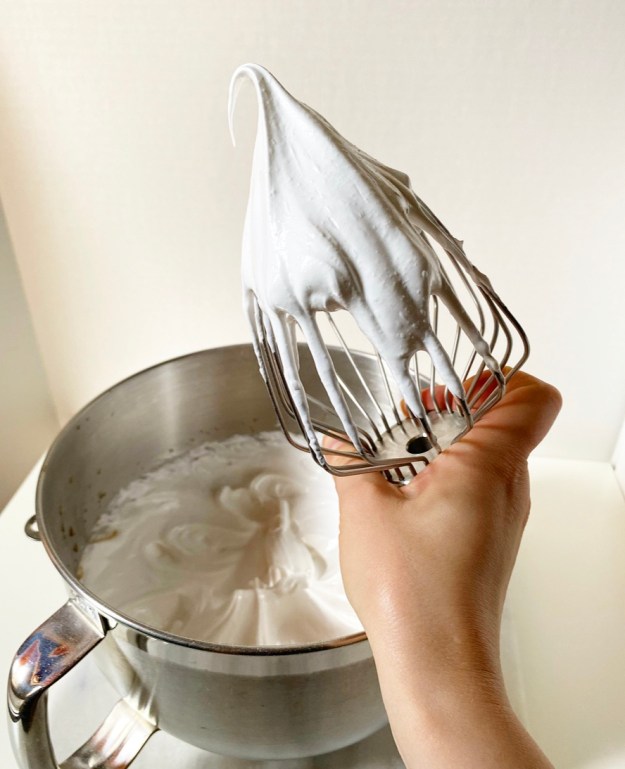
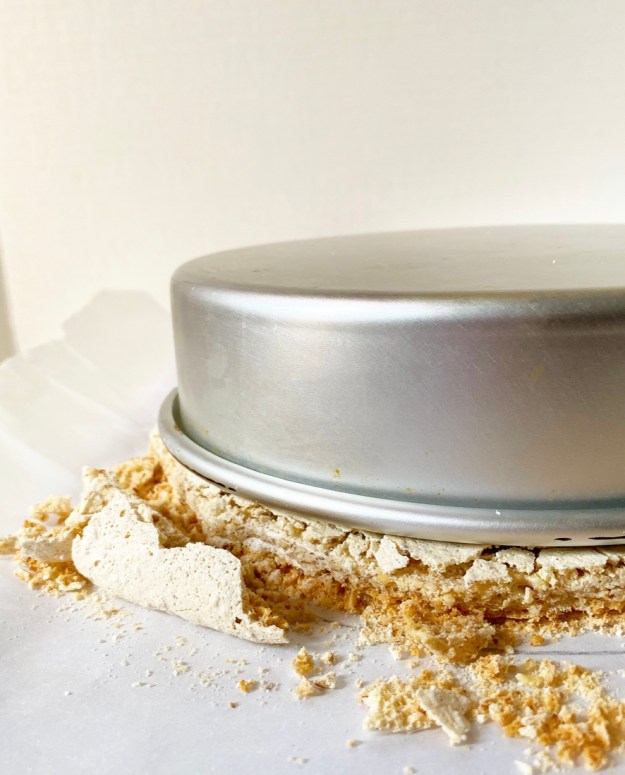 Now, I’m not going to pretend that this is a carbon copy of Swiss Pastry Shop’s cake—I cannot figure out how they get their dacquoise so thick!—but it tastes *exactly* right and hit the spot on my birthday a couple weeks ago. I made a teeny-tiny version on a whim, because if I had to turn 35 in a pandemic, there was *going* to be excellent cake. And, well, it just doesn’t get much more excellent than Black Forest Cake.
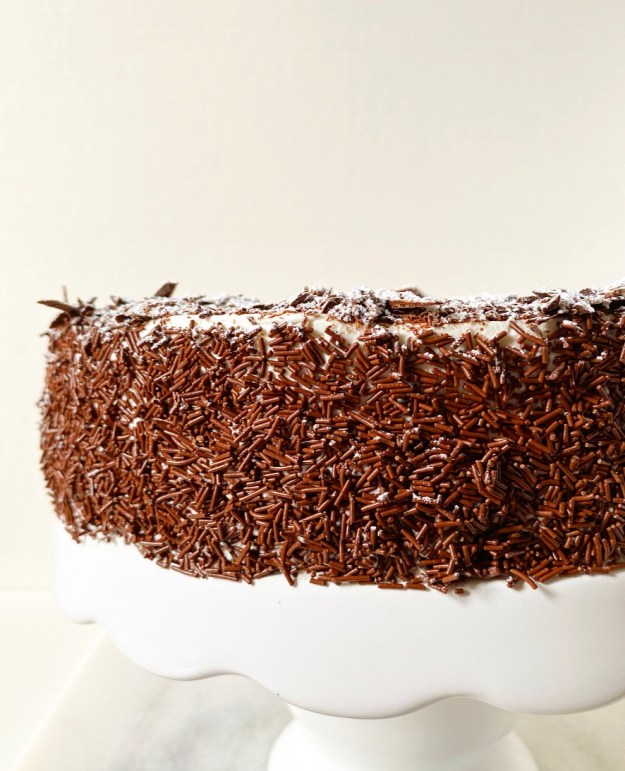 I had no plans to put it on the blog (
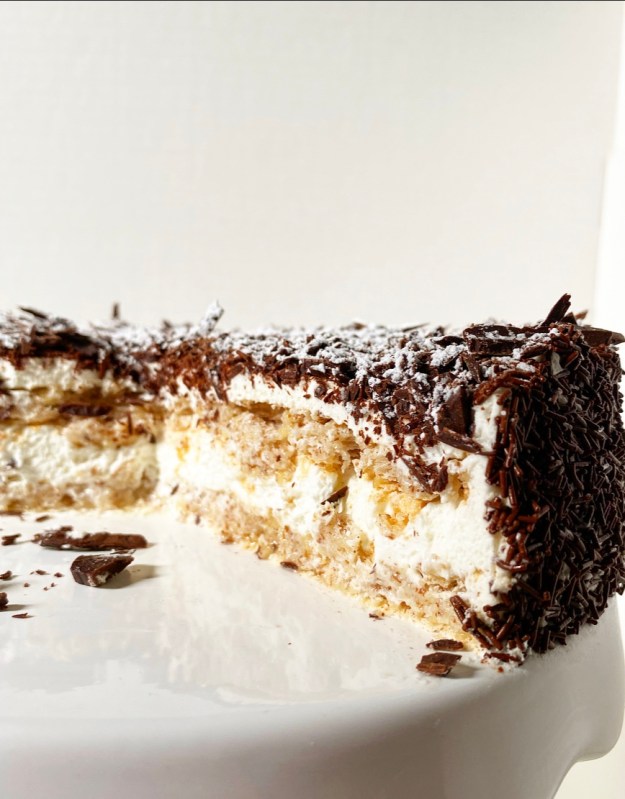 Black Forest Cake requires some skill and a time commitment, but is not actually difficult to make. Here are some tips for success.
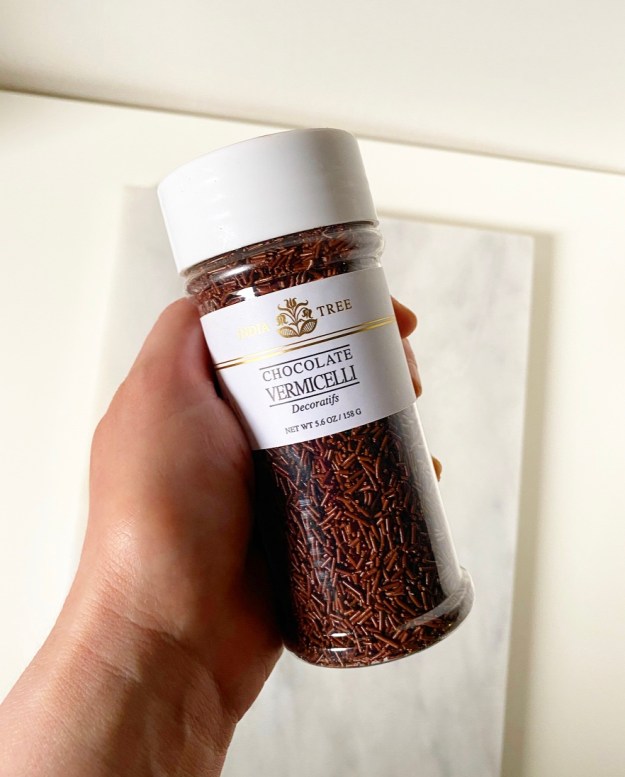
 Whew! Okay, I think that’s all. This one was a labor of love, y’all. Not for yours or mine, but for the love of cake. Really excellent cake.