When I don’t know what to make, I make magic bars. I have all sorts of recipes for them on this site—vanilla malt, peanut butter-Oreo, and s’mores are some of my favorites. As long as I have sweetened condensed milk in my pantry, nothing is safe from being turned into a magic bar.
These layered bars are so easy to make and so good. I mean, how could a buttery crumb crust topped with chewy, caramelly filling possibly be bad?! There is barely any mixing involved; the majority of the ingredients are layered or scattered into the pan. Their titular “magic” comes from the way their sweetened condensed milk-based filling seems to assemble itself in the oven.

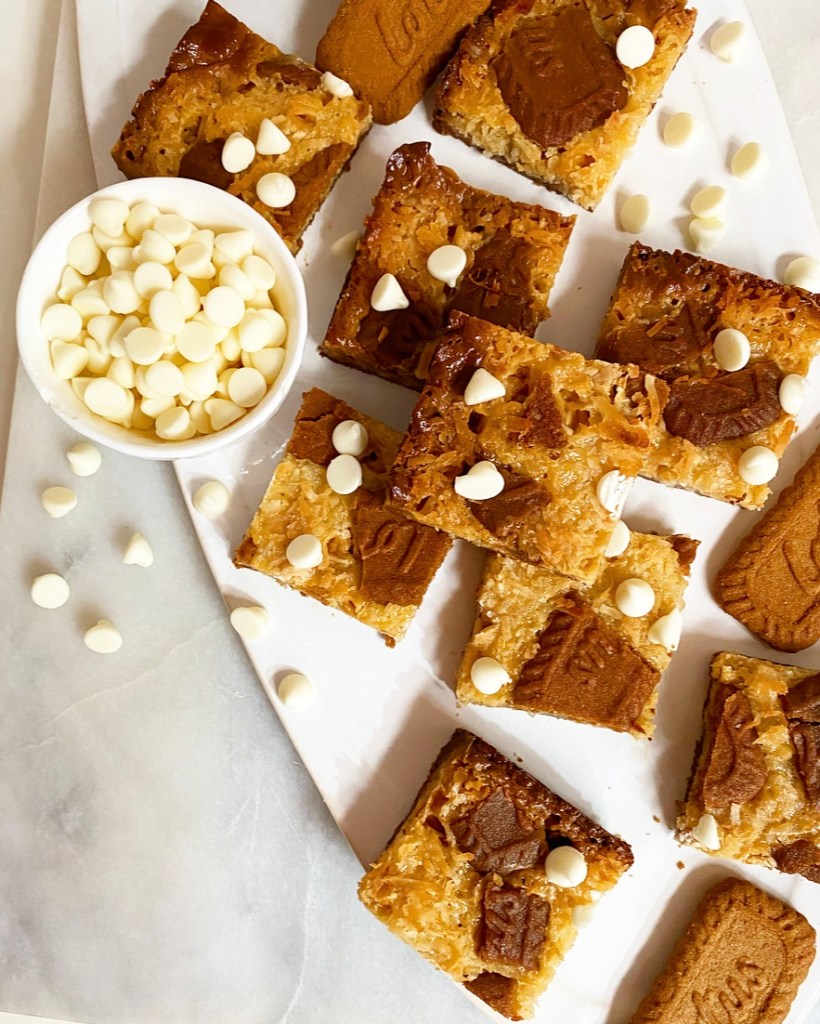
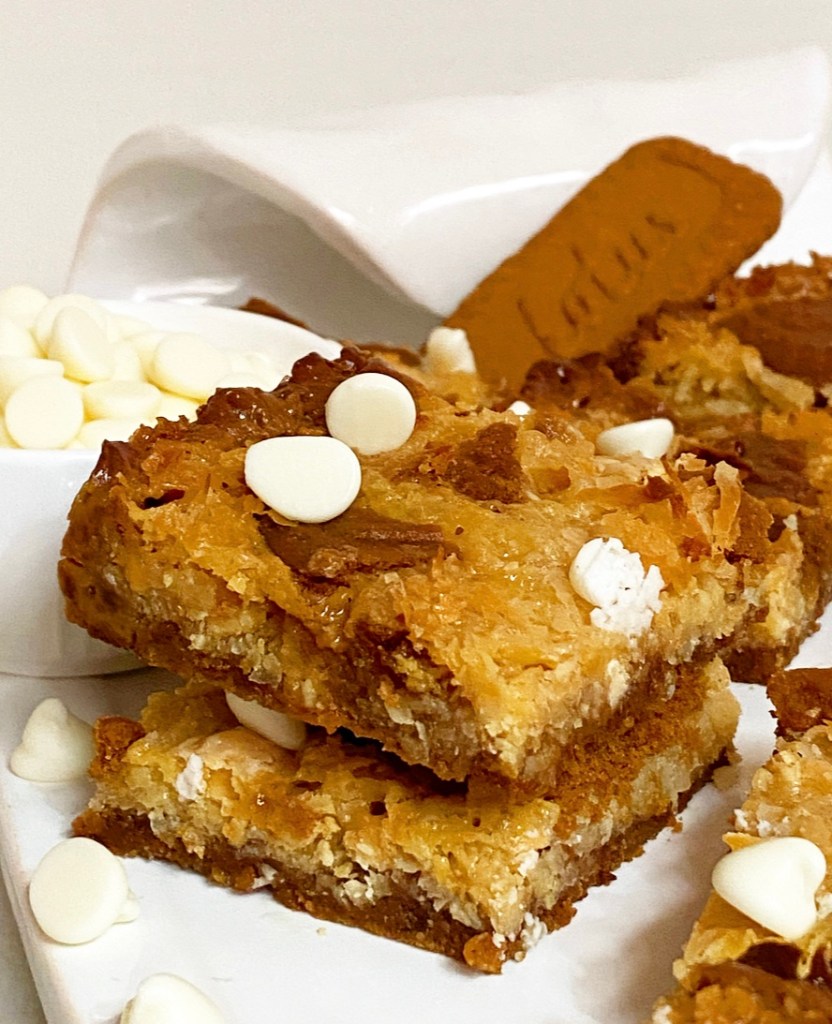
Today’s variation involves sweet, chewy coconut, smooth white chocolate, and buttery spice from Biscoff cookies. These are a little unusual, but definitely still magical. Coconut Biscoff Magic Bars are super simple to make, containing just seven ingredients and taking under an hour to prepare. Simply mix together the Biscoff cookie crumb crust, bake it for a few minutes, then layer the filling ingredients on top and bake again. Make sure to let these bars cool completely so that the caramelized sweetened condensed milk will set up properly—we love clean slices!
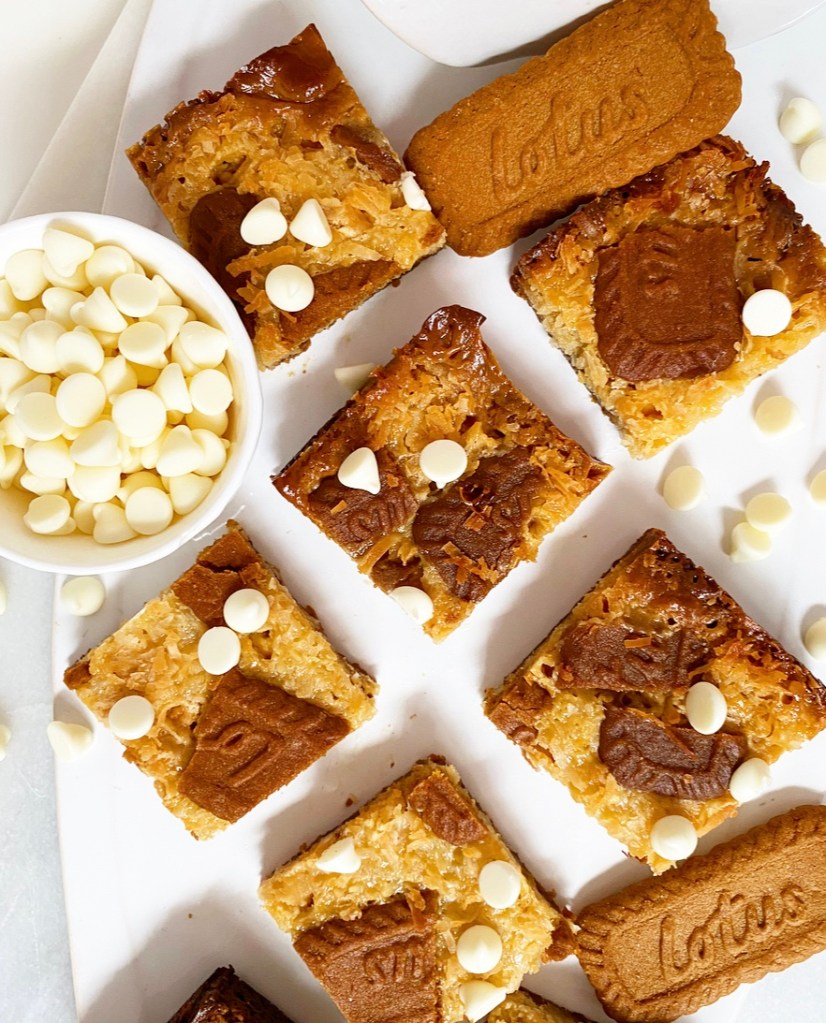
Now you might be wondering “why these flavors?” Well, as I alluded to above, magic bars are a great way to bake with the odds and ends in your pantry. I opened mine one day and saw the dregs of some coconut, the last of a bag of white chocolate chips, and a sleeve of Biscoff cookies—simple as that. The light spice of the Biscoff and the oven-toasted coconut compliment each other incredibly well, and the white chocolate and sweetened condensed milk add richness and texture.
If you’re not already sold, you’ll have to trust me that these bars are much more than the sum of their seven parts. Or, you know, you can dig into your own cabinets and make a weird and wonderful magic bar recipe of your own.
Coconut Biscoff Magic Bars
makes 1 8- or 9-inch pan, about 12-16 bars

26 Biscoff cookies, divided
1/4 cup light brown sugar, packed
pinch of Kosher or sea salt
5 tablespoons unsalted butter, melted
1 14-ounce can sweetened condensed milk
1 1/4 cup sweetened flaked coconut
1/2 cup white chocolate chips + more for topping
6 Biscoff cookies, broken into pieces

Preheat oven to 350F. Heavily grease a 9-inch square pan and line with parchment paper, leaving overhang on two sides. Grease again. Set aside.

Place 20 Biscoff cookies the bowl of a food processor and process until pulverized. Add brown sugar and melted butter. Pulse until combined. Alternatively, cookies may be crushed in a bag and crust ingredients may be mixed in a bowl.

Transfer crust mixture to the prepared pan. Press into an even layer. Bake for five minutes, until set. Set crust aside to cool for 10 minutes.

Drizzle sweetened condensed milk over crust. Use a silicone spatula or the back of a spoon to carefully spread into an even layer. Scatter coconut over the top, followed by white chocolate chips.

Break remaining 6 Biscoff cookies into pieces and scatter over the top. Use the palms of your hands to lightly press the toppings into the sweetened condensed milk. Bake for 30-32 minutes, tenting pan with foil if anything becomes too dark. Bars are done when the center jiggles just slightly when the pan is jostled. The bars will set as they cool. Top with more white chocolate chips if desired.

Let bars cool completely in the pan on a rack. Use overhang to remove bars from the pan to a cutting board. Peel off foil. Slice with a lightly-greased knife and serve.

Leftovers will keep in an airtight container at room temperature for up to 4 days, or in the refrigerator for up to a week.
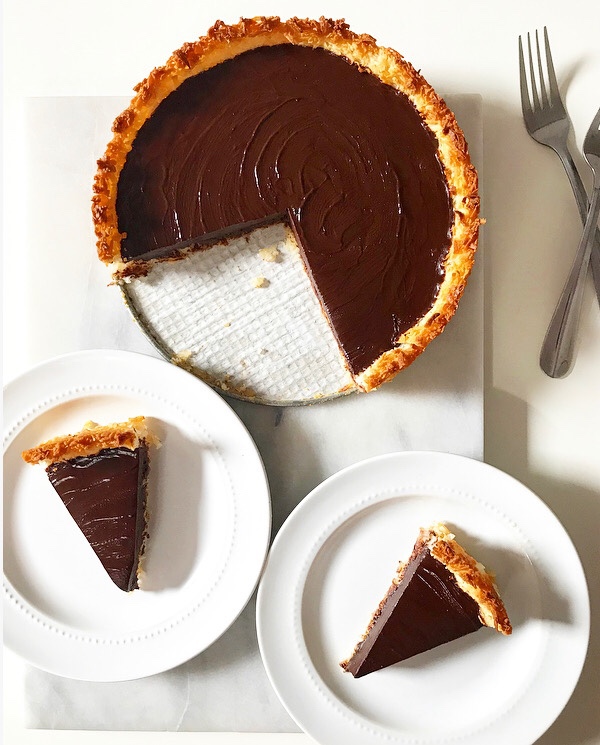
 I realize that I can bake with coconut anytime of year, but there’s something about spring that makes me want to put it in everything. Between its chewy texture and sweet, tropical scent, I just can’t get enough. Coconut is delicious as a primary flavor, of course—looking at you,

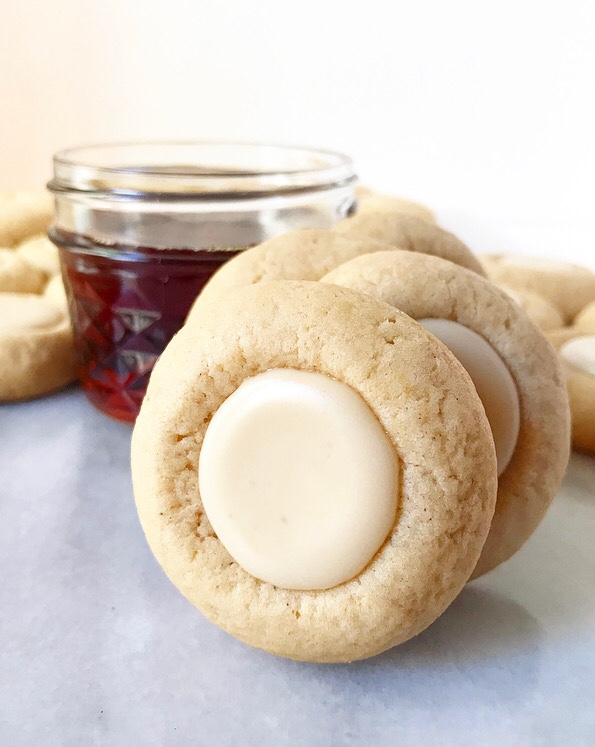
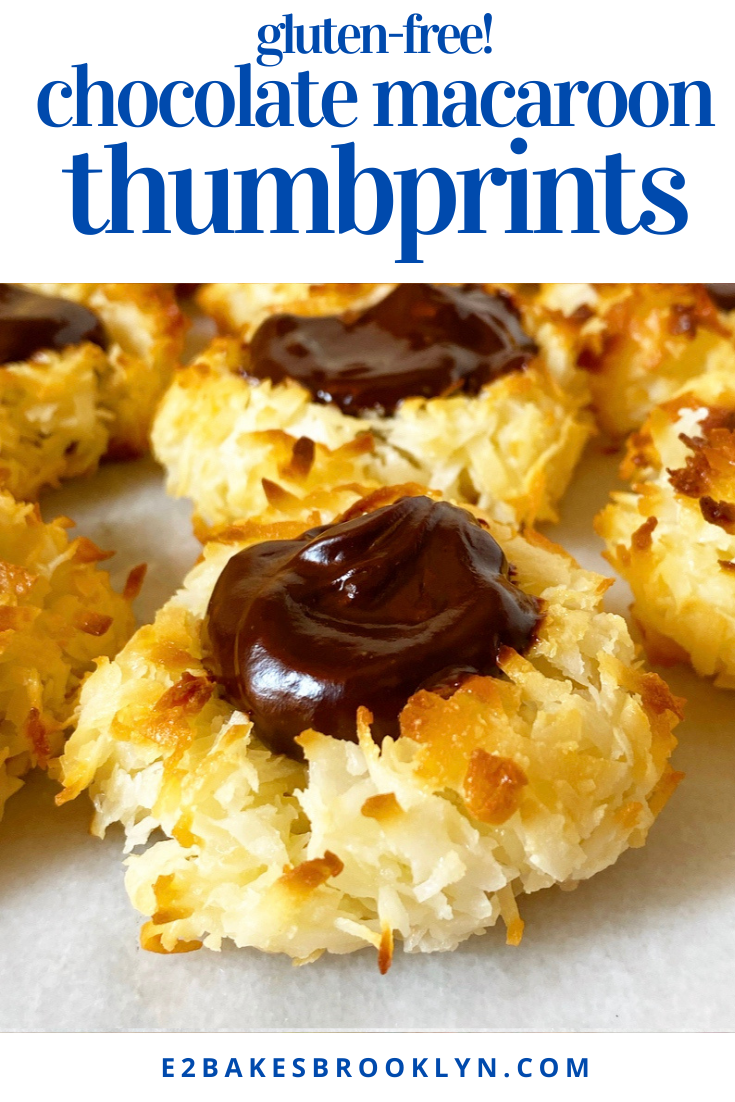
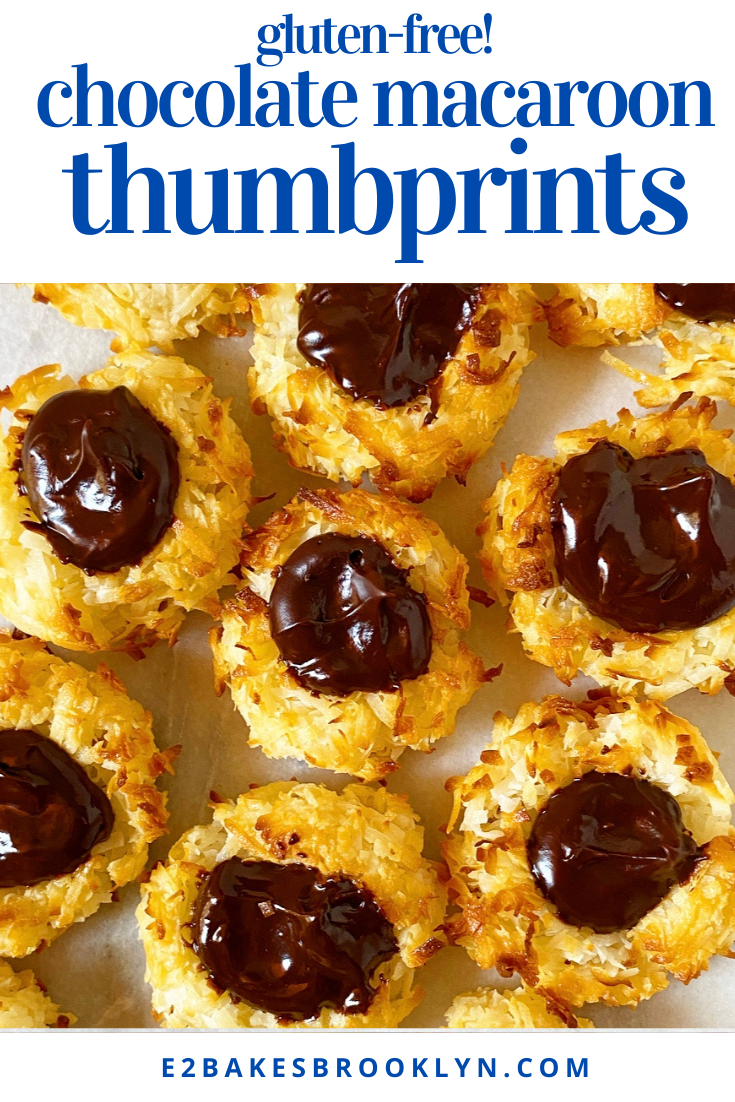
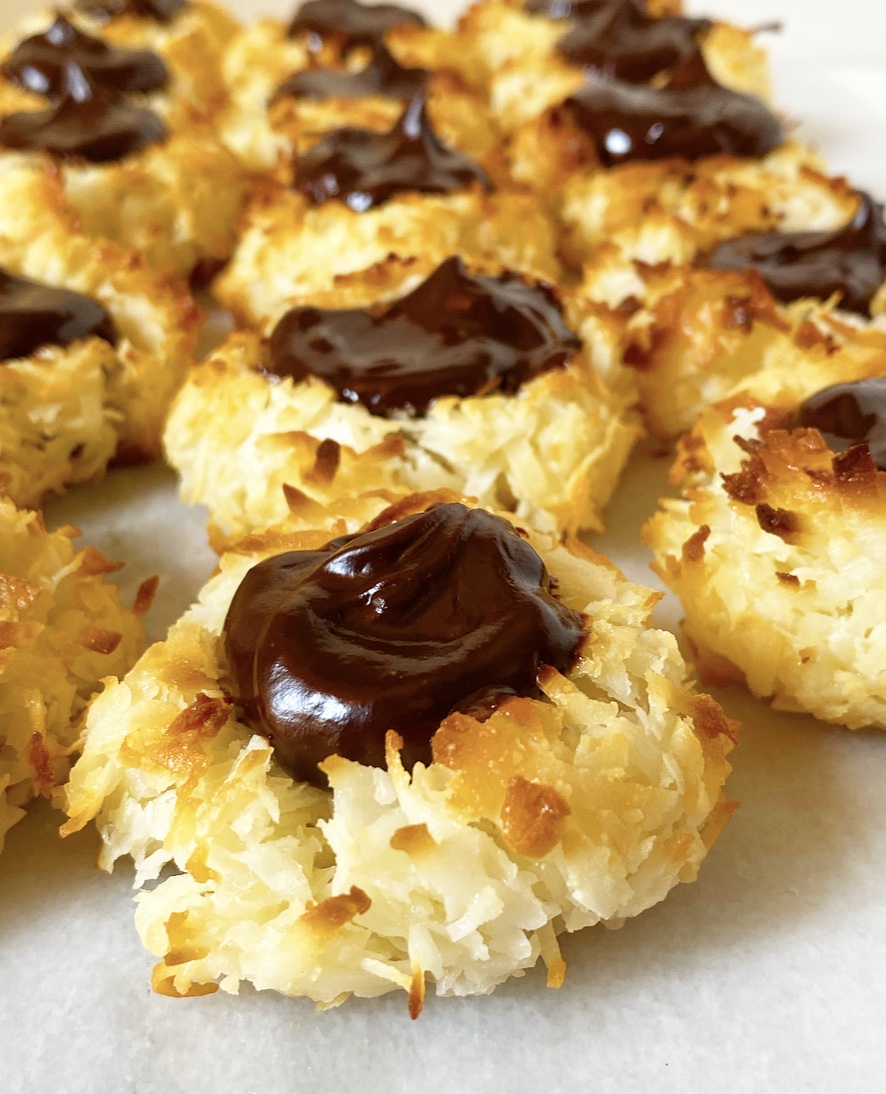 If these Chocolate Macaroon Thumbprints look familiar, it’s because they are—these are basically just miniature versions of my
 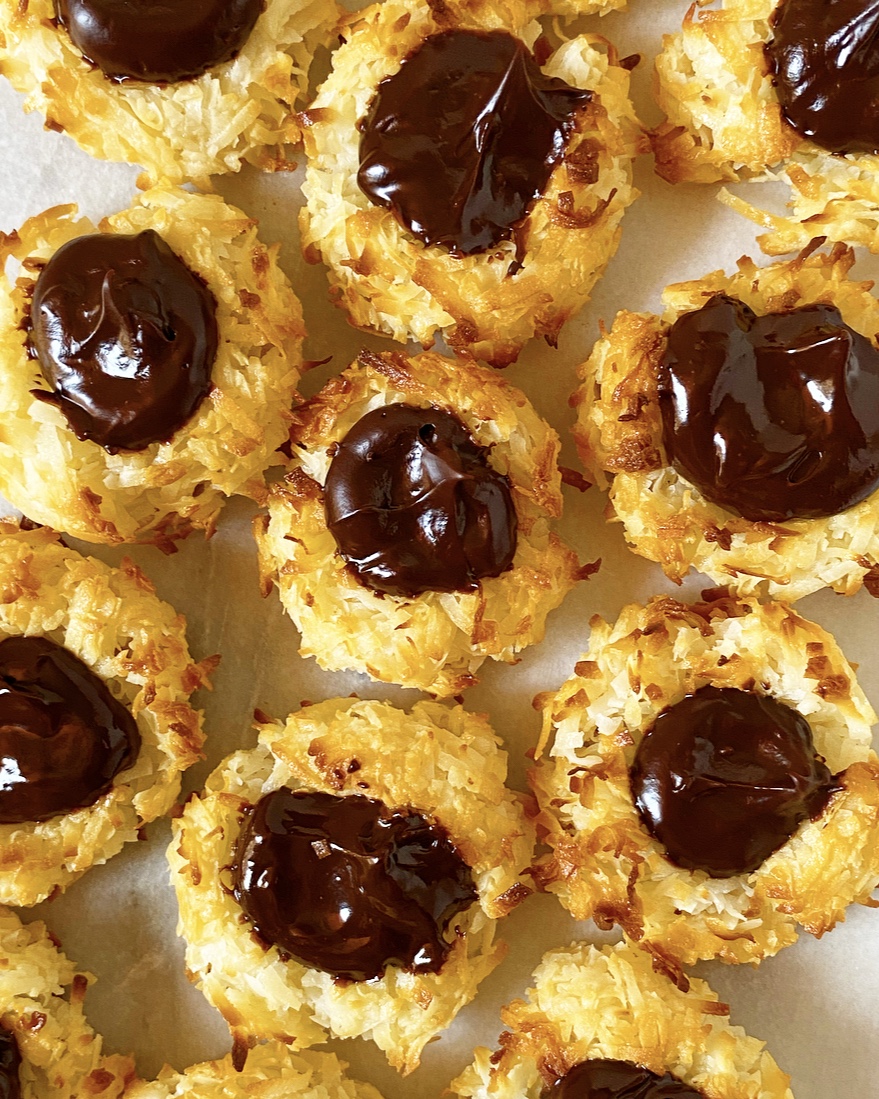 Chocolate Macaroon Thumbprints are made with my trusty gluten- and egg-free
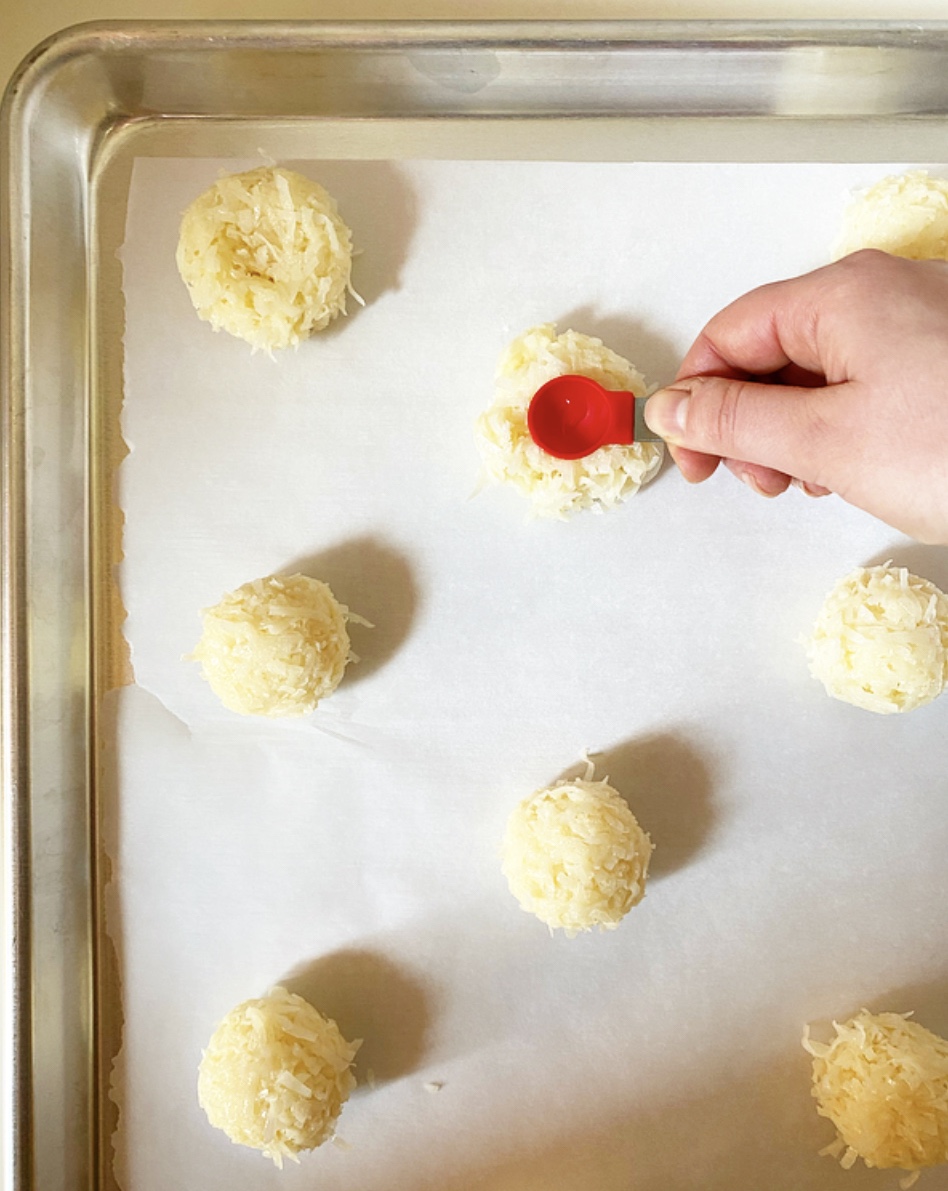
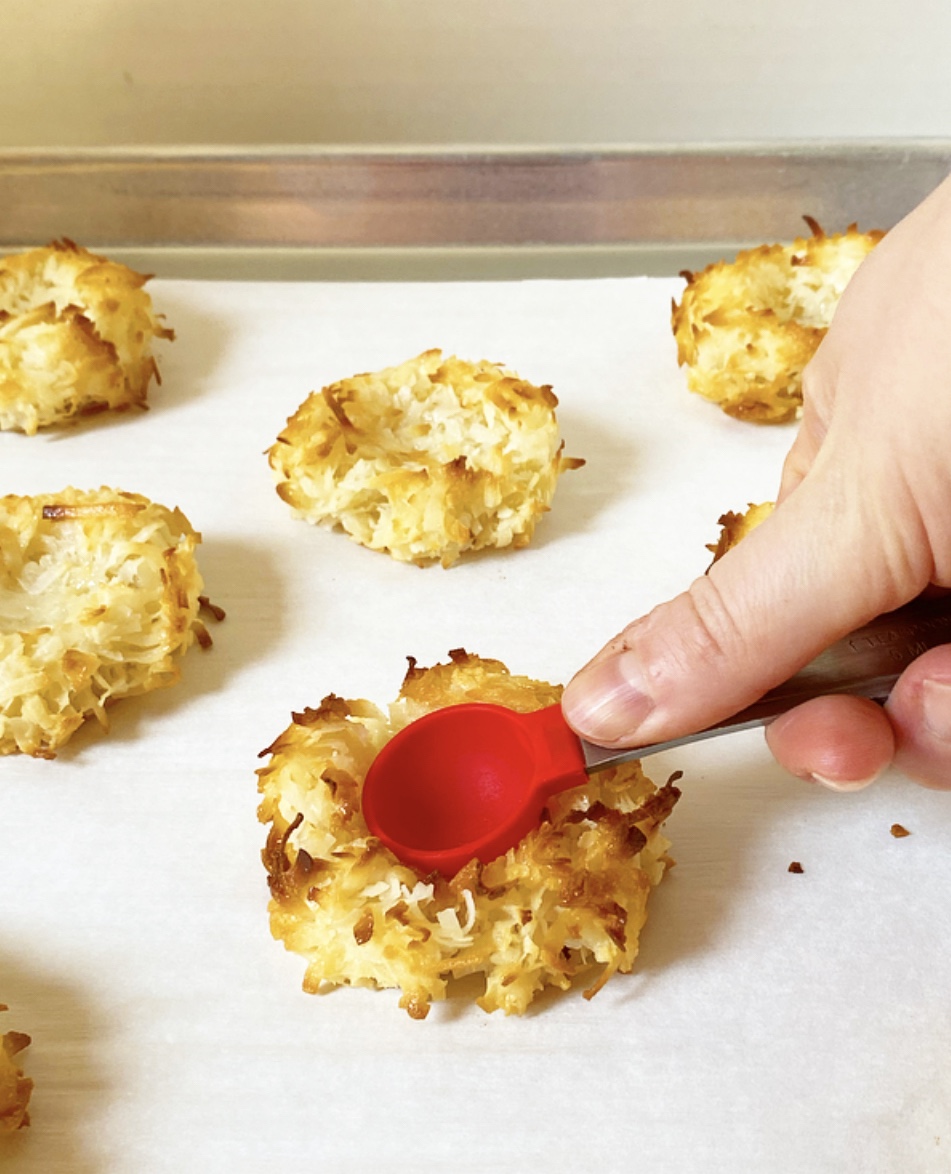 After the coconut base is rolled into balls, little indentations are pressed into each one to create the titular thumbprint. You could use your thumb, of course, but a spoon gives a more consistent shape and size and is way less messy. These initial thumbprints will become shallow during baking, so make sure to give them a second indentation when you pull them from the oven. Bigger thumbprint = more room for chocolate!
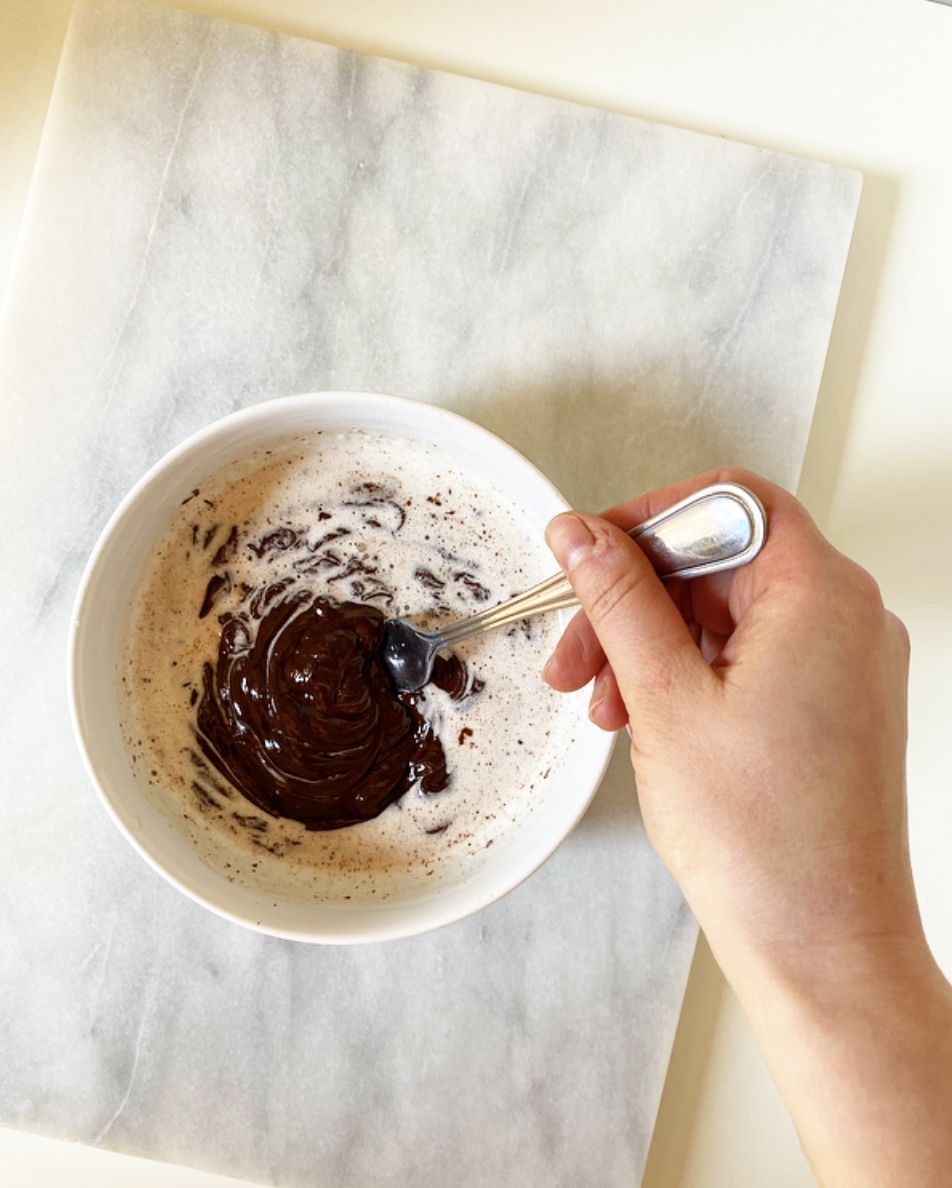
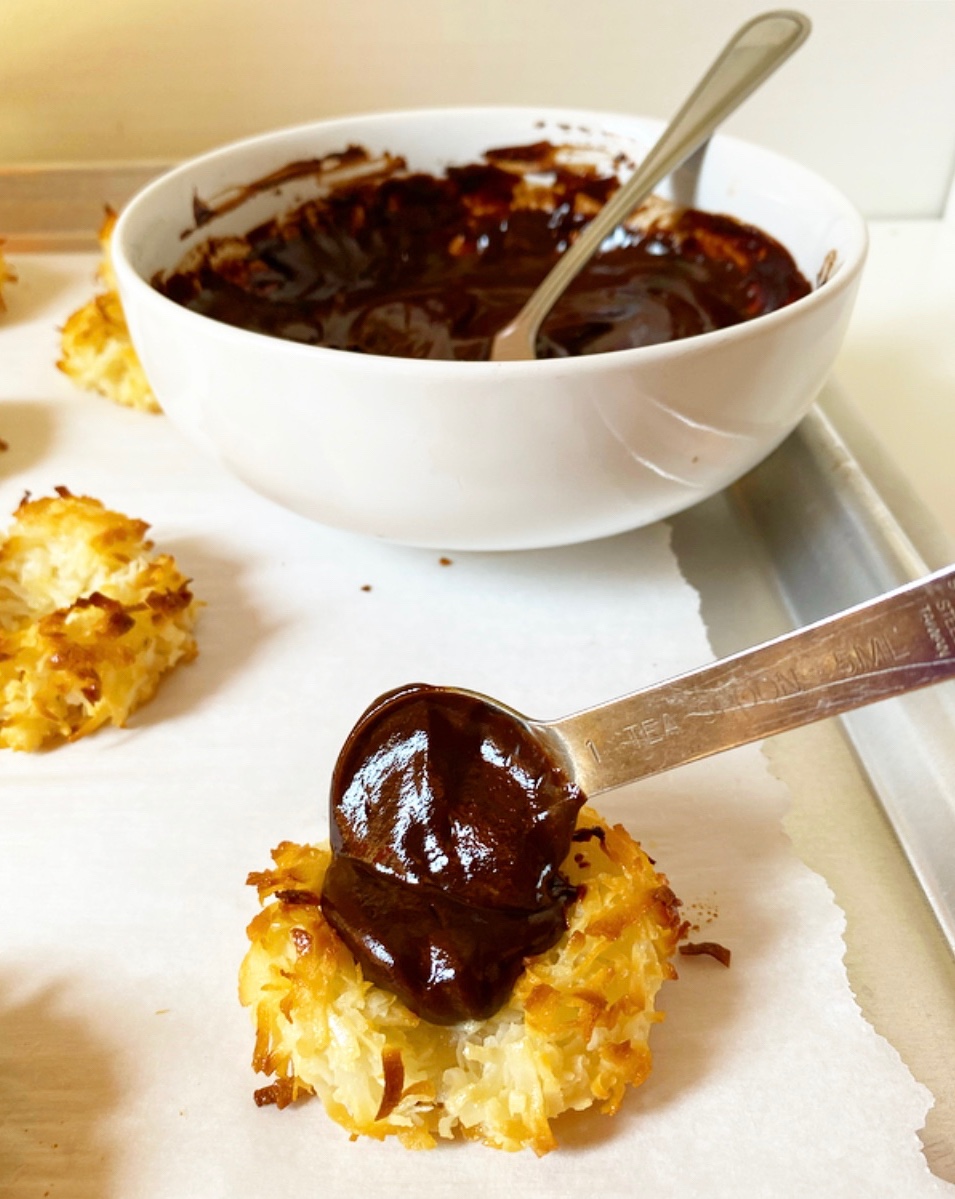 Ohhh yes, these thumbprints are filled to the brim with dark chocolate ganache! It’s no secret that coconut & dark chocolate are perfect together, but the creamy-chewy texture situation here is positively glorious. I can say this with confidence because…well, I’ve eaten a lot of these lately. A. Lot.
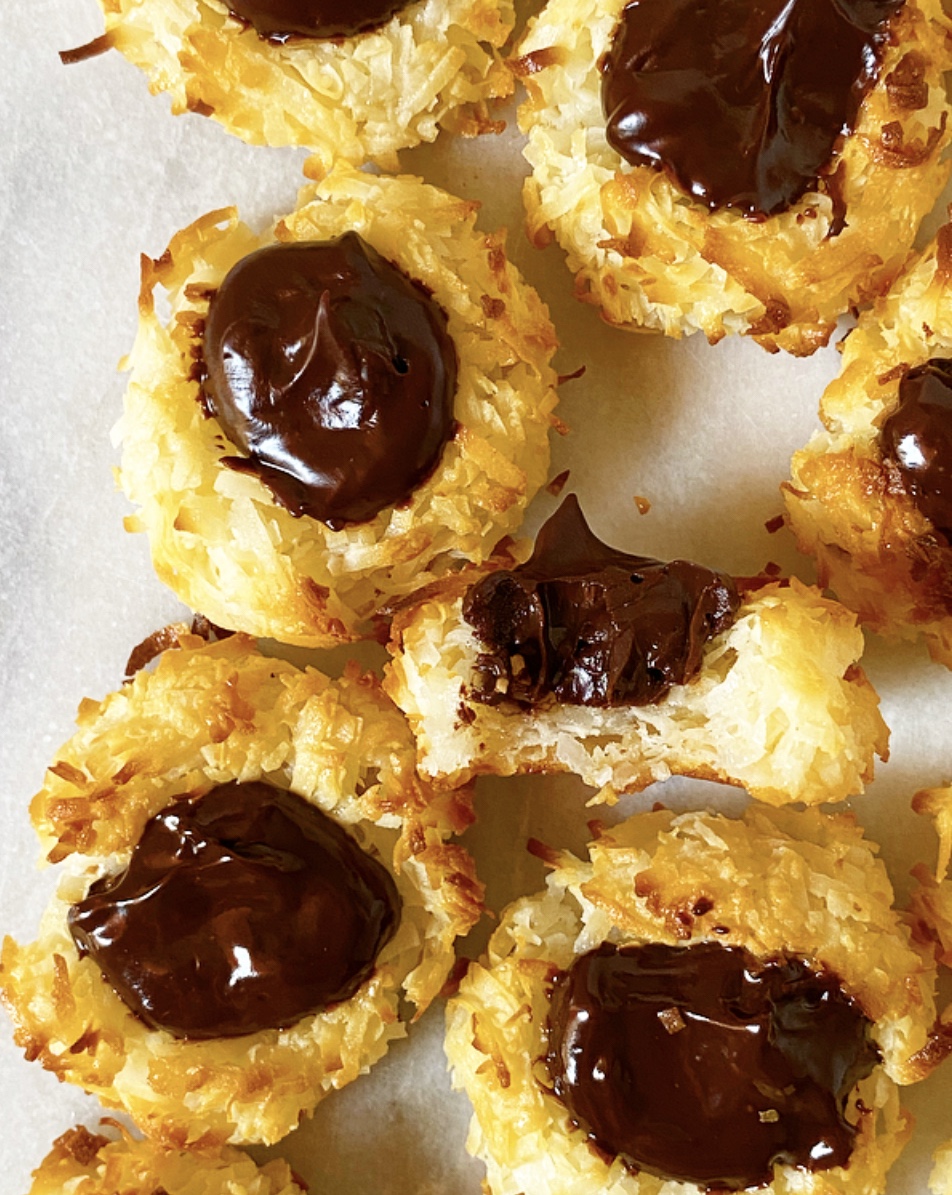 Chocolate Macaroon Thumbprints are a perfect addition to your Easter menu! Follow my lead and leave them plain for a simple & stunning finish, or top the pools of ganache with Easter egg candies for something a little more festive.
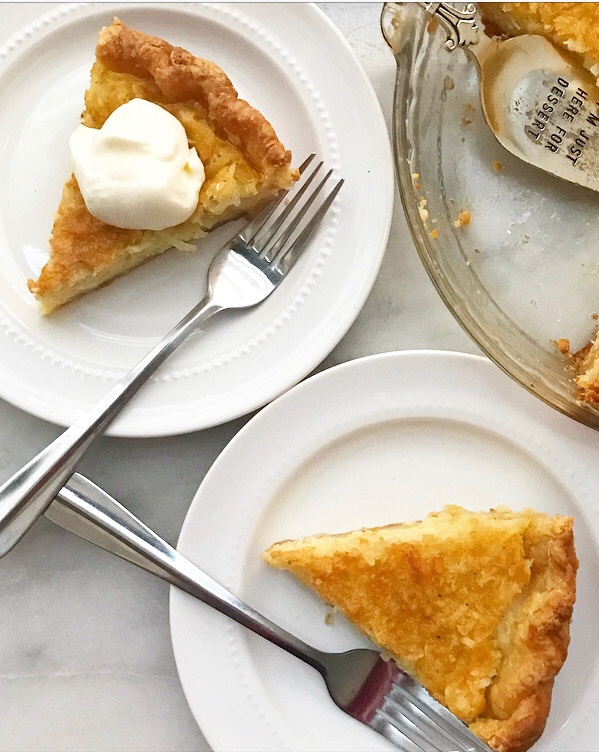
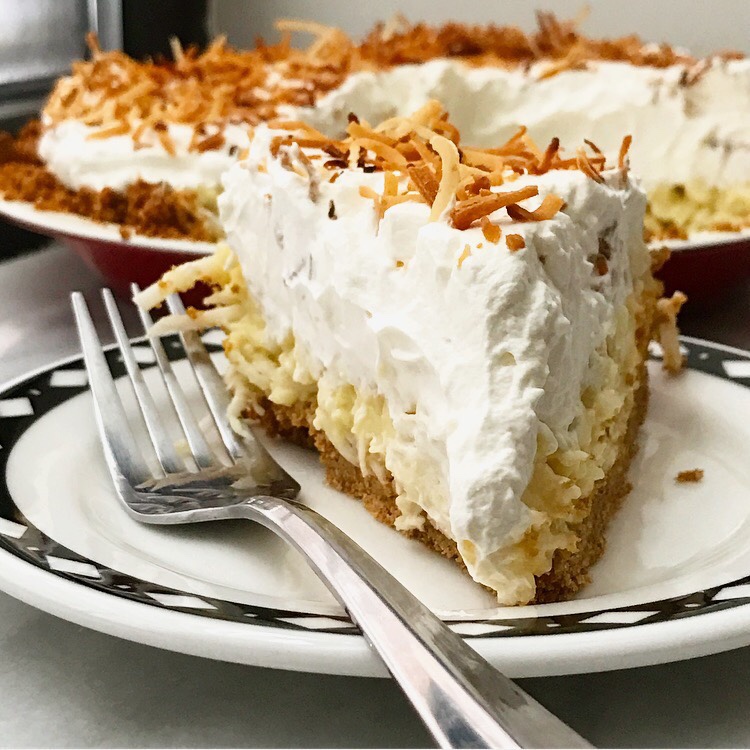
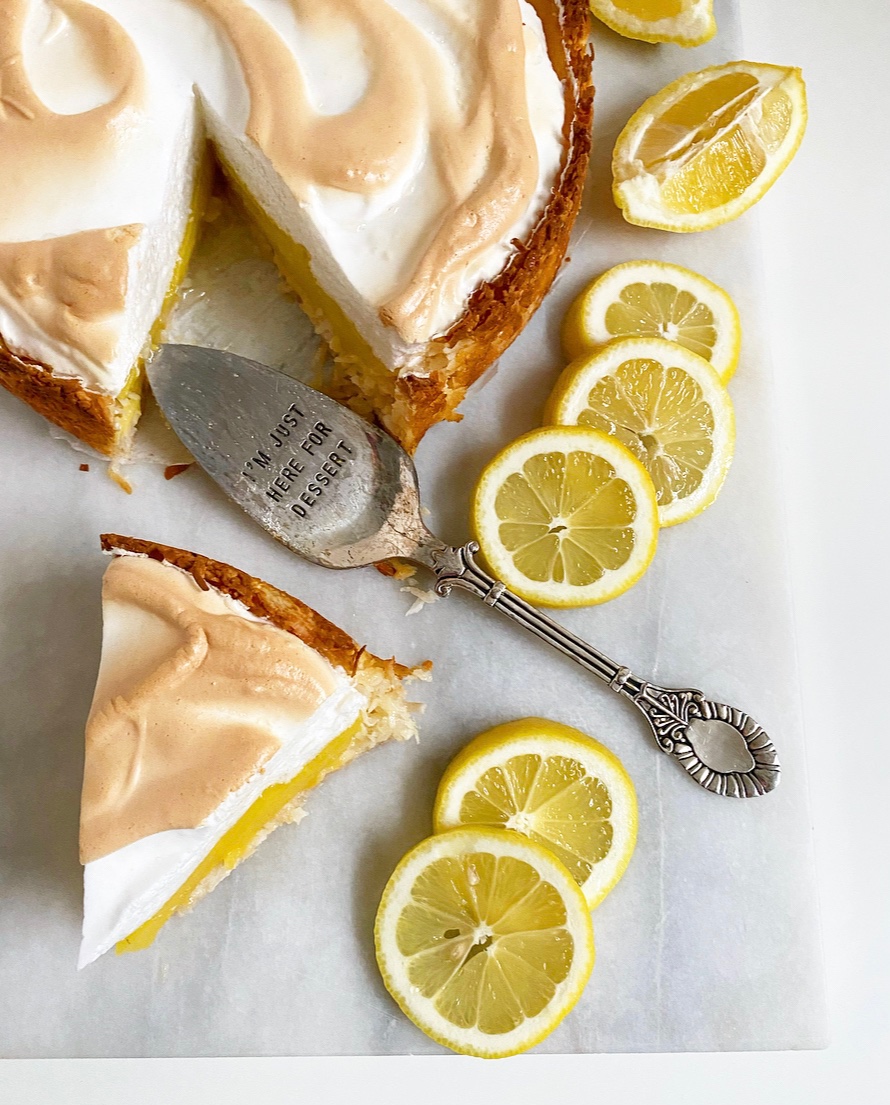 I put a
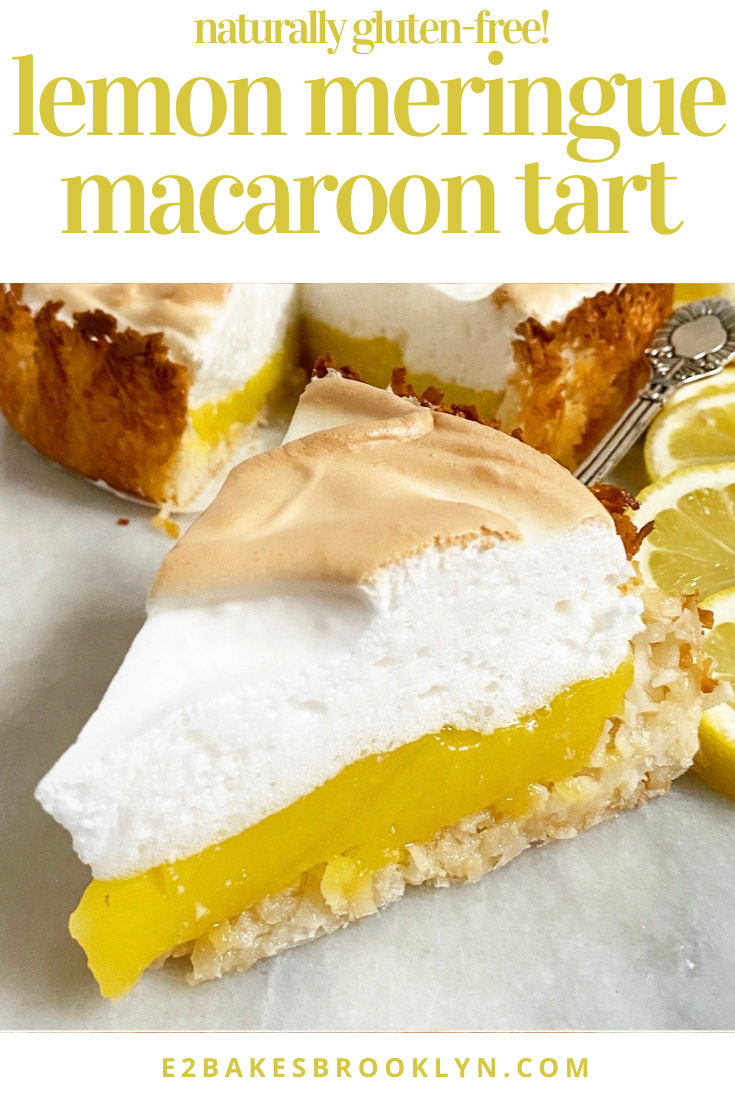
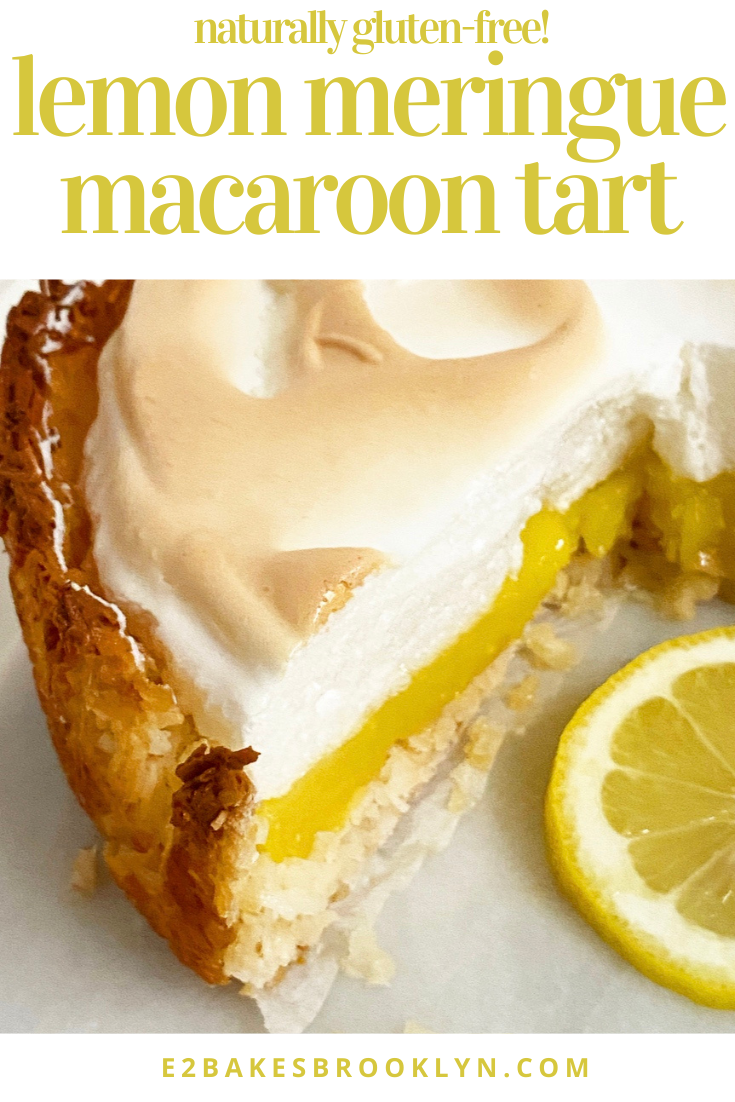
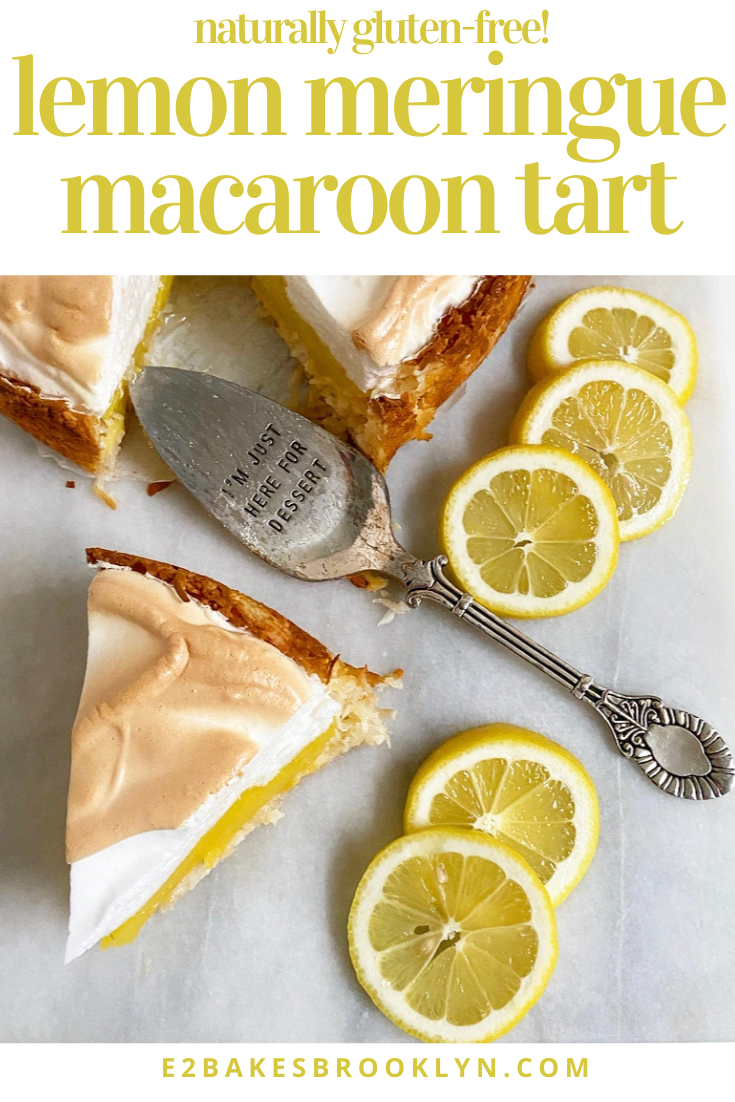
  You read that right: Lemon Meringue Macaroon Tart. Like tangy lemon filling and airy meringue layered into a giant coconut macaroon crust. Oh y’all, this is something special.
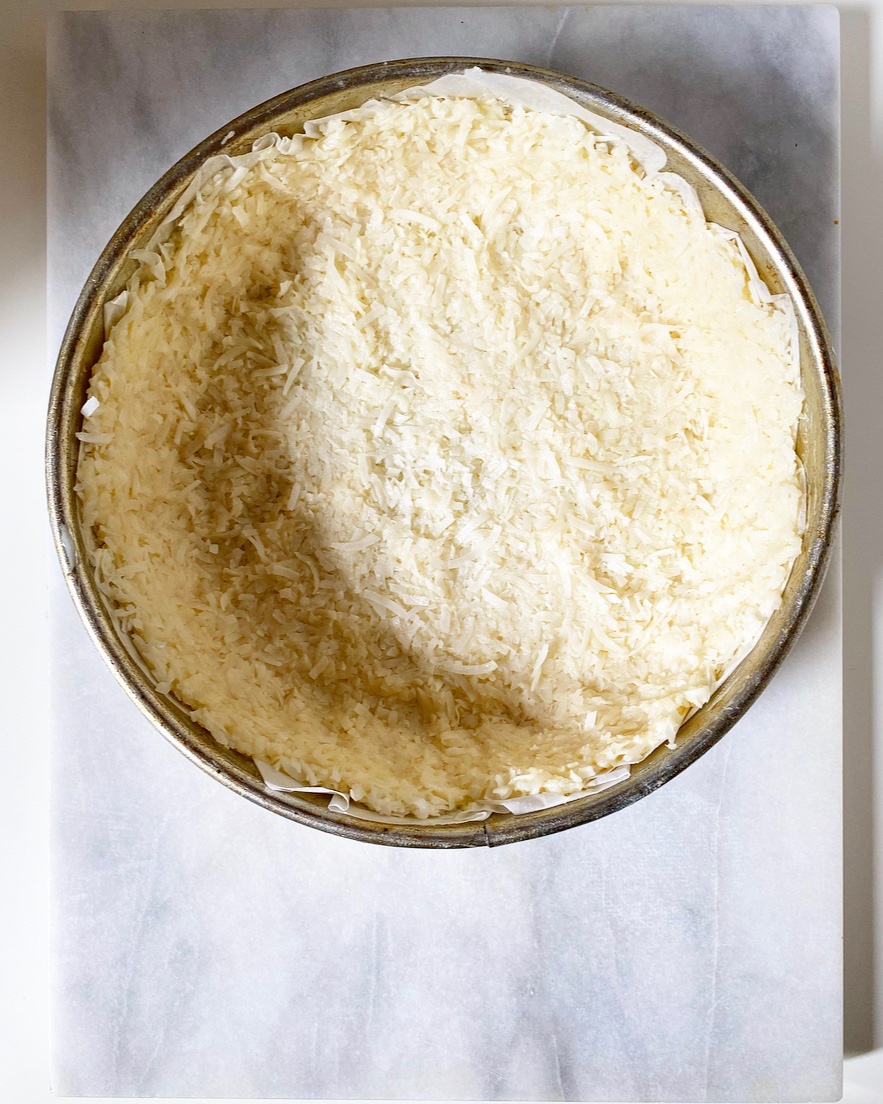
 Let me get this out of the way: we are talking about
 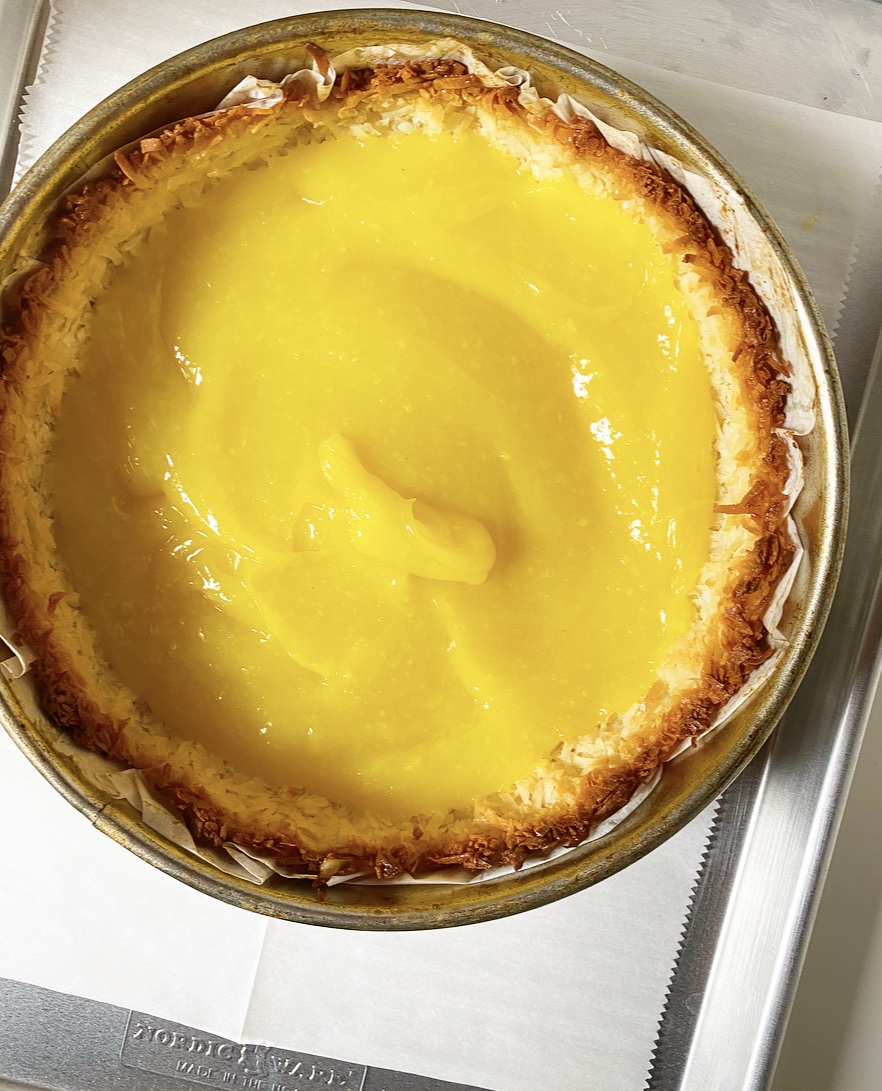 I know lemon meringue filling can be intimidating if you haven’t made it before, but I promise it’s not scary. I think it’s the color blocking that sends people running for the nearest bakery, but lemon meringue is just a marriage of two really simple recipes. The lemon portion is very similar to the
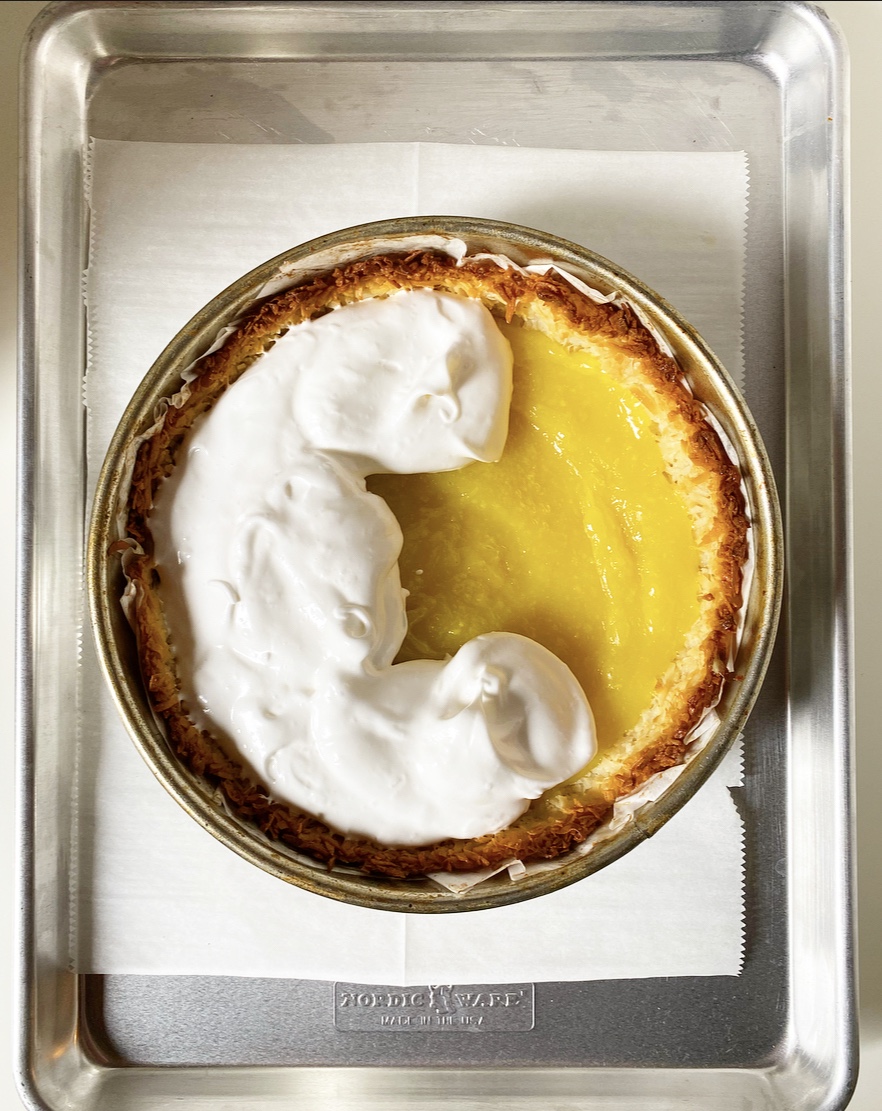
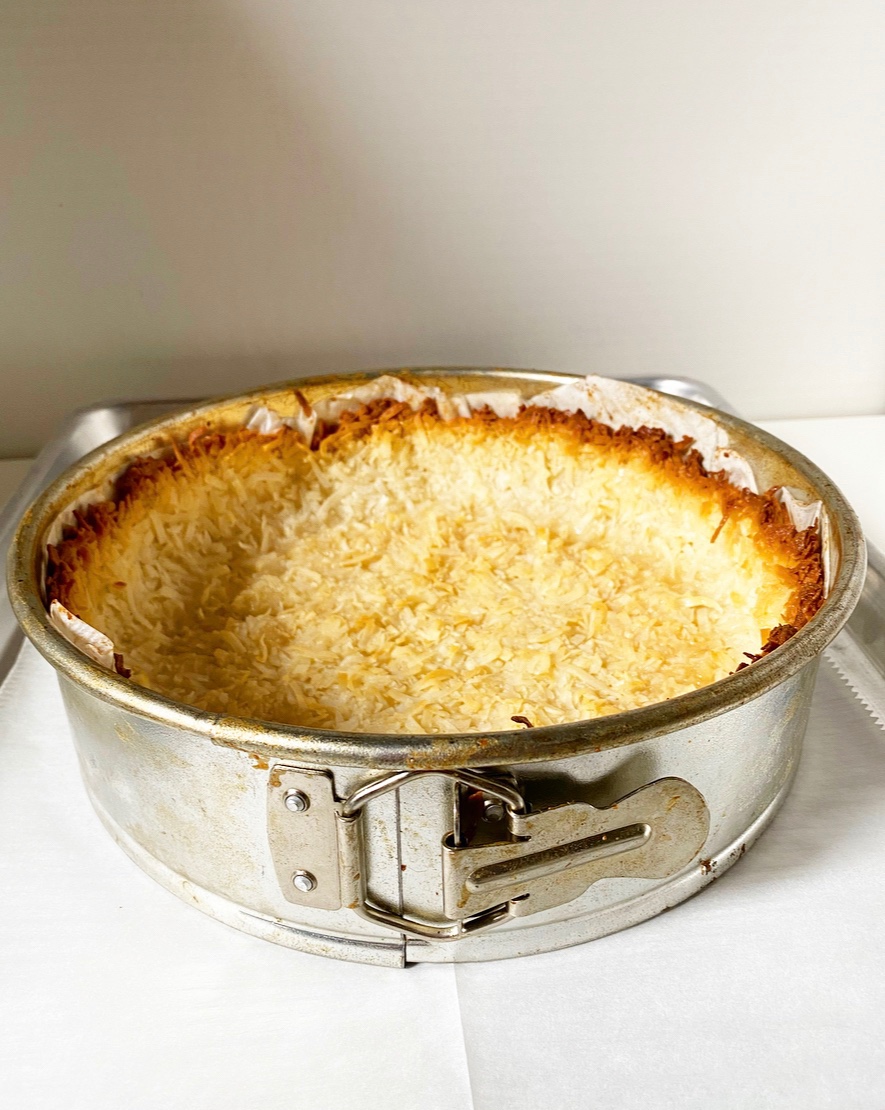
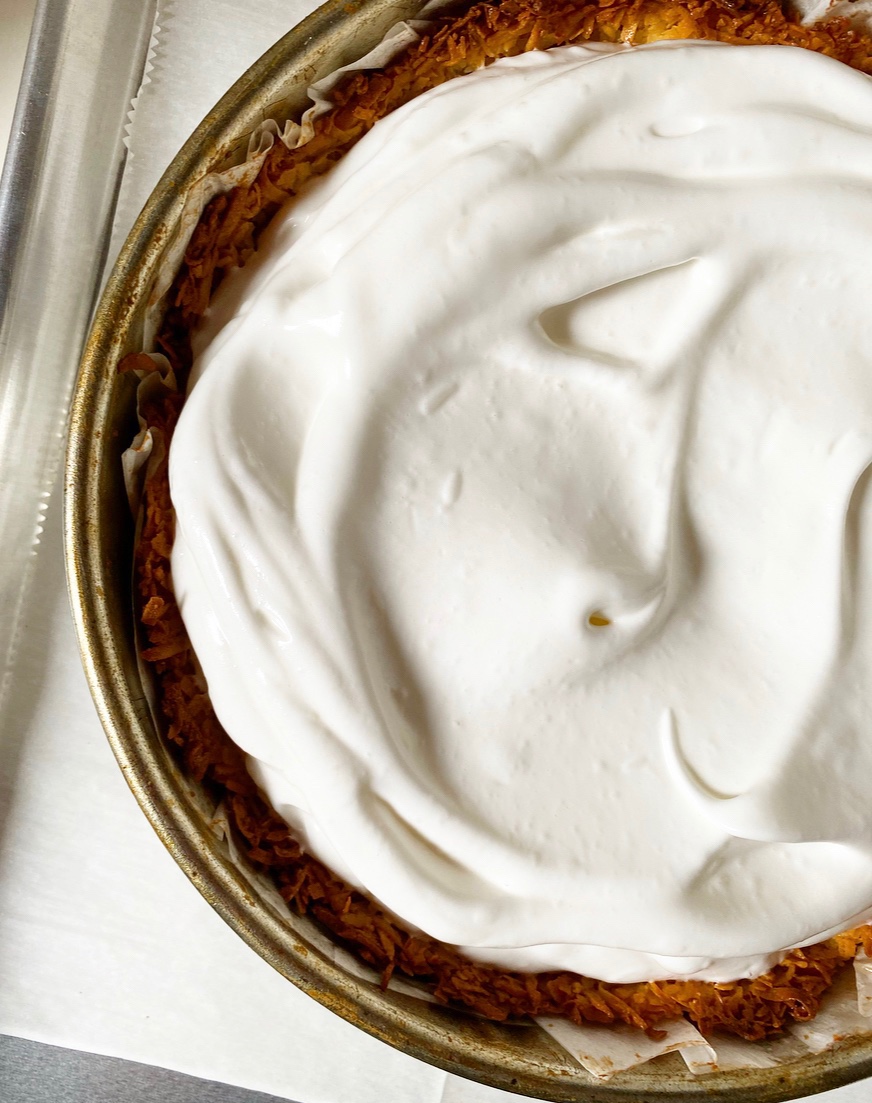 Regarding assembly, you’ll need to have your crust baked and cooled and the meringue whipped before you make the lemon filling. The reason for this is that the filling needs to be piping hot when it meets the meringue. By doing this, we are allowing the egg whites in the meringue to bake directly onto the entire surface of the filling, helping them to fuse together so they don’t slide apart during slicing. Once filled, the tart will need to bake for about 25 minutes, just until the meringue is beginning to turn golden.
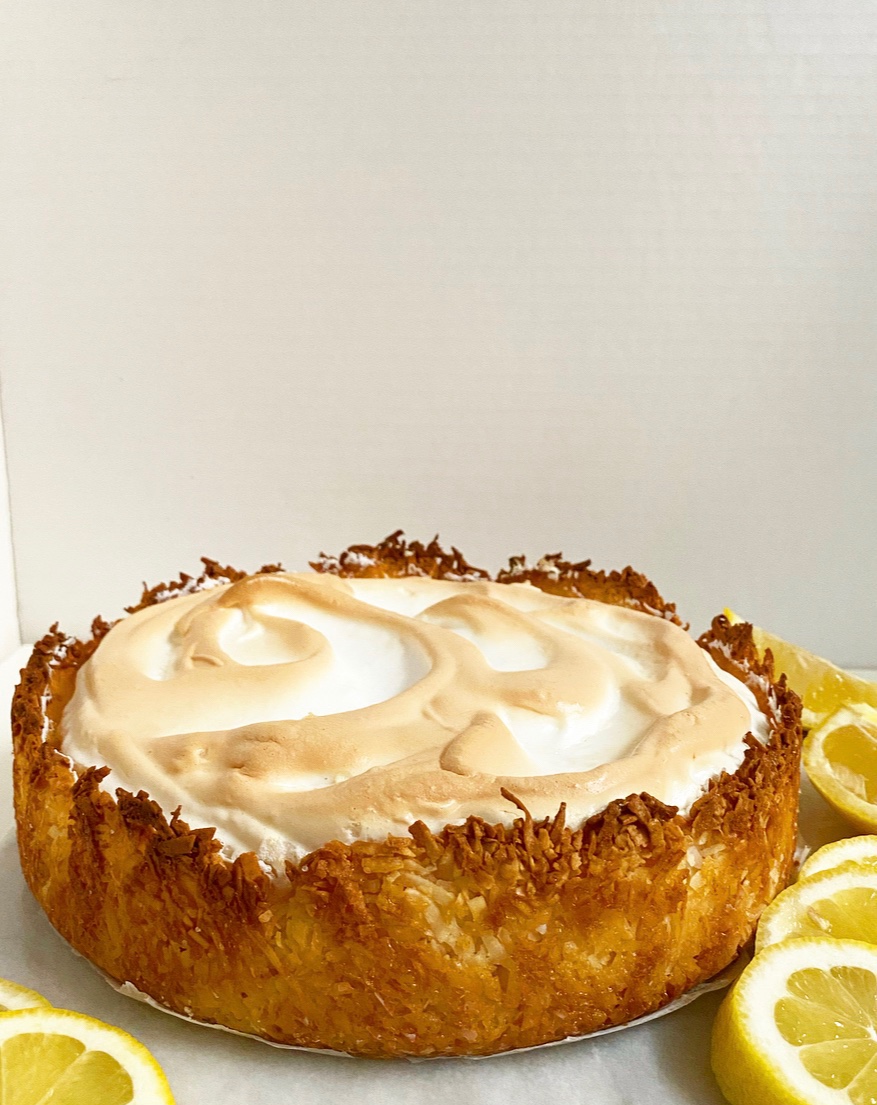
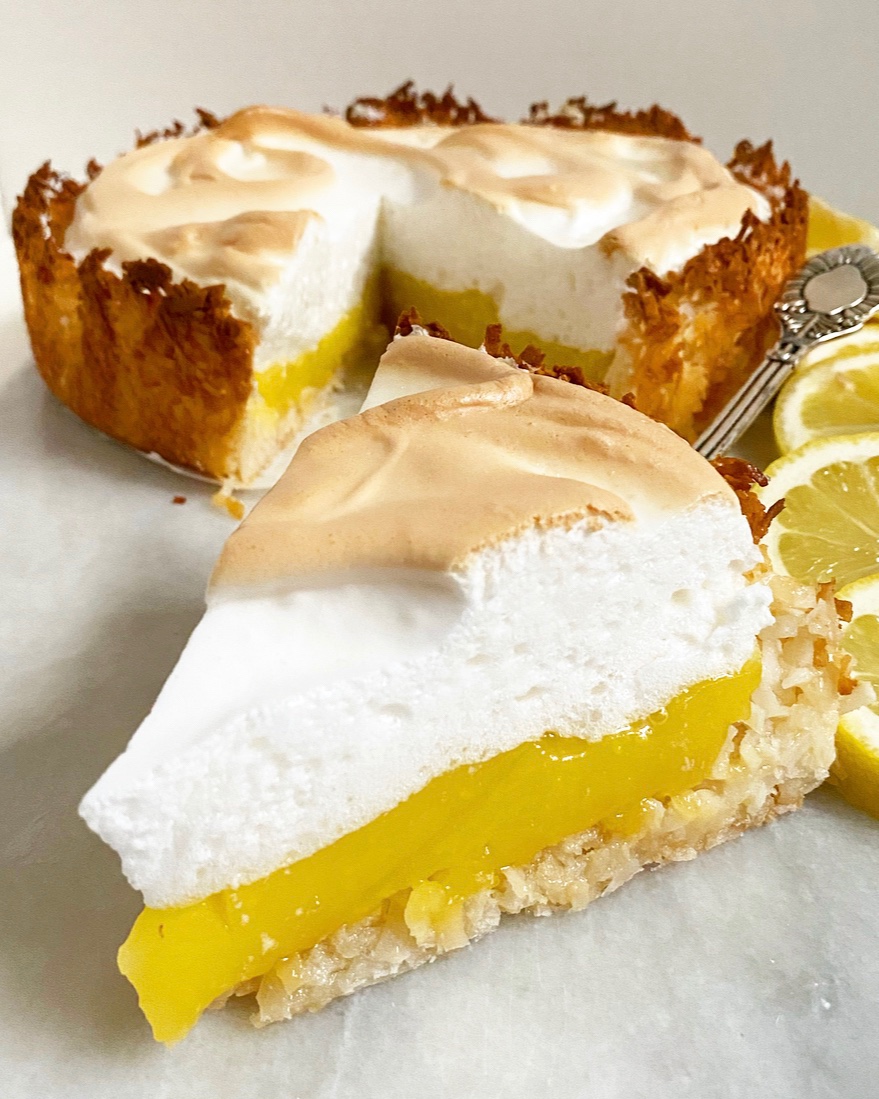 Some people like their lemon meringue desserts at room temperature, but I prefer mine cold. Also, I think it makes for more aesthetically pleasing slices. That color blocking though 😍
  One persnickety thing about lemon meringue desserts? They need to be served the day they’re made. Meringue is a beautiful thing, but it is fleeting. If not served within hours of baking, it will begin to weep. Ew. Rest assured that even if you don’t have the time to bake and serve on the same day you can still get your lemon macaroon tart fix. The solution? Skip the meringue layer. You can cool the tart just after adding the lemon filling, then refrigerate until ready to serve.