Tag Archives: Caramel

Peanut Butter Caramel Corn

Peanut Butter Caramel Corn

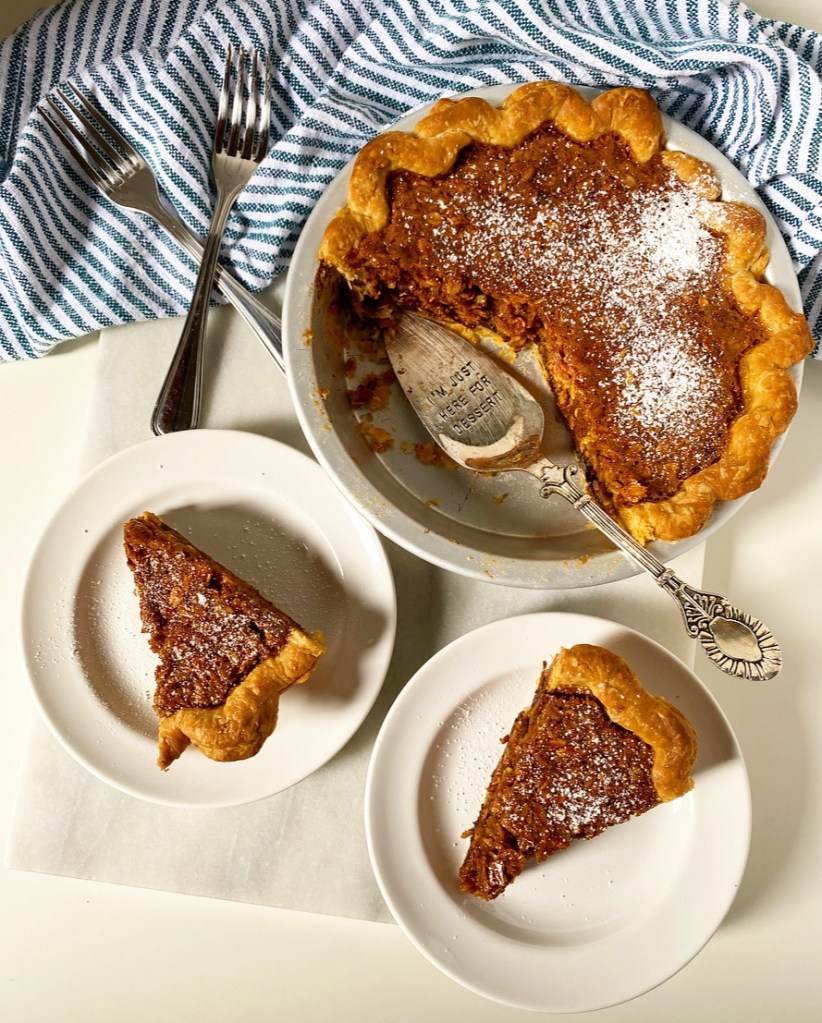
I’ve been holding out on you.

This recipe? These pictures? They’re from last summer! I did a bunch of work ahead so I could spend time with my family in New Mexico, which was a good idea, in theory. The trouble is, I forgot to write down the finished recipe, so I had to wait until I had a spare moment to re-test it…and that didn’t happen until about two weeks ago.

What can I say? I’m busy.

Peanut Butter Caramel Corn

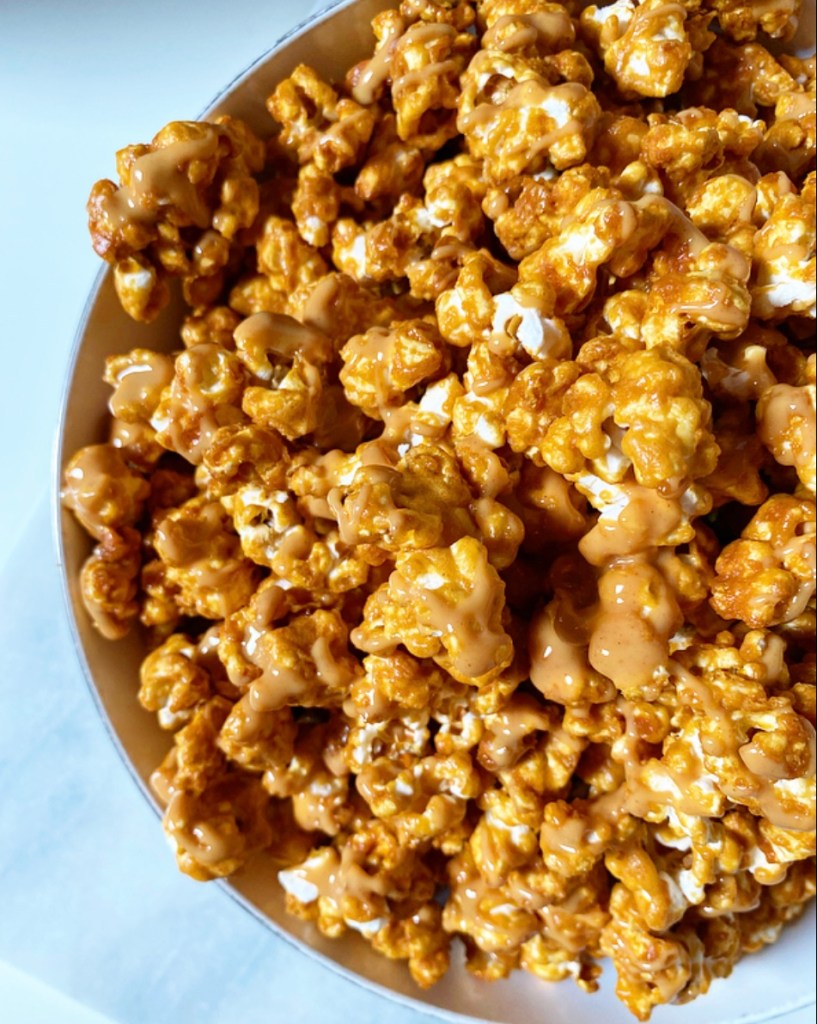
Please believe me when I tell you this one was worth the wait though. I mean, it’s Peanut Butter Caramel Corn. How could it possibly be anything but wonderful?!

Peanut Butter Caramel Corn

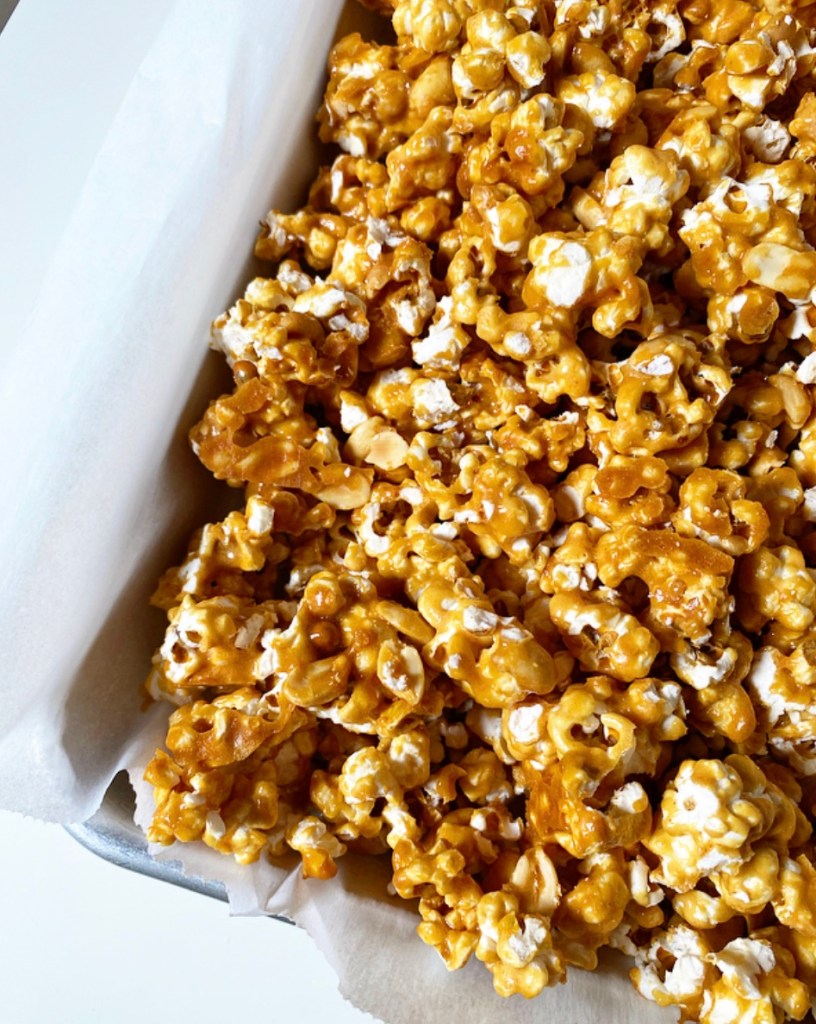
Oh yes, all the crispy, crunchy, sweet and glossy deliciousness you love about traditional caramel corn is here, but with a big punch of peanut butter. Roasted peanuts optional, but recommended.

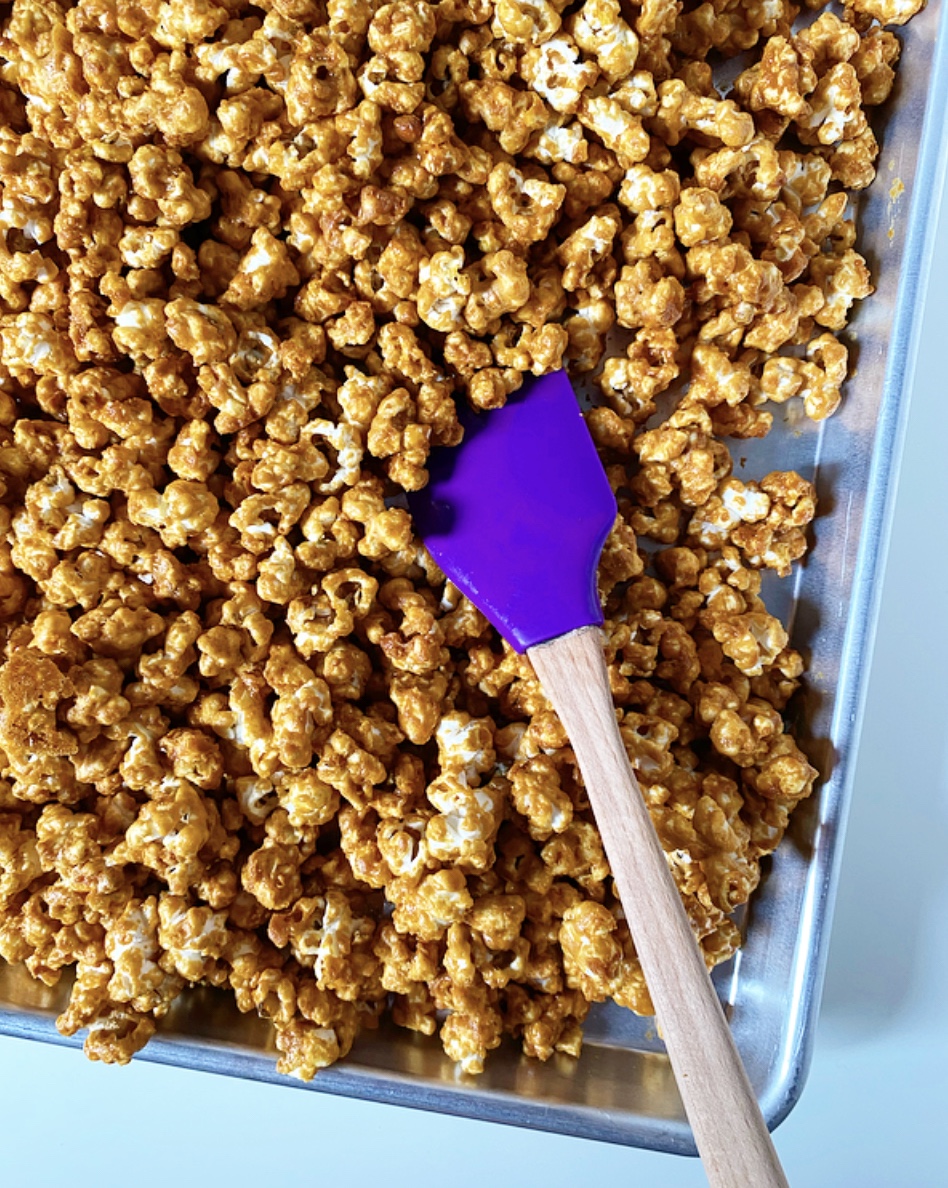
If you’re intimidated by the idea of making your own caramel corn, fear not! The caramel coating is made with my go-to no-stir method—just toss all the ingredients together and let them do their thing. Trust me!

When it’s ready, toss the peanut butter caramel with a whole bunch of plain popcorn (and peanuts!) and bake it low and slow until it’s super glossy and your kitchen smells amazing.

Peanut Butter Caramel Corn

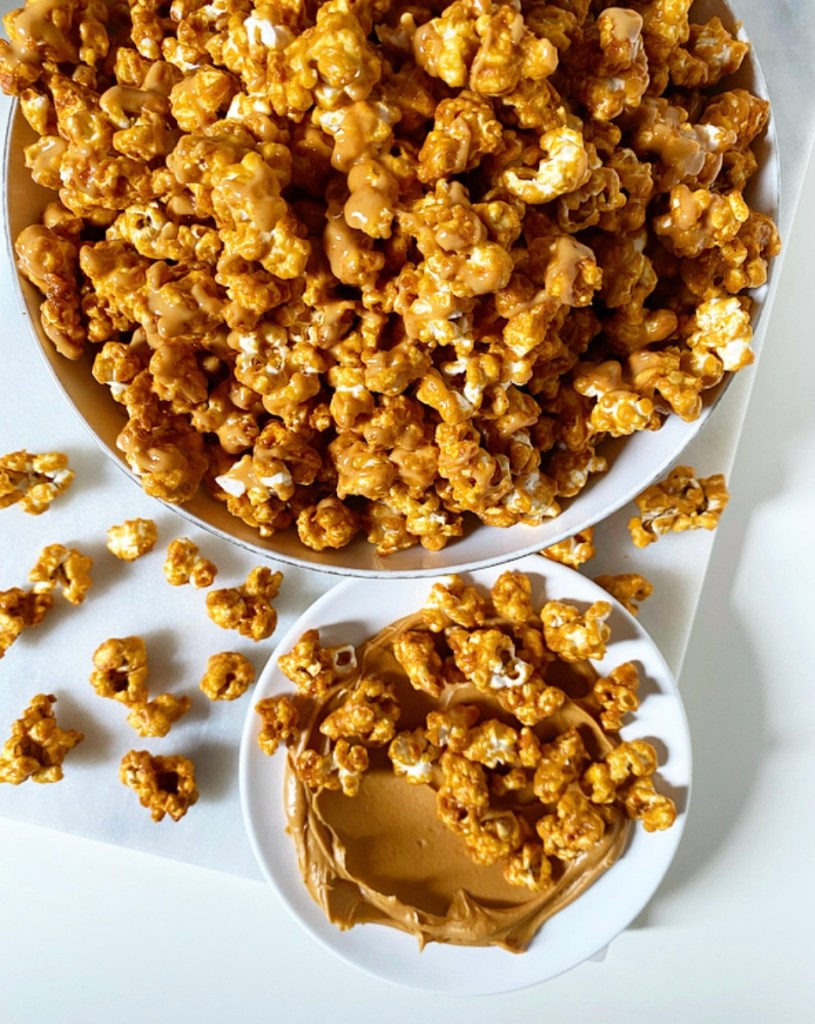
This recipe for Peanut Butter Caramel Corn makes a huge batch and keeps for two weeks, which is a good thing because you’re going to want to bring it everywhere. It’s a positively dreamy addition to just about any occasion. Family vacations, movie nights, picnics, beach days, cookouts, sitting around in your pajama—whatever you’ve got going on, this is *the* thing to bring. Just promise me you won’t wait a year to make it.

Peanut Butter Caramel Corn
makes about 12 cups

1 tablespoon neutral-flavored oil
3/4 cup unpopped popcorn kernels
1 1/2 cups peanuts (optional)
2/3 cup granulated sugar
3/4 cup light corn syrup
2 tablespoons honey
1 teaspoon Kosher or sea salt
1/2 cup (1 stick) unsalted butter, sliced into 8 pieces
3 tablespoon water
2 teaspoons pure vanilla extract
1 teaspoon baking soda
1/2 cup creamy-style peanut butter (not natural-style)

Pour oil in a large heavy-bottomed pot. Add 4-5 popcorn kernels. Heat over medium heat until kernels begin to pop. Add remaining kernels and cover with lid, leaving it a little bit ajar. Jostle constantly while popcorn pops, until pops are 2-3 seconds apart. Do not burn.

Remove pot from heat and pour popcorn into a bowl. Measure popcorn to ensure there are 12 cups. Set aside excess or pop more, as needed to meet the 12-cup requirement for this recipe. Add roasted peanuts, if using.

Preheat oven to 250F. Heavily grease two rimmed sheet pans, your largest mixing bowl, and 2 silicone spatulas with oil or non-stick spray. Put popped popcorn in the bowl. Set aside.

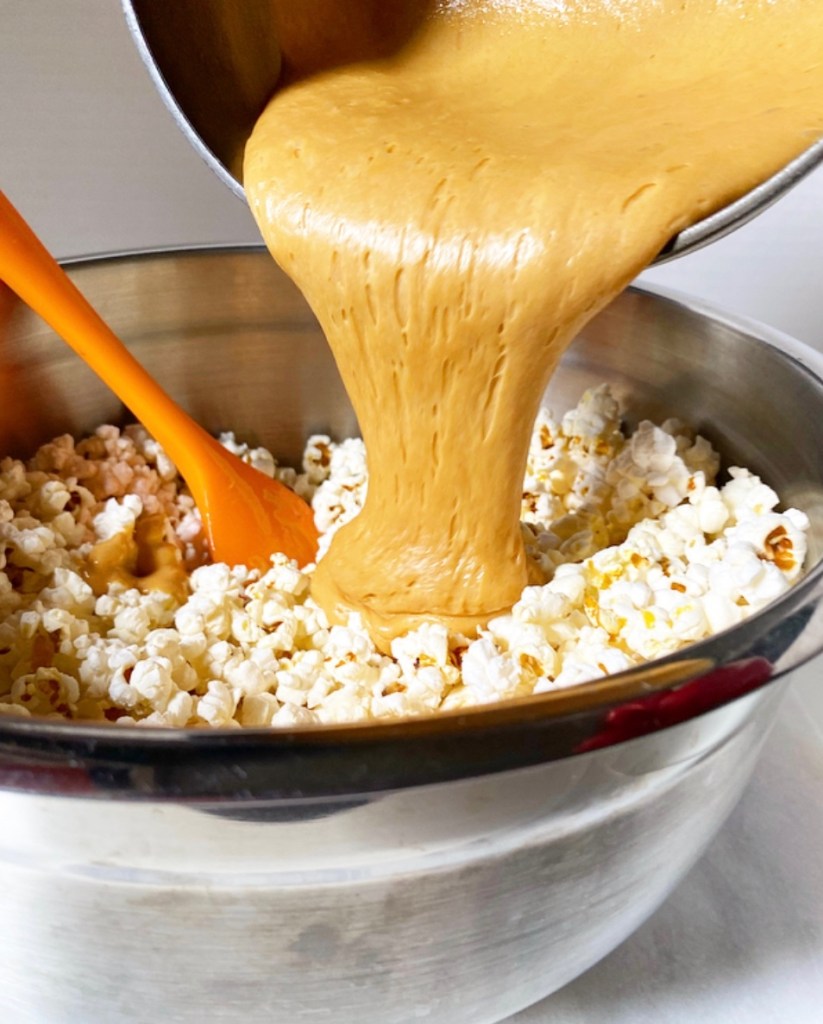
Without stirring or jostling, combine sugar, light corn syrup, honey, salt, butter and water in a 4-quart pot. Bring to a boil over medium heat. Let boil 5 minutes. Do not stir. Remove from heat. Stir in vanilla and baking soda; be careful, mixture will bubble up violently. Whisk in peanut butter.

Pour peanut butter caramel over popcorn and use greased spatulas to toss together. Do not touch any coated pieces that fly out of the bowl—the molten sugar will burn you. Wait til they cool a bit before picking them up.

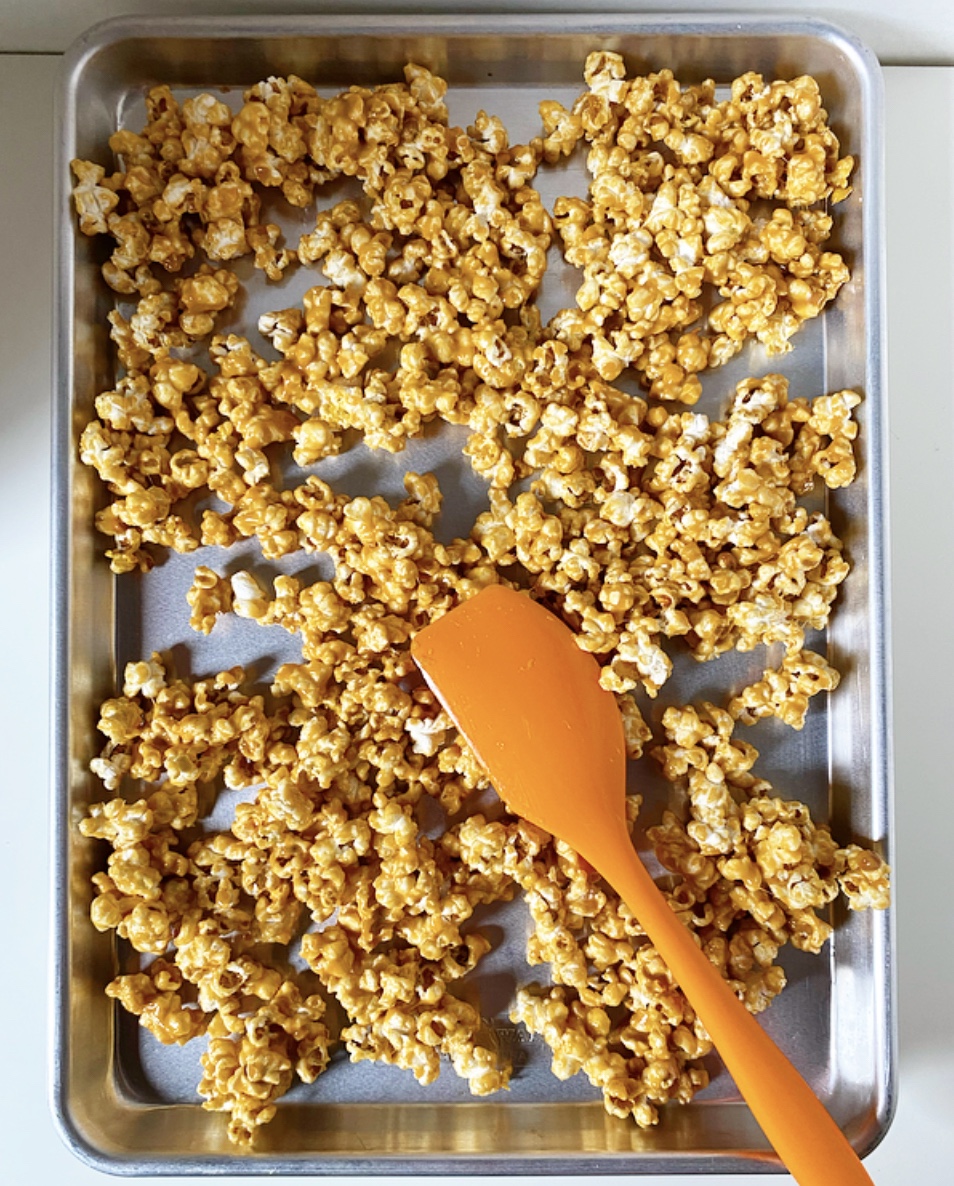
Divide coated popcorn among sheet pans. Bake for 45 minutes, stirring every 15 minutes.

Line a sheet pan or a surface with parchment. Pour baked popcorn on top. Let cool to room temperature. Serve.

Leftover Peanut Butter Caramel Corn will keep in a ziptop bag for up to 2 weeks. It may soften slightly on humid days.
Advertisement

Millionaire’s Rice Krispies Treats

Have you ever had Millionaire’s Shortbread? Called “millionaire’s” because it’s so rich, it’s a popular sweet in the UK, consisting of a buttery shortbread crust layered with homemade caramel and dark chocolate. It’s as delicious as it is beautiful to look at, and one of my favorite recipes that hasn’t made it onto this blog yet…though I have a sneaking suspicion it will before the year is out.

Millionaire’s Rice Krispies Treats

For now though, I’m taking the Millionaire’s Shortbread look and flavors and pushing them in an easy no-bake direction, just in time for picnic season. Instead of using a shortbread crust, I’m swapping in a layer of Rice Krispies Treats!

Millionaire’s Rice Krispies Treats

Oh, y’all, these Millionaire’s Rice Krispies Treats are so good! They’re super rich and delicious with an irresistible, chewy, crispy crust. And I mean, can we take a minute to admire these layers?!

Let’s take a look at each one. To start, I used my go-to Rice Krispies Treats formula. As a general rule, I use 1 tablespoon butter : 1 cup mini marshmallows : 1 cup cereal and round up as needed. I’ve doubled that formula to give the other layers a good thick base. If you like, you may use another formula (there are a zillion out there), but keep in mind that you want these Rice Krispies Treats to be sturdier than they are gooey to support all the other layers.

For the middle caramel layer, I decided to forgo the homemade caramel this time around, instead opting for a mix of melted soft caramel candies and cream. Some will sink into the nooks in the Rice Krispies Treats as it sets, while the rest will set smoothly to support the chocolate topping. Yum!

The top is the easiest layer of all three: dark chocolate and butter melted together until smooth and spread from edge to edge. Easy peasy.

Millionaire’s Rice Krispies Treats

As with many no-bake treats, these are easy to make but take a fair amount of time since each layer needs to set up before the next can be added. The whole process can be done in a couple hours though (including setting time), so it’s no big deal. If you don’t have time to make these all in one go, you can take a few minutes here and there and assemble them at your leisure.

Once all the layers are set and chilled, it’s time to slice up the treats! Since these are so rich, I like to cut these pretty small (24 servings from an 8-inch pan), but do whatever makes you happy. While you need a few chills to set these treats properly, you may serve them cold or at room temperature. I like both, but am extra fond of the gooey caramel centers the room temp versions have to offer.

Millionaire’s Rice Krispies Treats

Like I said above, I think these would be wonderful for picnics and other casual get togethers this spring. I took a batch to a meeting last week and they were *very* popular. More than one person said “I can’t believe you actually made these. They’re so good!” Just proof that you only need a tiny amount of effort for a dessert that looks and tastes like a million bucks!

Millionaire’s Rice Krispies Treats
makes one 8-inch square pan, about 24 treats

Rice Krispies Treats:
2 tablespoons unsalted butter
2 cups mini marshmallows
pinch of Kosher or sea salt
2 cups Rice Krispies cereal

Caramel Filling:
16 ounces caramel candies (1 1/2 11-ounce bags, about 60 caramels)
6 tablespoons heavy cream
pinch of Kosher or sea salt

Chocolate Topping:
4 ounces dark or bittersweet chocolate, chopped
2 tablespoons unsalted butter, cut into pieces

Butter a 8-inch square pan. Line it with parchment, leaving overhang on at least two sides for removal. Butter again.

Make the Rice Krispies Treats. Heat a medium, heavy-bottomed pot over medium heat. Add butter and swirl to melt. Add mini marshmallows and salt, and stir constantly until melted. Remove pan from heat and stir in Rice Krispies cereal.

Transfer cereal to prepared pan. Use greased implements or hands (be careful—the mixture is hot!) to press the mixture into an even layer. Let cool completely.

Make the caramel filling. Combine caramels, heavy cream, and salt in a small saucepan over medium heat. Stir constantly until melted and smooth, about 5 minutes. Remove from heat.

Pour caramel over the top of the Rice Krispies Treats and smooth to the edges. Let cool at room temperature for 20 minutes before transferring to the freezer for 30 minutes (or the refrigerator for 2 hours) to firm up.

Make the chocolate topping. Combine chopped chocolate and butter in a small microwave-safe bowl. Microwave in 15 second increments, stirring in between, just until melted. Drop chocolate over filling and use a small offset icing spatula to carefully spread it over the caramel. Let cool a few minutes before transferring to the freezer until chocolate has hardened and the bars are chilled through, about 30 minutes (or 1-2 hours in the refrigerator).

Use parchment overhang to remove bars to a cutting board. Carefully remove and discard parchment. Use a lightly-greased sharp chef’s knife to slice into 24 pieces. For cleanest slices, wipe knife clean between cuts.

Treats may be served cold or at room temperature. They may be kept covered at room temperature for up to 3 days or in the refrigerator for up to 5 days. For best storage, layer them with parchment or wax paper.

Black Bottom Caramel Oatmeal Pie

Black Bottom Caramel Oatmeal ​Pie

Just before I started my blog, Brooklyn’s favorite pie shop, Four & Twenty Blackbirds, released a recipe for their Black Bottom Oatmeal Pie and everyone in the food world lost their minds over it. And for good reason. That pie is an old fashioned favorite: essentially a pecan pie with toasted oats instead of nuts, all suspended over a puddle of dark chocolate ganache—a triumph, if you ask me.

Black Bottom Caramel Oatmeal ​Pie

But, as you have probably noticed, I cannot leave well enough alone. I can’t just leave a recipe the way it is. I can’t! I’ve been looking at this perfect pie for six Thanksgivings thinking “but what if you made it with caramel?”

Well, I finally got myself together and did just that. I made the pie with luxurious homemade caramel instead of the usual invert sugars, adjusting for time and texture, and it came out magnificently. Now I just wish I hadn’t waited six whole freaking years to experience this rich, buttery, oat-studded caramel & dark chocolate masterpiece. I mean, I know I’ve made lots of other delicious things, but my goodness, I need to make up for lost time with this one.

As with so many pies, this one isn’t complicated, but it has a bunch of steps and does take time. You’ve got to partially blind bake the crust, and then there’s the whole making a caramel oatmeal filling and layering it over chocolate bit, but I promise you these are all simple steps, and if you follow them one by one and give yourself some grace and time, you will be rewarded. Oh, will you ever.

The balance of chocolate and caramel and chewy oats and flaky crust? It’s a triumph, if you ask me.

Black Bottom Caramel Oatmeal Pie
adapted from Four & Twenty Blackbirds
makes 1 pie

Crust:
1/2 batch All-Butter Pie Dough (or other good single crust recipe)

Caramel Oatmeal Filling:
1 1/2 cups rolled oats (toast)
1 cup granulated sugar
1 teaspoon Kosher or sea salt
1/2 cup (1 stick) unsalted butter, cut into pieces
1 cup heavy cream, divided
2 tablespoons light corn syrup (or maple syrup or mild honey)
1 teaspoon pure vanilla extract
1 teaspoon apple cider vinegar
2 large eggs, lightly beaten, room temperature

Dark Chocolate Ganache (Black Bottom):
5 ounces bittersweet chocolate, chopped
5 tablespoons heavy cream

For Garnish:
confectioner’s sugar, if desired

Place oven racks in the upper and lower positions. Preheat oven to 375F.

Partially blind bake the pie crust. On a floured surface, roll out pie dough to a 12" diameter. Fit into a deep 9-inch pie plate and trim the overhang to 1/2-inch. Crimp the edges and freeze for 30 minutes or refrigerate for an hour.

Remove pie crust from the freezer. Line frozen crust with a big piece of parchment. Fill the center with pie weights (or dried beans or rice).

Place the prepared pie crust on a rimmed baking sheet and bake for 20-25 minutes, or until pie crust has “set” and is starting to turn golden in places, but is far from done. Use parchment to lift out pie weights. Prick the bottom several times with the tines of a fork. Return crust to the oven for 10 minutes.

Make the caramel oatmeal filling. Place oats on a dry rimmed sheet pan. Toast in the oven for 5-7 minutes, until fragrant. Remove and let cool.

Make the caramel. Place a medium heavy-bottomed pot on the stove. Add sugar, salt, butter, 1/2 cup cream, and corn syrup to the pot. Do not stir or jostle in any way! Bring to a boil over medium heat and let cook for 10 minutes, until dark all over but not burnt. Remove from heat and *carefully* whisk in remaining 1/2 cup cream, followed by vanilla and vinegar. Let caramel cool 20 minutes.

Add oats to a mixing bowl and pour caramel over the top. Stir together. Whisk in eggs. Set aside.

Make the dark chocolate ganache (black bottom). Place bittersweet chocolate in a small bowl. Pour heavy cream into a small saucepan over medium heat. When it just barely starts to boil, remove it from the heat and pour the cream over the chocolate. Once the chocolate looks soft, stir it together with a fork until you have a smooth chocolate sauce.

Spread ganache into the bottom of the pie crust. Top with caramel oatmeal filling. Bake pie on the bottom rack for 25 minutes, then move to the top rack for another 20-25 minutes, until puffed and slightly jiggly in the center. If crust is darkening too quickly at any point, tent with foil.

Let pie cool completely before serving, with a dusting of confectioner’s sugar, if desired.

Leftover pie will keep covered at room temperature for up to two days or in the refrigerator for three.

Caramel Sauce & a Food Gift Guide

Caramel Sauce & a Food Gift Guide
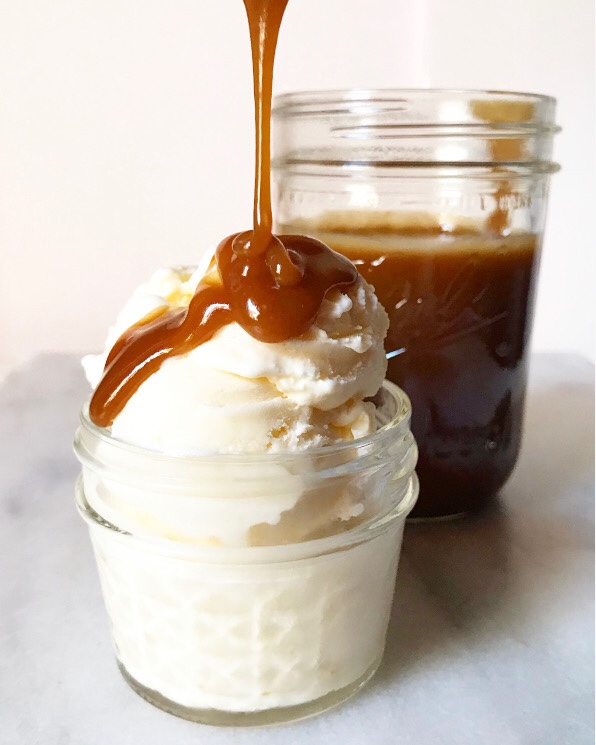
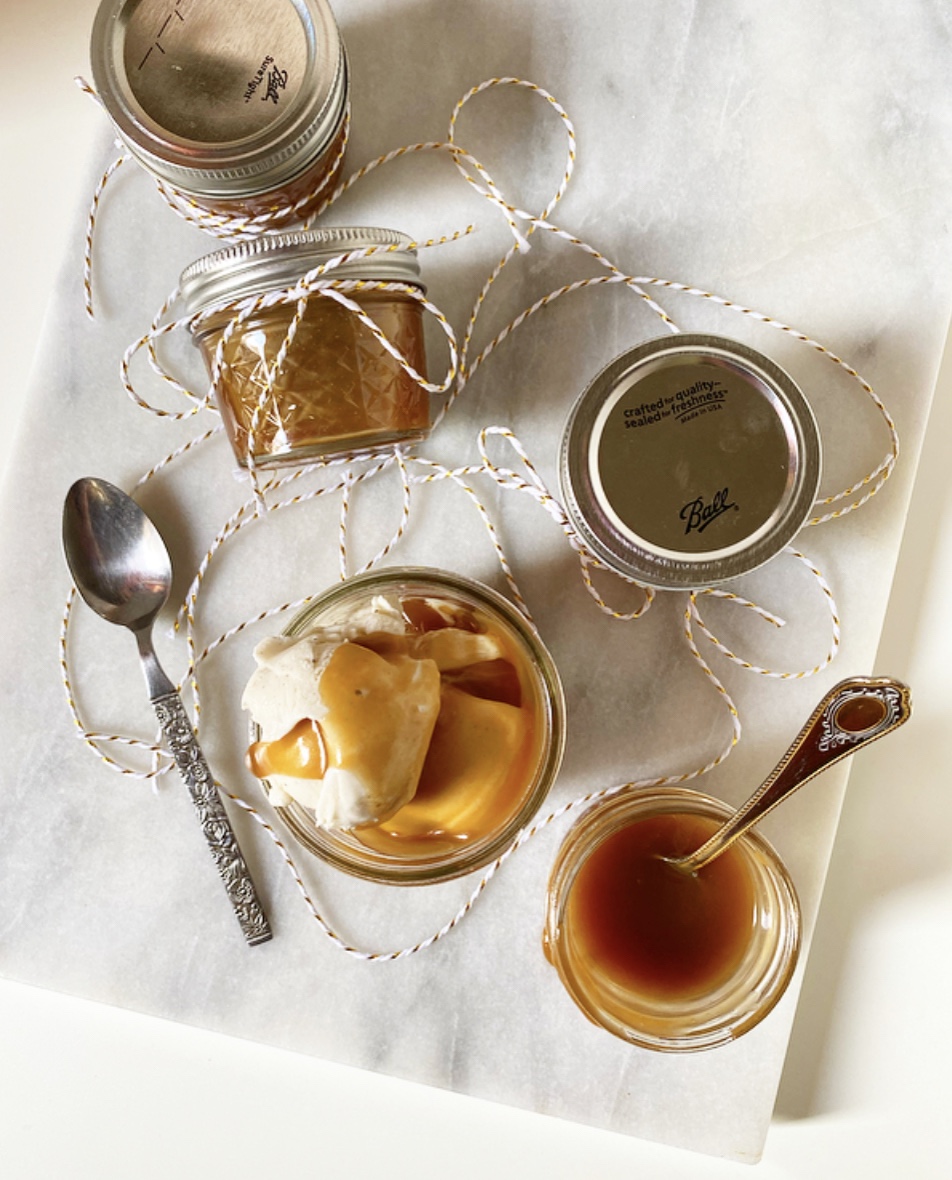
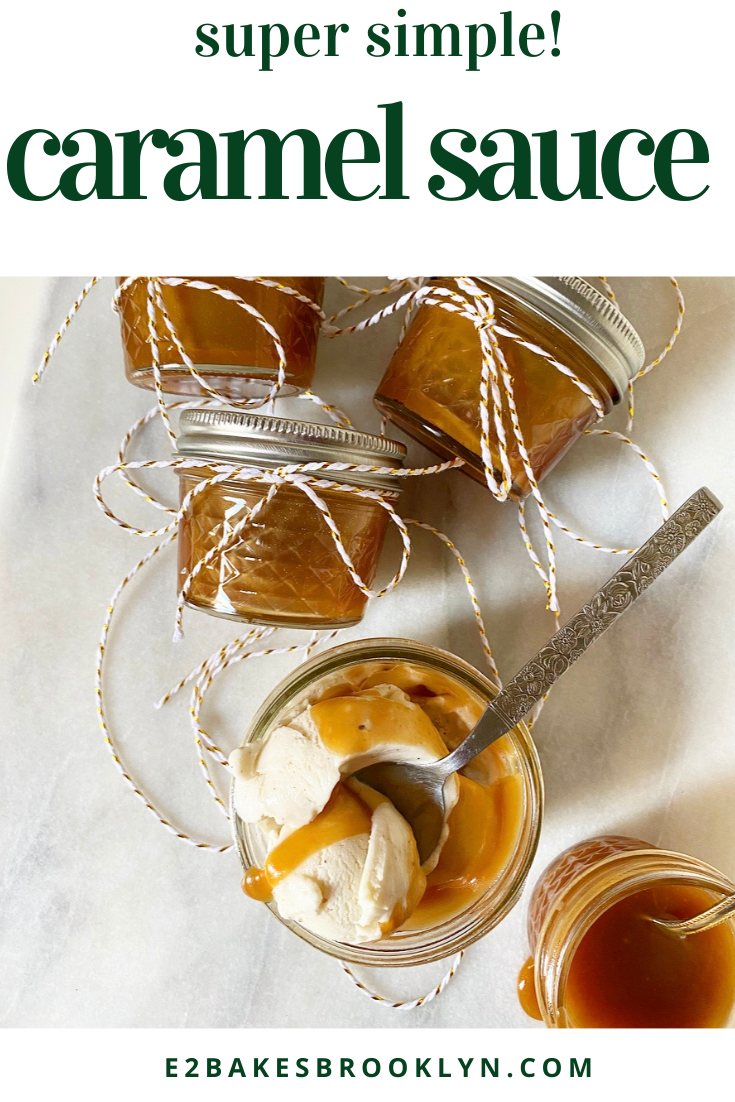
I know what you’re thinking. “Hasn’t Caramel Sauce already been on here?” Well yes, a few times, but it’s never had its own post and don’t you think it deserves that tiny amount of recognition? I do. Also, it’s my blog and I can do what I want.Caramel Sauce & a Food Gift Guide
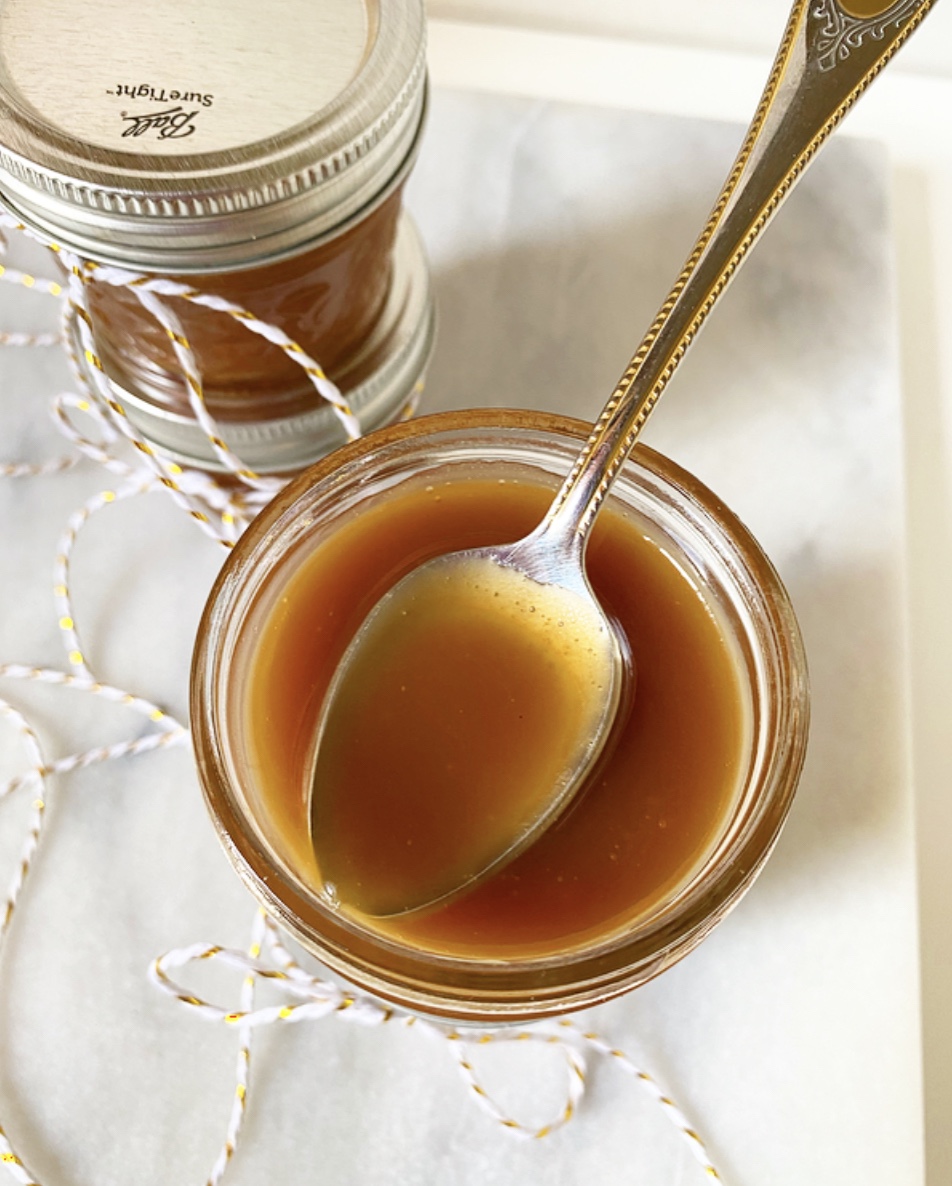
So, why am I posting Caramel Sauce now, at the holidays, instead of mid-summer like every other ice cream topping and dessert sauce in my archives? Because it is perfect for food gifting. Perfect! It’s easy, you can make it days or weeks ahead (watch the dates on your dairy), and who wouldn’t be absolutely thrilled to receive a little jar of homemade Caramel Sauce from someone they love? A monster, obviously.

(Why am I phrasing everything as a question today?)Caramel Sauce & a Food Gift GuideTruth is, I’ve been meaning to write a little homemade food gift guide for years, but am just now getting around to it. I am a big proponent of homemade gifts, having done everything from making clay ornaments to puffy painting to sewing stuffed animals. I can tell you from experience that food is definitely the quickest, easiest and cheapest in terms of DIY gifting, and as sugar, butter and flour have been my artistic media of choice for the last 7.5 years, I have learned a lot about what makes for quality food gifts.Caramel Sauce & a Food Gift GuideCaramel Sauce & a Food Gift GuideCaramel Sauce & a Food Gift Guide
Want to give something saucy? People love an ice cream topping, even in the dead of winter. I’m obviously out here shilling for Caramel today, but you can do Peanut Butter Caramel, Butterscotch or even homemade Hot Fudge without much hassle. You could also go super easy and just microwave a bunch of Chocolate Shell! Just make a batch of any of the aforementioned sauces and divide it among heatproof jars. The jars pictured today are 4-ounce mason jars that I keep on hand, but 8-ounce jars would be great too.Caramel Sauce & a Food Gift GuideCaramel Sauce & a Food Gift GuideCaramel Sauce & a Food Gift GuideCaramel Sauce & a Food Gift GuideCaramel Sauce & a Food Gift GuideCaramel Sauce & a Food Gift Guide
Looking to give cookies? You’re in luck! There are so many holiday cookie recipes that are beyond perfect for gifting. Not only do they look beautiful all boxed (tinned?) up, but they keep incredibly well, especially crisper offerings. Think Iced Sugar Cookies, Candy Cane Cookies, Stained Glass Cookies, Maple Spice Stars, Brown Butter Shortbread, Orange Cardamom Pistachio Shortbread, Gingersnaps, this week’s Peppermint Bark Cookies, Pinwheels, vegan/gluten-free Oat-Pecan Linzers, Pretzel Shortbread, Red Velvet Cheesecake Thumbprints…the list goes on and on.Caramel Sauce & a Food Gift GuideDon’t forget that brownies and blondies are technically cookies, too! Pro tip: you can easily double most of my 9″ square recipes and bake them up in a 9×13″ pan without changing much of anything.Caramel Sauce & a Food Gift GuideCaramel Sauce & a Food Gift GuideCaramel Sauce & a Food Gift Guide
Candy on your mind? I am not the world’s most proficient candy maker, but I have a few tricks up my sleeve. I love a good homemade truffle, especially these vegan Five Ingredient Salted Marzipan beauties. You could also make easy Peppermint Mocha Fudge or Peppermint Mocha Buttercreams. Yum!Caramel Sauce & a Food Gift GuideCaramel Sauce & a Food Gift Guide
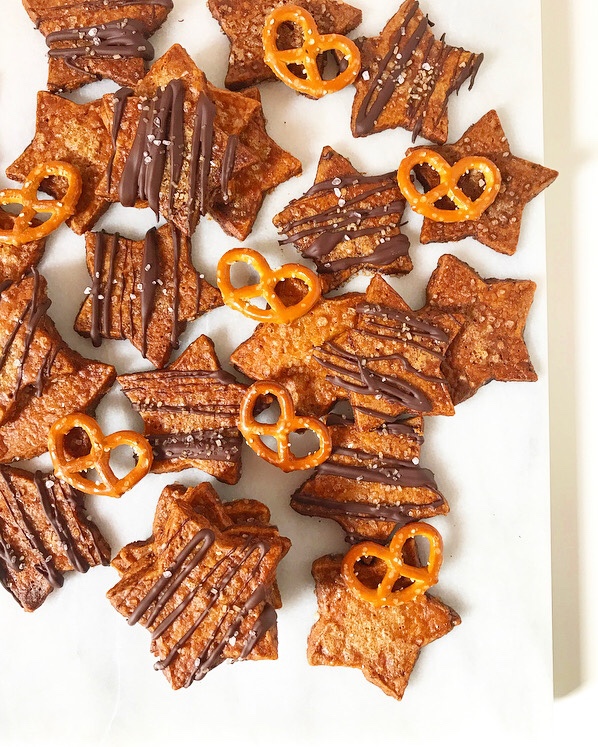
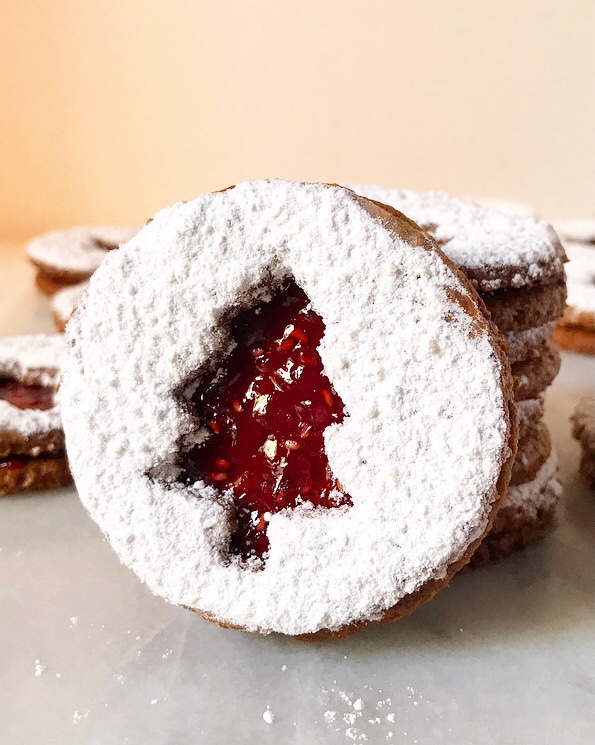
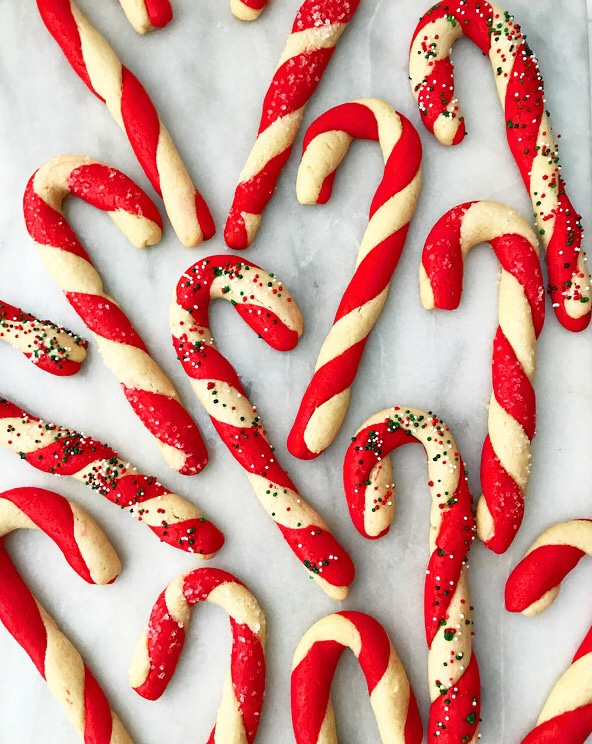
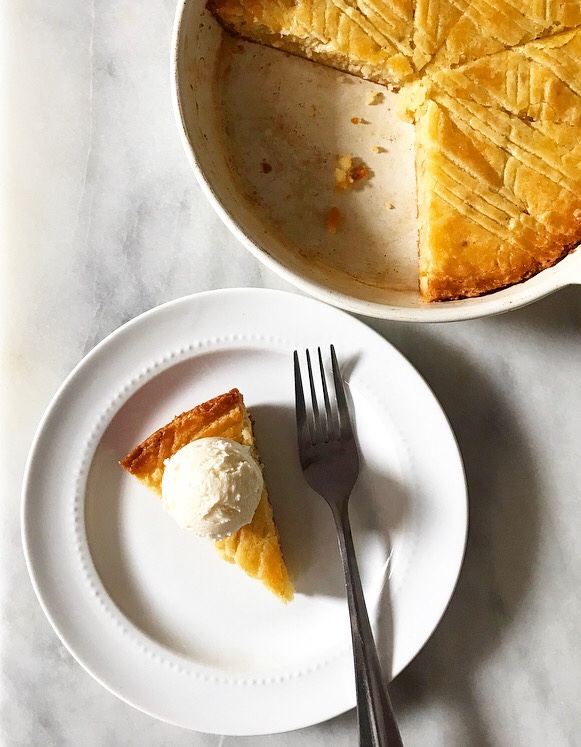
If I were to gift candy this year, I’d go for popcorn. People LOVE popcorn. <–that’s me, I’m people. The Super Sprinkle Popcorn I made over the summer could easily be transformed with some holiday sprinkles. And then there’s Salty Maple Caramel Corn. Ohhh my. It’s salty-sweet easy, gluten-free, and makes enough for several tins. You could even get a little wild and make Sriracha Cracker Jack. Caramel Sauce & a Food Gift GuideCaramel Sauce & a Food Gift GuideCaramel Sauce & a Food Gift Guide
In the mood to make cakes? Well, you’re the kind of friend I’d like to have. Cake definitely takes a little forethought, but if you were to wrap a Boterkoek {Dutch Butter Cake}, Meyer Lemon Drizzle Cake or Eggnog Bundt in cellophane, or deliver a grain-free Winning Hearts & Minds Cake in a (clean) small pizza box, you might just…win hearts and minds. And make someone feel incredibly special.Caramel Sauce & a Food Gift GuideCaramel Sauce & a Food Gift Guide
Don’t want to bother turning on your oven? I’ve got you there, too. Make a homemade mix! You can easily jar individual brownie and hot chocolate mixes! Just make yourself an assembly line and write (or print out) little tags with instructions for how to make your brownies or hot chocolate. This will give your friends a little low-maintenance something to do and enjoy during this weird AF holiday season.Caramel Sauce & a Food Gift Guide
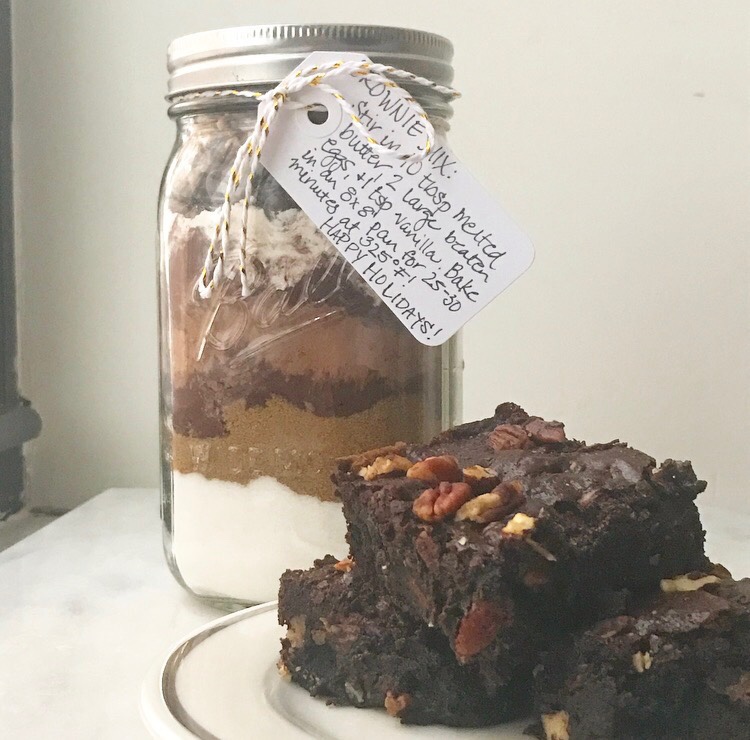
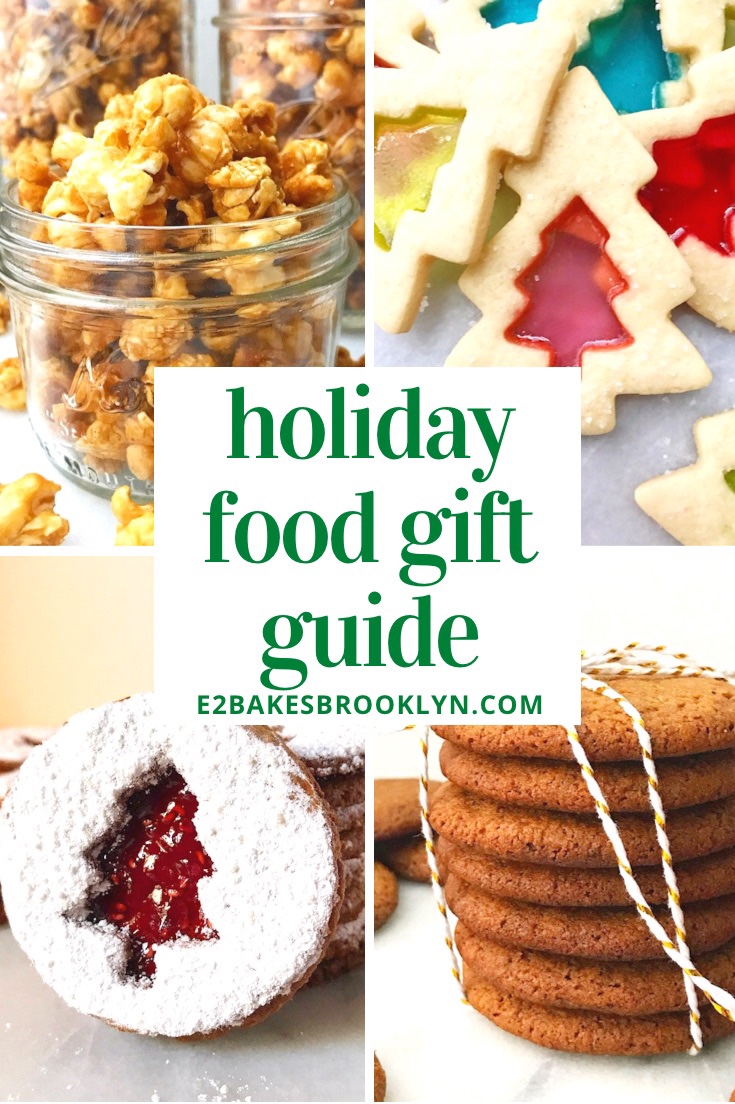
This is just the tip of the food gifting iceberg–I could go on forever. I hope this guide inspires you to treat your friends to something sweet this month. It’s going to be strange and solitary holiday for many of us, and I know a little homemade something would do us all some good.Caramel Sauce & a Food Gift Guide

Caramel Sauce
makes about 1 1/2 cups

1 cup granulated sugar
6 tablespoons unsalted butter, cut into pieces
1/2 cup heavy cream
1 teaspoon pure vanilla extract
1/4 teaspoon Kosher or sea salt

Place sugar in a 2-3 quart saucepan over medium-high heat. Whisk sugar until the sugar melts and turns a deep copper color. Whisk in butter until completely incorporated. Remove the pan from the heat and stir in heavy cream. Caramel will bubble violently, but will quickly relax into a smooth sauce. Whisk in vanilla and salt. Transfer sauce to a jar and let cool to room temperature.

Leftover caramel sauce should be kept in the refrigerator. Microwave in 15 second bursts, stirring in between, to reheat.

Caramel Sauce & a Food Gift GuideCaramel Sauce & a Food Gift GuideCaramel Sauce & a Food Gift Guide

Peanut Butter Carmelitas

Peanut Butter Carmelitas
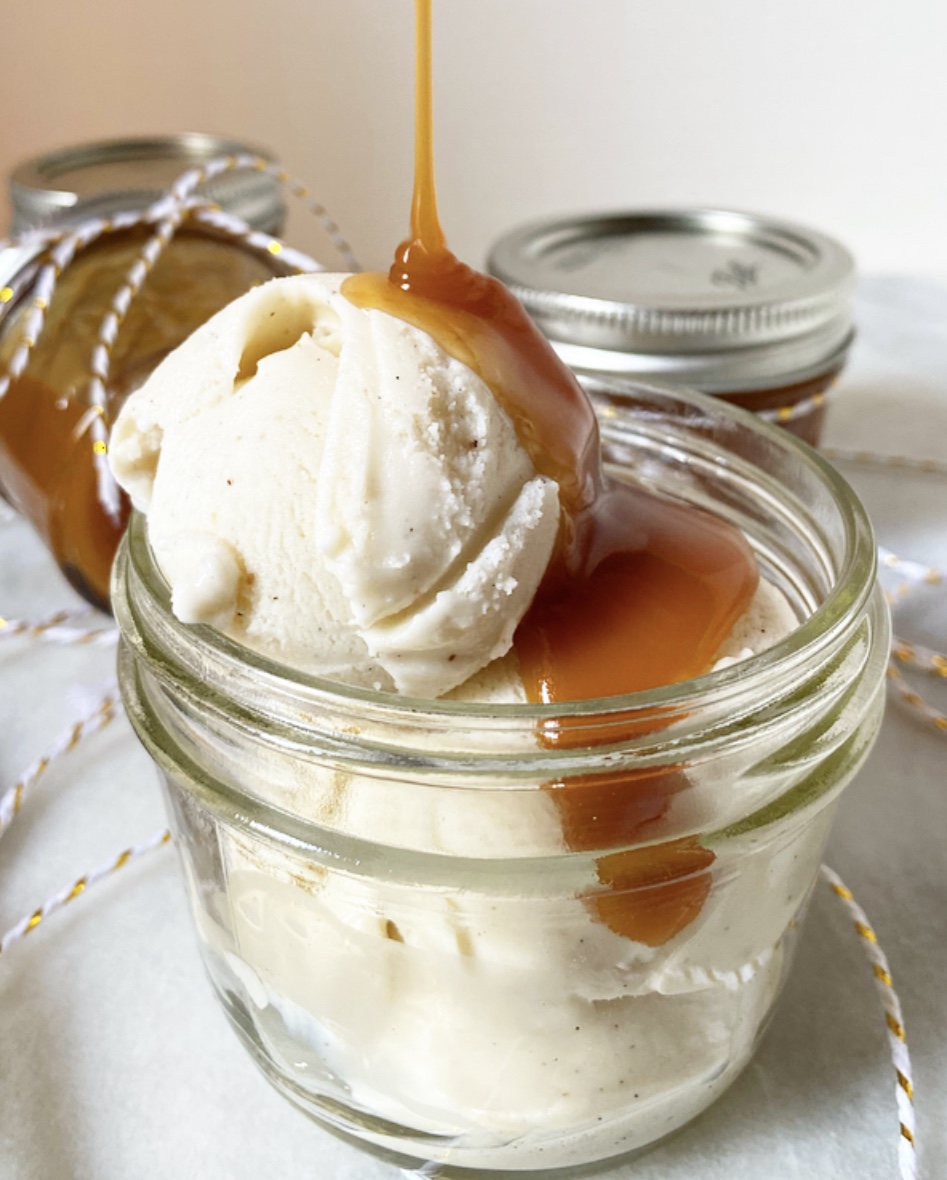
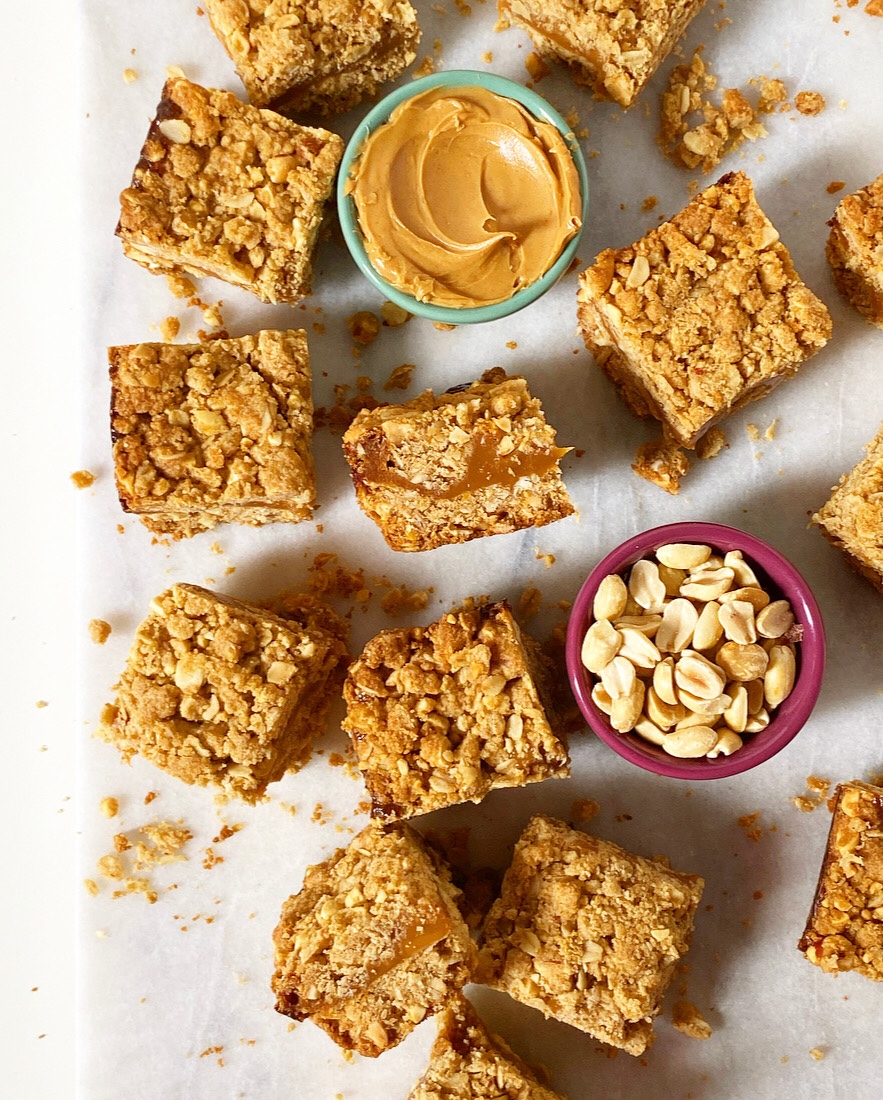
Sometimes you—and by “you,” I mean “I”—want a dessert that is purely about peanut butter. No chocolate or candy or jelly or Oreos—just peanut butter in all its glory. You could, of course, remedy this by going directly to the pantry and dipping into the jar with a spoon, or you could make a batch of these Peanut Butter Carmelitas. Peanut Butter Carmelitas
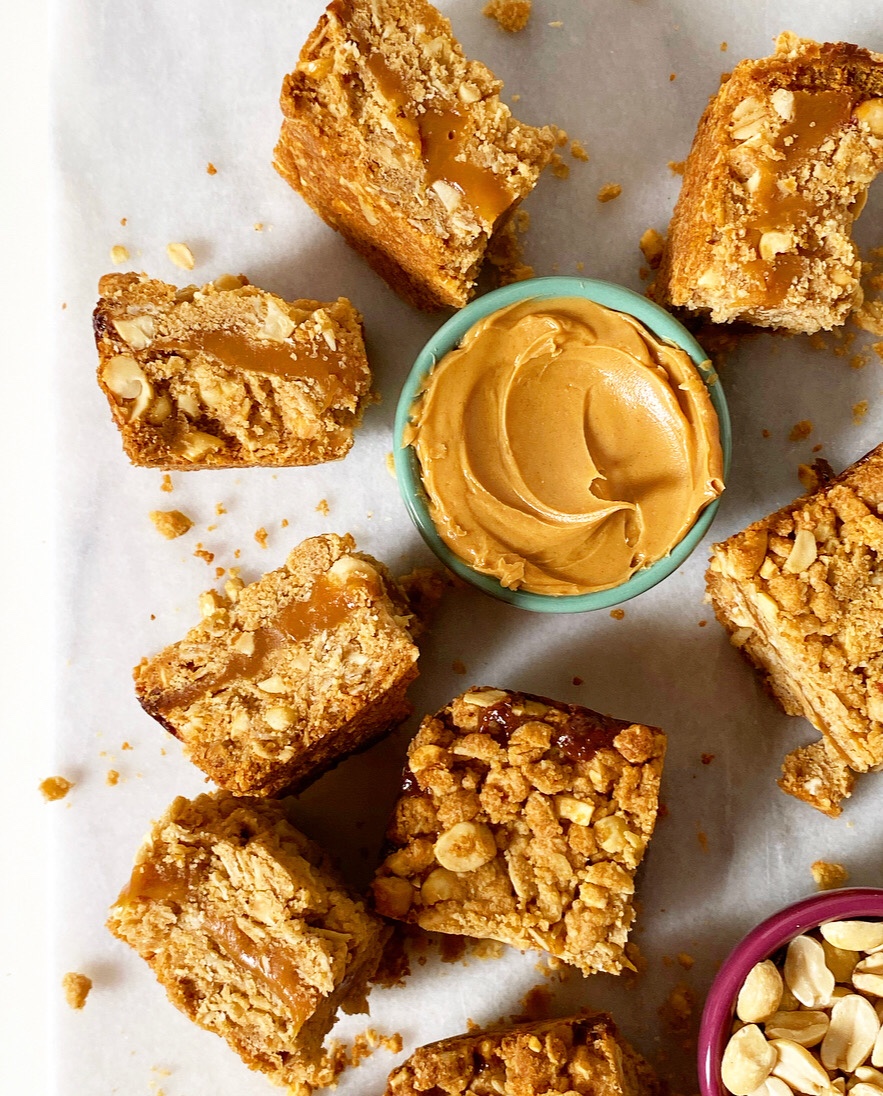
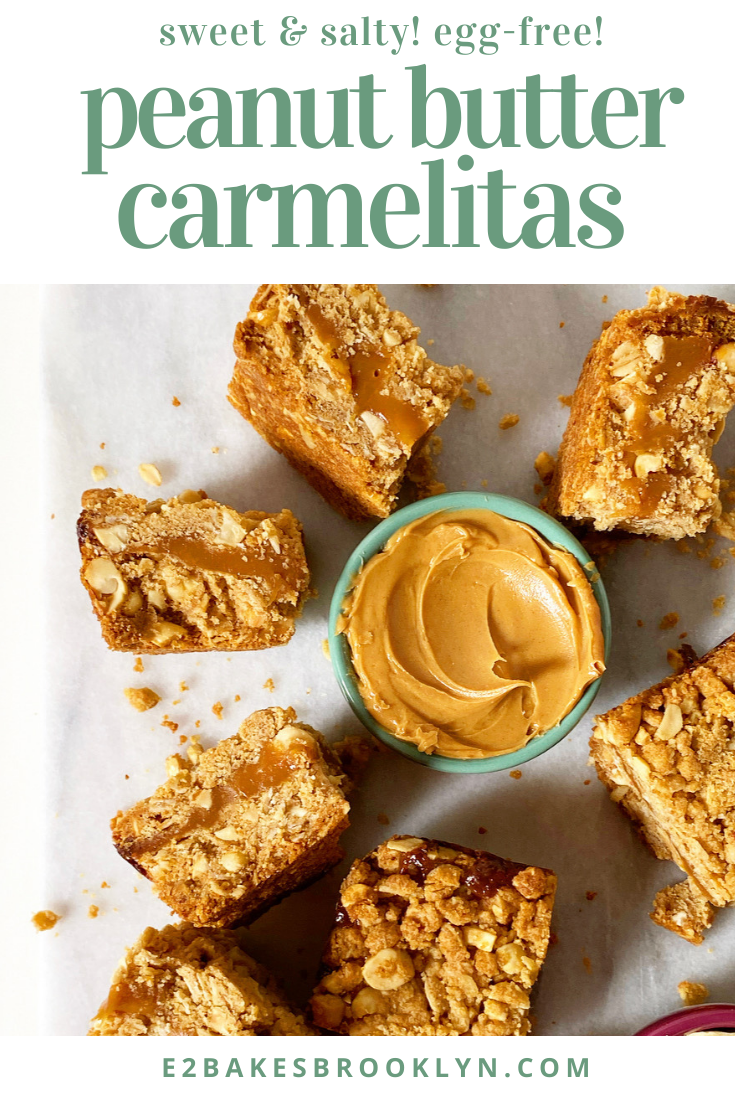
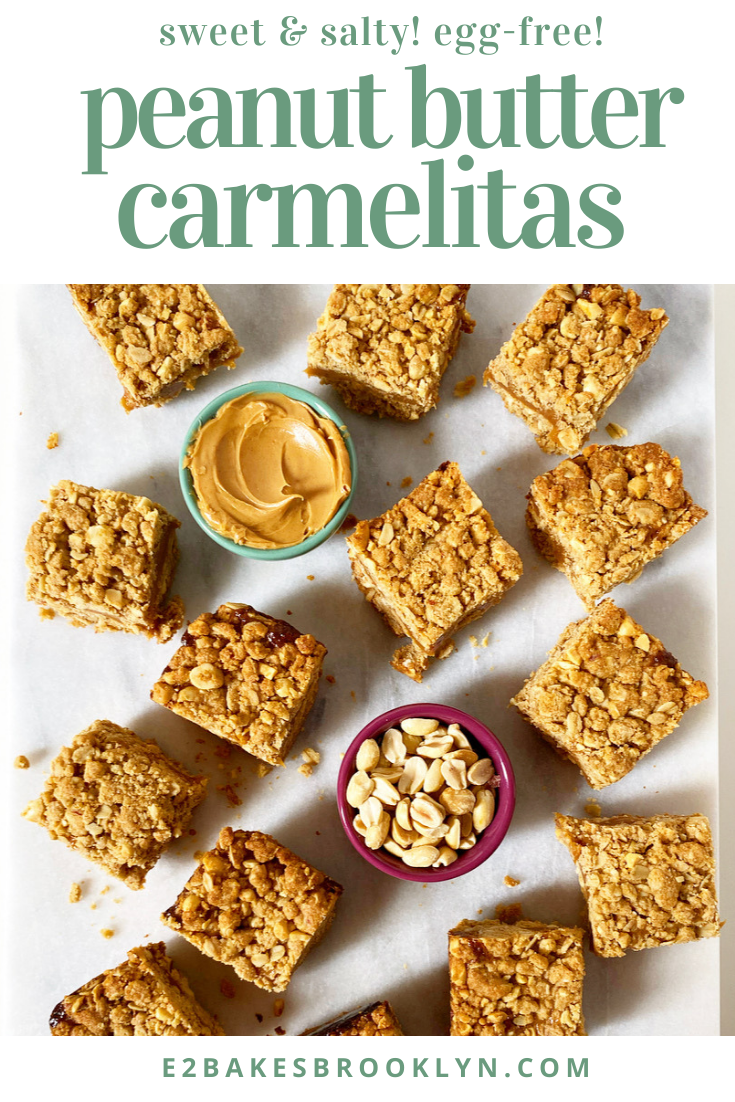
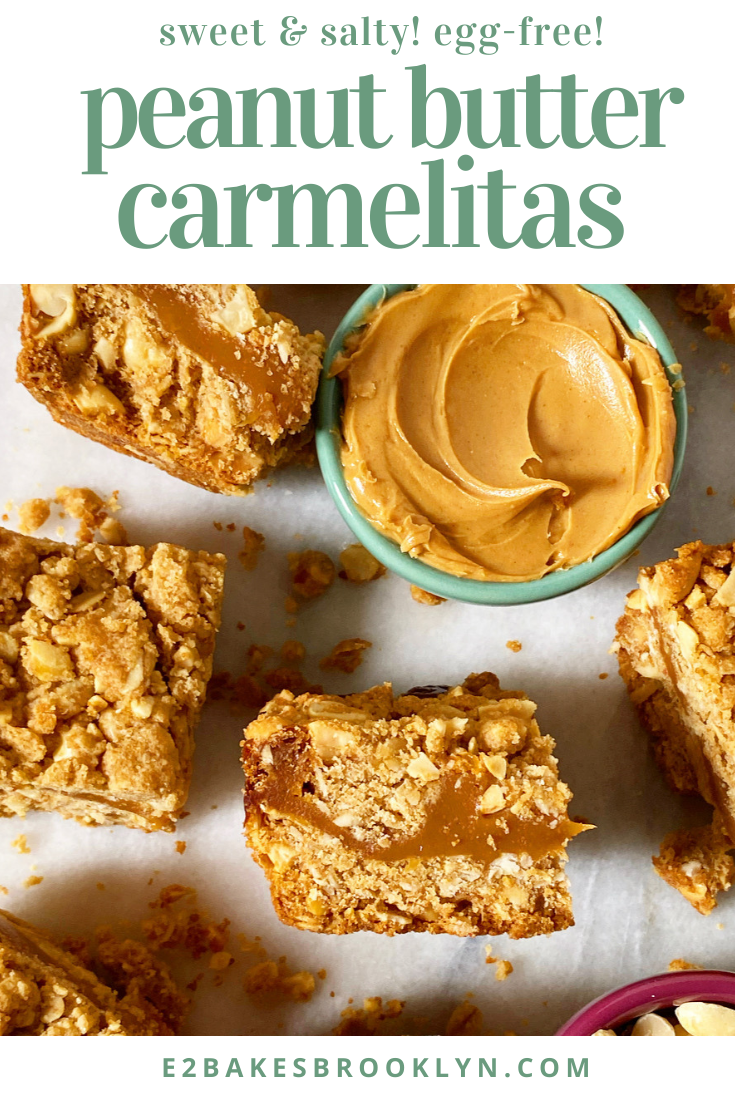
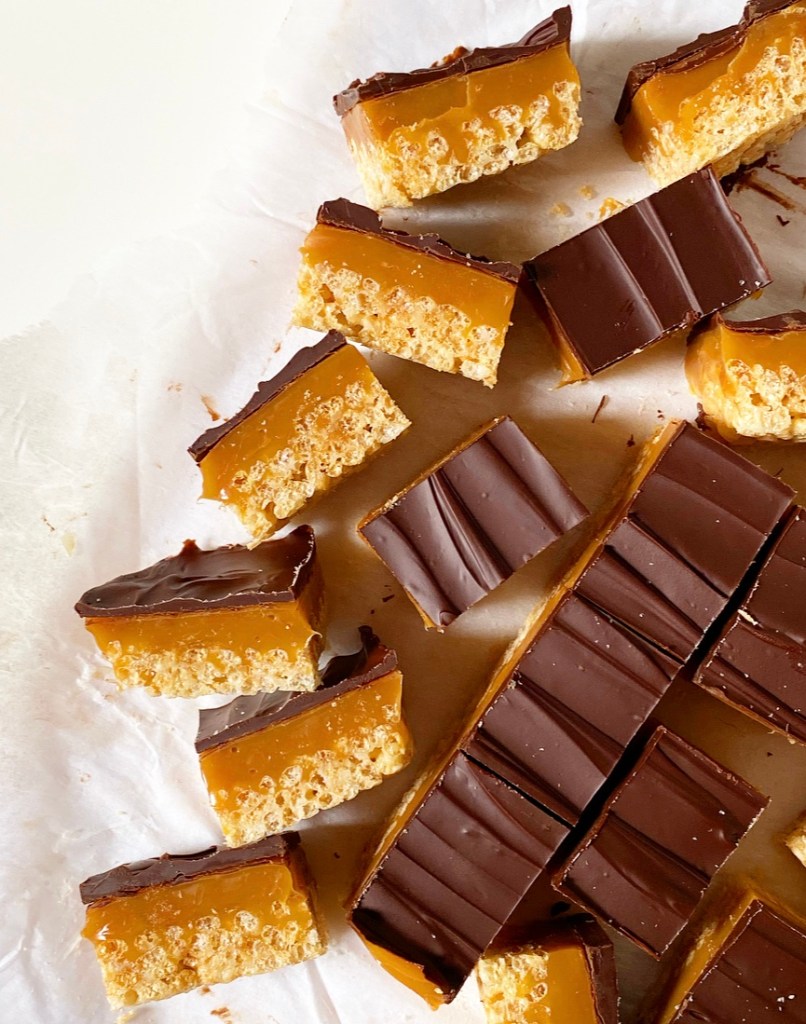
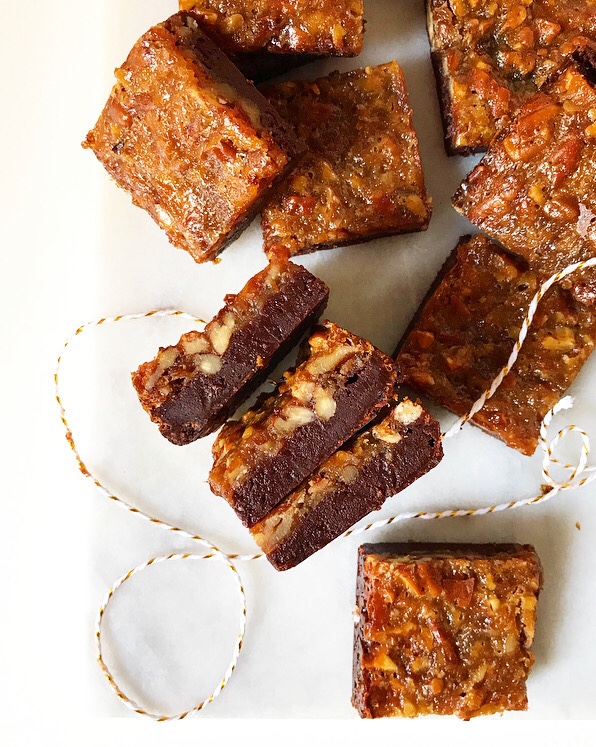
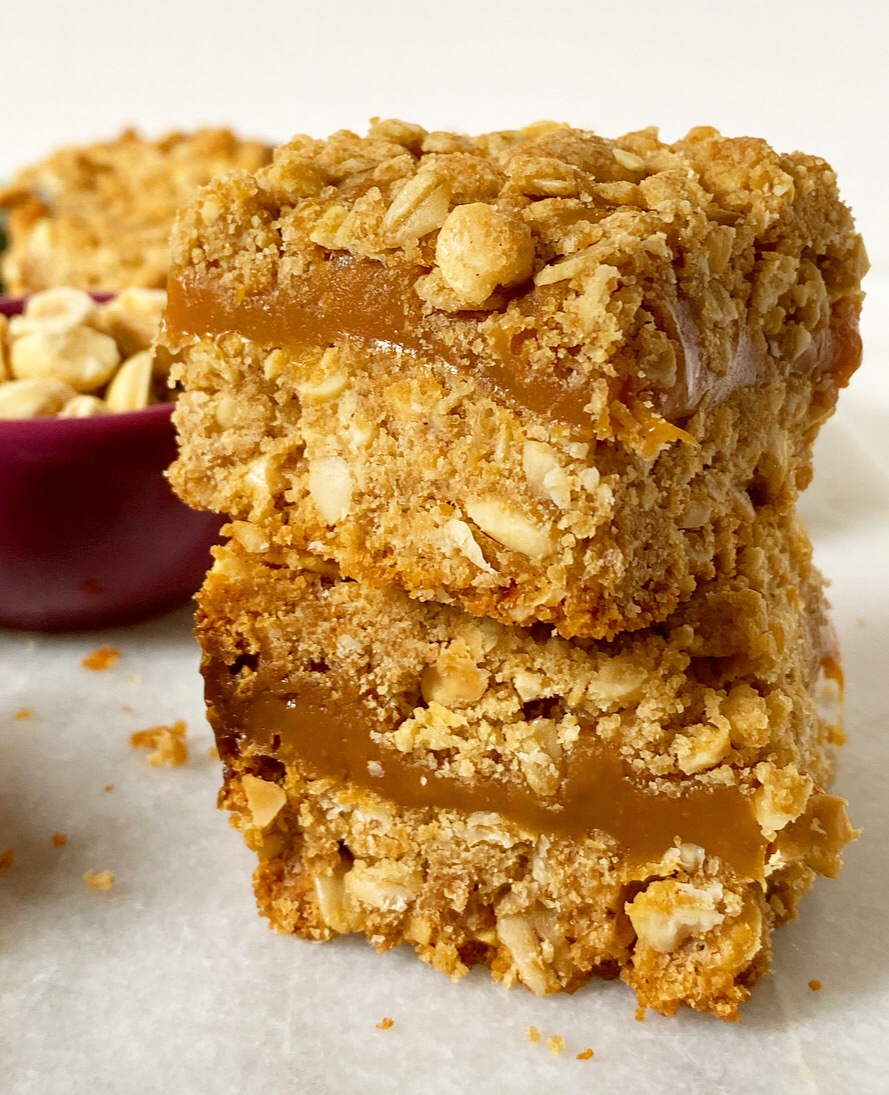
You should make these, period. They’re a peanut butter lover’s paradise! Two layers of crispy peanut butter cookie are sandwiched together with a thick layer of peanut butter caramel and then sliced into crumbly, chewy bars. It’s like someone—and by “someone,” I mean “I”— took my favorite peanut butter cookie recipe and turned it up to 11. Oh my word, these are good.Peanut Butter Carmelitas
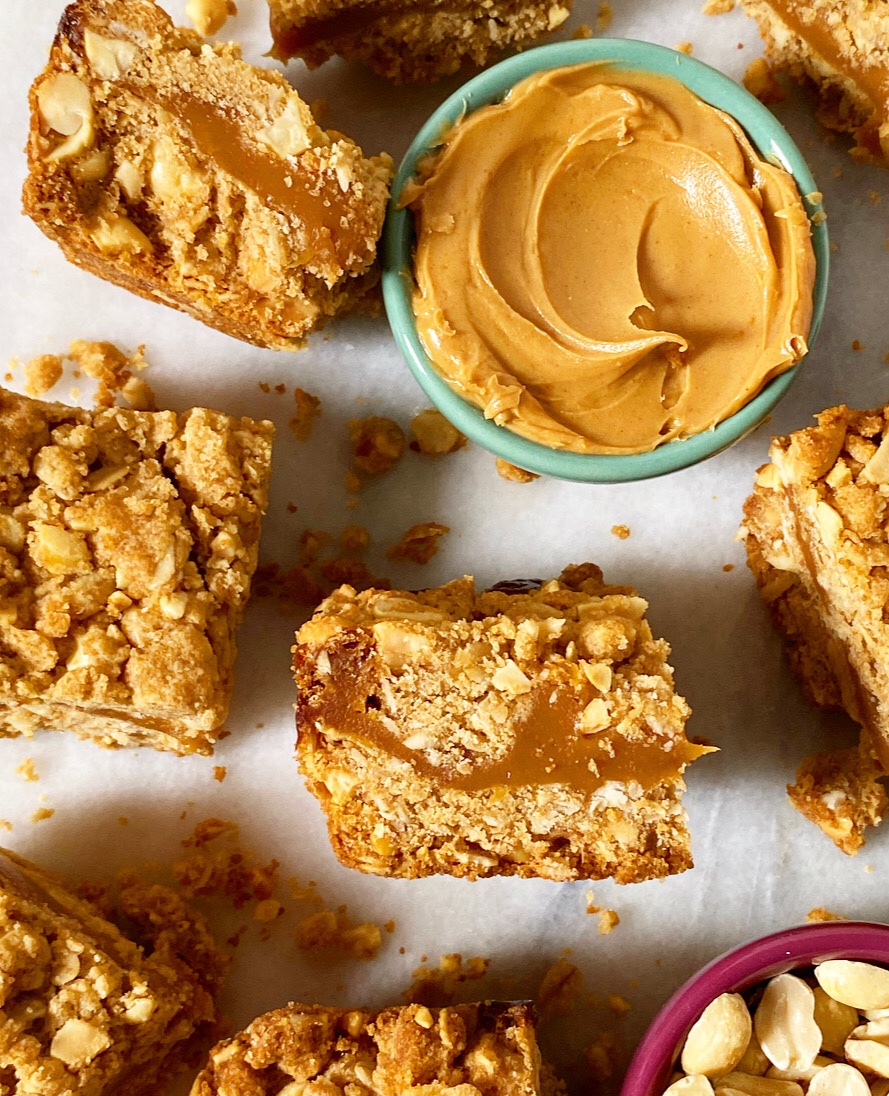
They’re easy to make, too! Start by mixing up a crumbly peanut butter and oat dough, tossing in some chopped roasted peanuts for good measure. Pack half of it down, and then drizzle on a bunch of caramel candy that you’ve melted with peanut butter and heavy cream. Mmhmm.Peanut Butter CarmelitasPeanut Butter Carmelitas
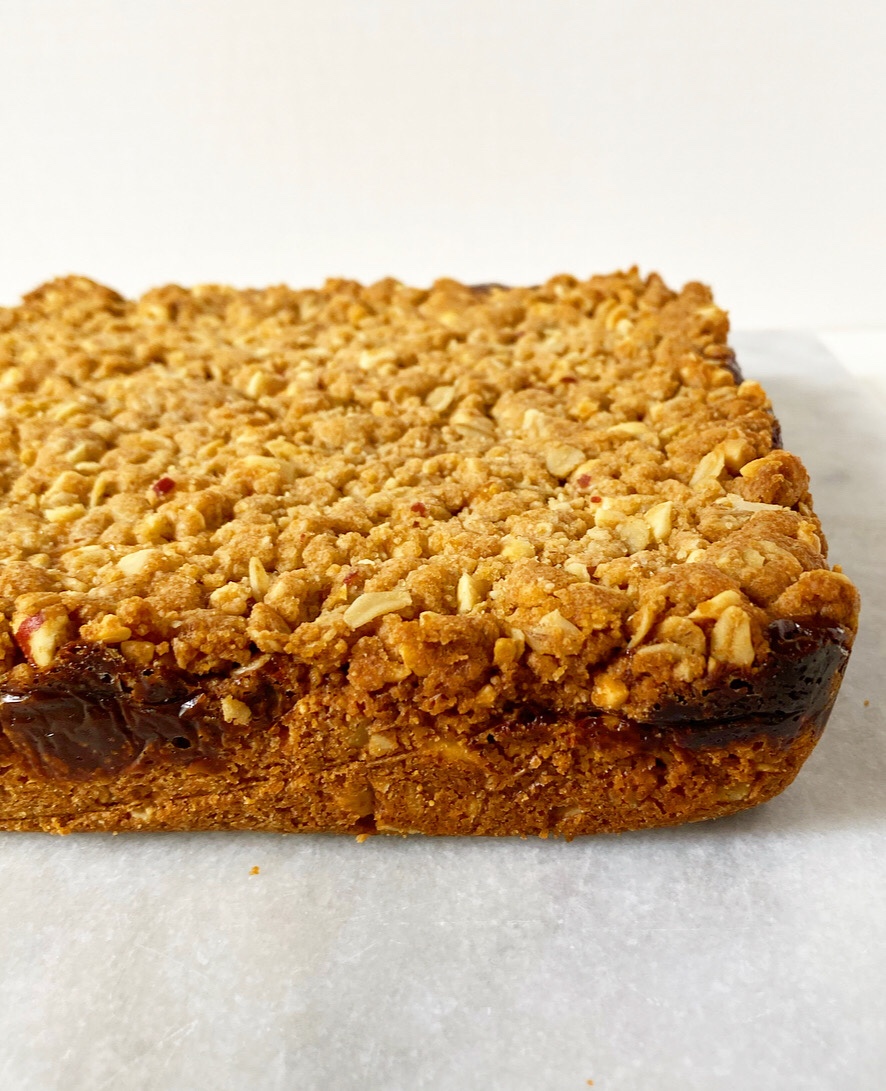
Finish it all off with the remaining dough and then bake until the edges are golden and the caramel bubbles up in a few spots and then—and this is very important—let them cool completely.Peanut Butter CarmelitasI’m serious! Don’t be tempted to slice these (or any carmelitas) while they’re still warm. I know gooey peanut butter caramel is extremely tempting, but the mess isn’t worth it. I promise you that the middles of these carmelitas are just as enticing at room temperature. We’re talking soft, stretchy peanut butter candy magic, y’all.Peanut Butter Carmelitas
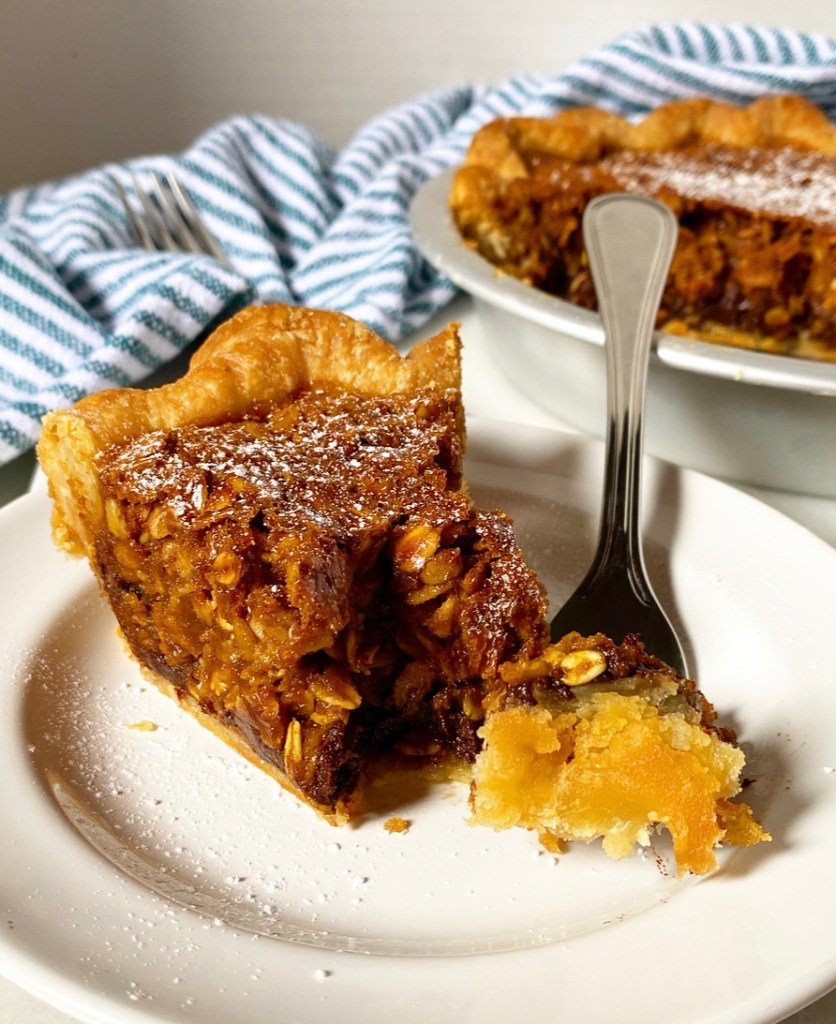
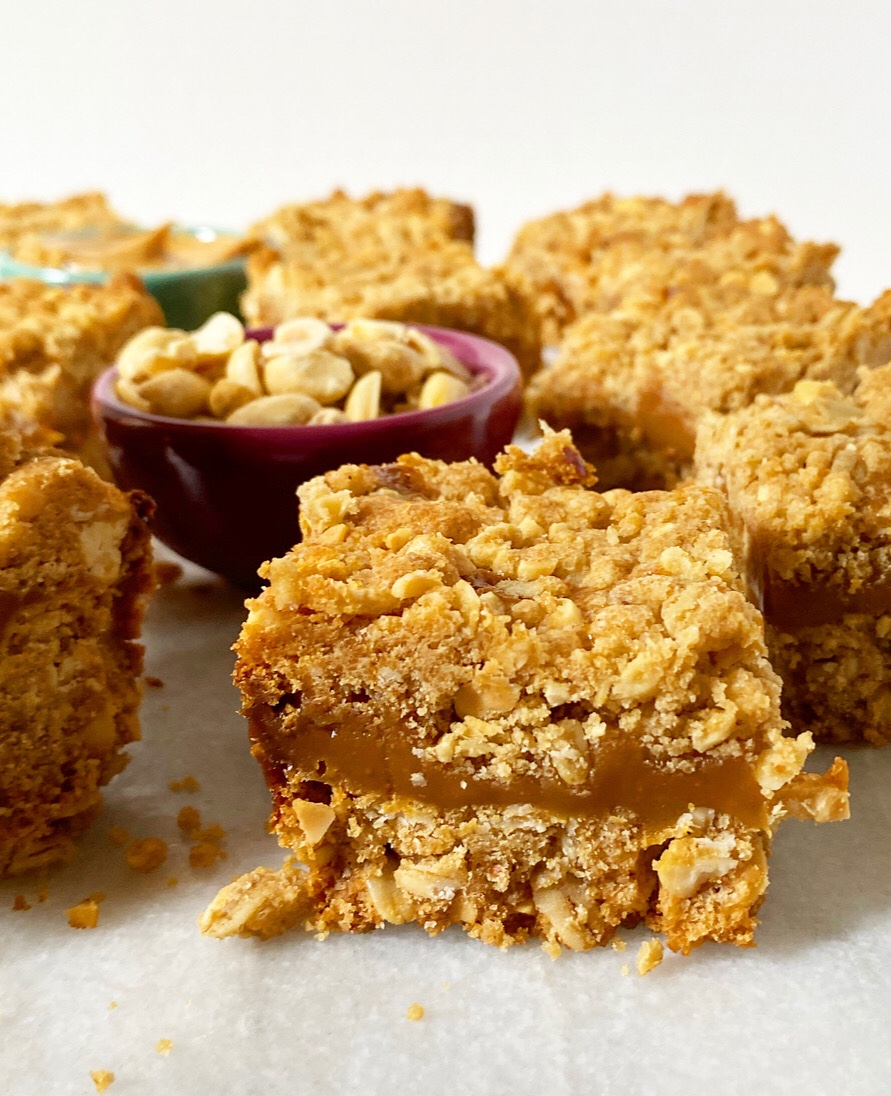
Yes, the caramel is the star of this show, but don’t sleep on those cookie layers. Crispy, crunchy, buttery, salty-sweet, crumbly cookie held together by caramel? Sign me up! These bars will crumble at bit when you bite in, but it’s not a bad thing. In fact, it’s a very good thing.

Very good.Peanut Butter Carmelitas

Peanut Butter Carmelitas
makes one 8-inch pan, about 16 squares

1 cup all-purpose flour
1 cup old-fashioned oats
1 cup light brown sugar, packed
1 teaspoon baking soda
1/2 teaspoon Kosher or sea salt
1/2 cup unsalted butter, cut into 8 pieces
1/2 cup creamy-style peanut butter
1 cup roasted peanuts (salted or unsalted), roughly chopped

Caramel Layer:
1 11-ounce bag caramel candies
1/4 cup creamy-style peanut butter
1/4 cup heavy cream

Preheat oven to 350F. Line an 8-inch square pan with aluminum foil and grease heavily with butter. Set aside.

In a medium mixing bowl, whisk together flour, oats, light brown sugar, baking soda, and salt.

Combine butter and peanut butter in a small microwave-safe bowl. Heat in 30 second increments, stirring in between, until melted. Use a silicone spatula or wooden spoon to fold it into the dry ingredients—mixture may be crumbly, but should hold together when pinched. Ensure that the dough is not too warm before folding in chopped peanuts. Set aside.

Combine caramels, peanut butter and heavy cream in a small saucepan over medium heat. Stir constantly until melted and smooth, about 5 minutes. Remove from heat. Set aside.

Firmly press about 2 1/2 cups of the dough into an even layer at the bottom of the prepared pan. Pour caramel over the top and smooth to the edges. Scatter remaining dough mixture over the top. Use the palms of your hands to gently pack it into a even layer, covering the caramel.

Bake full pan for 23 minutes, or until turning golden at the edges. Let cool completely in the pan on a rack,

Slice bars with a lightly greased chef’s knife, wiping the blade clean between cuts. Do not try to slice bars until they are completely room temperature.

Bars will keep in an airtight container at room temperature for up to five days. Layer them with wax paper to keep them from sticking together.Peanut Butter CarmelitasPeanut Butter CarmelitasPeanut Butter Carmelitas